
Cutover migration from Exchange server 2019 to Exchange online
In this blog we will be talking about Cutover migration. We will understand what is cutover migration, what is the process of cutover migration, we will talk about the pre-requisites those are required to be met before we perform cutover migration, and we will perform cutover migration from Exchange server to Exchange online.
Table of Contents
Watch video
Watch this video and learn what is cutover migration and how to perform cutover migration from Exchange server 2019 to Exchange online.
What is cutover migration
Cutover migration is the simplest migration type to implement. Using cutover migration you can migrate all the mailboxes, groups, contacts, and calendars to Microsoft 365 in one go.
Cutover migration is used when you are planning to move completely to Exchange Online. You want to move all on-premises recipients to Microsoft 365 and you want to decommission your on-premises Exchange server.
Important: You can perform cutover migration if your on-premises Exchange server version is 2003 or later, and you have less than 2000 mailboxes.
How cutover migration works
In cutover migration the contents from on-premises Exchange server are copied to Exchange online. Cutover migration is not a cut and paste process. When you start cutover migration, it first provisions the on-premises accounts in Microsoft 365, and then it copies the contents of these accounts to Microsoft 365 accounts. So during the process of cutover migration, there will be 2 mailboxes for one user at the same time. The original mailbox that is stored in the on-premises Exchange server, and the copy of the user mailboxes that is stored in the Exchange Online.
Let’s take a look at cutover migration process:
Step 1: Verify on-premises domain in Microsoft 365: We need to create a Microsoft 365 tenant, and we need to verify the on-premises domain in Microsoft 365 tenant.
Step 2: Connect Microsoft 365 to on-premises Exchange server: Then we will create a migration endpoint to connect Microsoft 365 tenant to our on-premises Exchange server.
Step 3: Create and start migration batch: Once migration endpoint is created, we will create a migration batch and we will start the migration.
Step 4: Route emails to Microsoft 365: Once migration is completed, we will point MX record to EOP and we will route all the incoming emails to Microsoft 365.
Step 5: Delete cutover migration batch: Then we will delete the migration batch.
Step 6: Assign licenses: We will assign licenses to the users.
Step 7: Publish other DNS records: We will publish other DNS records like, CNAME and SPF so that users can connect to their mailboxes using Outlook client.
Step 8: Decommission on-premises Exchange server: And finally, we can go ahead and decommission on-premises Exchange server.
Cutover migration prerequisites
Now let’s talk about the prerequisites for cutover migration.
- Cutover migration use Outlook Anywhere (RPC over Http) to connect to your on-premises Exchange server. So you need to make sure that Outlook Anywhere is enabled and configured in your Exchange Server. In Exchange 2013, 2016 and 2019, Outlook anywhere is enabled by default. But if you are using Exchange 2003, 2007 and 2010, you need to enable Outlook Anywhere manually.
- You would require an SSL certificate from a 3rd party certification authority. And mail.domain.com and autodiscover.domain.com should be added under Subject Alternative Name of that certificate. Follow this link to create free SSL certificate for Exchange server.
- When we create migration endpoint in Exchange Online, we specify on-premises Exchange administrator credentials. This Admin account should have FullAccess permission on all the recipients that we want to migrate to Microsoft 365, or this account should have Receive As permission on the on-premises mailbox database where user mailboxes are stored.
- You need to make sure the mailboxes that you want to migrate to Exchange Online, they should not be hidden from Address List. If any mailbox is hidden from address list, cutover migration will skip that mailbox.
- If you have Azure AD Connect deployed in on-premises, you need to disable it before you start cutover migration. If you have already synchronized on-premise identities to Microsoft 365 using Azure AD Connect, you need to purge them. Because during cutover migration these identities will be provisioned automatically in Microsoft 365. So if you already have users synchronized, cutover migration will either provision duplicate accounts in Azure Active Directory, or the migration process will fail. So that is the reason you need to disable Azure AD Connect.
- If Unified Messaging is enabled in on-premises, you need to disable it.
- if you are planning to migrate on-premises security groups, you need to create mail-enabled security groups in Azure Active Directory. These groups will be empty mail-enabled groups. And once migration is done, the membership of the on-premise groups will be updated in Microsoft 365 security groups automatically. We create empty security groups in Microsoft 365 because cutover migration can not provision security groups in Microsoft 365. So we need to create these groups manually and the memebrship of these groups will be updated automatically during the migration process.
Perform cutover migration step by step
Let’s meet all the prerequisites and perform cutover migration step by step.
Step 1: Verify domain in Microsoft 365.
You need to create a Microsoft 365 tenant and you need to verify your domain in the Microsoft 365 tenant.
Step 2: Connect Microsoft 365 to Exchange server.
Before we test connectivity between Microsoft 365 and on-premises Exchange server, we need to make sure Outlook Anywhere is enabled on the Exchange server. You can refer to this article to know how to validate if Outlook Anywhere is enabled in your Exchange server.
Once you verify Outlook Anywhere is enabled in Exchange server, open Windows PowerShell and run below commands:
#Connect to Exchange Online#
Connect-ExchangeOnline

$Credentials = Get-Credential   #type the credentials of on-premises Exchange server administrator#

Test-MigrationServerAvailability -ExchangeOutlookAnywhere -Autodiscover -EmailAddress "admin account" -Credentials $Credentials
Where admin account is the email address of the on-premises Exchange administrator. This command will use Autodiscover and Outlook Anywhere to verify the connection from Microsoft 365 to your on-premises Exchange server.
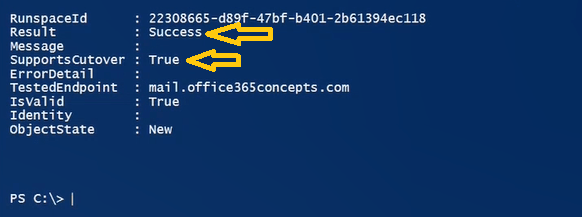
As you can see in the above image, the result for my Microsoft 365 tenant and on-premises Exchange server 2019 connectivity is success and cutover migration is also supported on this connection.
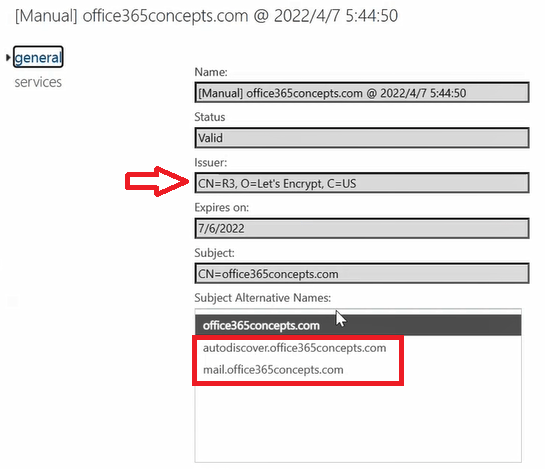
Step 3: Verify SSL certificate in Exchange server
We need to make sure we have a SSL certificate in Exchange server that is issued by a 3rd party Certification Authority, and the Subject Alternative Names of this certificate should include mail.domain.com and autodiscover.domain.com.
To verify the certificate, go to Exchange admin center, click servers, click certificates and double click the SSL certificate. In the below image you can see I have an SSL certificate issued by Let’s Encrypt and autodiscover.domain.com and mail.domain.com is also included within the Subject Alternative Names of the certificate.
Step 4: Assign permissions to the admin account
Next we need to make sure the on-premises Exchange server administrator account has either FullAccess permission on all the recipients that we want to migrate to Microsoft 365 or he has Receive As permission on the on-premises mailbox database where user mailboxes are stored. You can refer to the below PowerShell commands to assign the permissions.
Below command will assign FullAccess permission to Exchange Admin on Bob Ross’s mailbox.
Add-MailboxPermission -Identity "Bob Ross" -User "Exchange Admin" -AccessRights FullAccess -InheritanceType allThe below command will assign FullAccess permissions to Exchange Admin on all the members of the DL Name distribution group.
Get-DistributionGroupMember "DL Name" | Add-MailboxPermission -User "migadmin""Exchange Admin -AccessRights FullAccess -InheritanceType allThee below command will assign FullAccess permission to Exchange Admin on all the user mailboxes.
Get-Mailbox -ResultSize unlimited -Filter "RecipientTypeDetails -eq 'UserMailbox'" | Add-MailboxPermission -User "Exchange Admin" -AccessRights FullAccess -InheritanceType allBelow command will assign ReceiveAs permission to Exchange Admin on Mailbox Database 1900992314.
Add-ADPermission -Identity "Mailbox Database 1900992314" -User "Exchange Admin" -ExtendedRights receive-asStep 5: Verify on-premises recipients are not hidden in Address List
We need to make sure that the recipients are not hidden from the address list in on-premises Exchange server. You can run below command to check HiddenFromAddressList attribute for the user mailboxes:
Get-mailbox -resultsize unlimited | Select-Object Name,HiddenFromAddressListStep 6: Disable Azure AD Connect (Optional)
If you have deployed Azure AD Connect or Microsoft Entra Connect, you need to disable it. Please run below commands in Windows Powershell:
Connect-MSolService   #Enter Azure AD Global Admin credentials#

Set-MsolDirSyncEnabled -EnableDirSync $false

#Run below command to verify#

(Get-MSOLCompanyInformation).DirectorySynchronizationEnabled
Step 7: Create migration endpoint for cutover migration in Exchange Online
In the next step we will create a migration endpoint in Exchange Online. You can run below PowerShell command to create migration endpoint for cutover migration. In below command administrator@domain.com is the email address of the on-premises Exchange server administrator.
Connect-ExchangeOnline   #Enter credentials of M365 Global Admin#

$Credentials = Get-Credential      #Enter credentials of on-premises Exchange admin#

New-MigrationEndpoint -ExchangeOutlookAnywhere -Name "Cutover Migration" -Autodiscover -EmailAddress administrator@domain.com -Credentials $Credentials
Step 8: Create migration batch and start migration
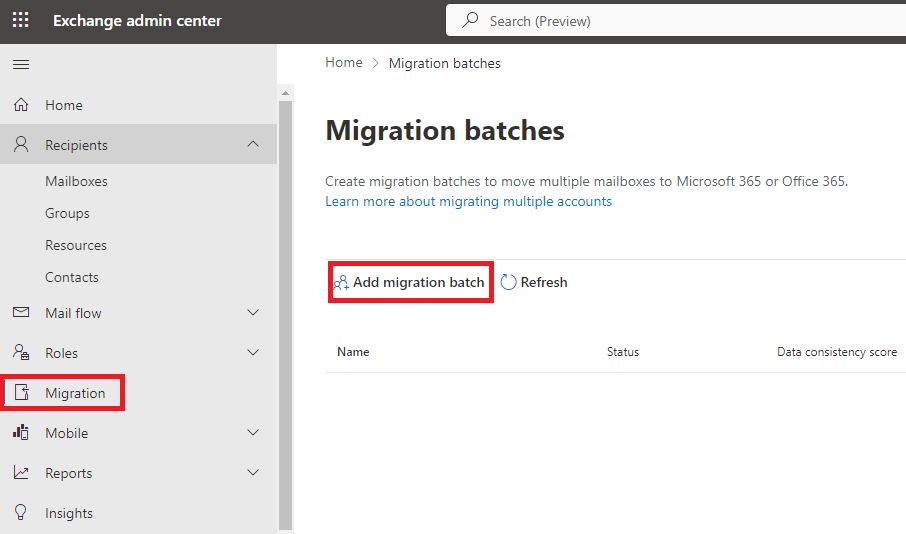
To create a migration batch, go to Microsoft 365 Exchange Admin Center, click Migration, and click Add migration batch.
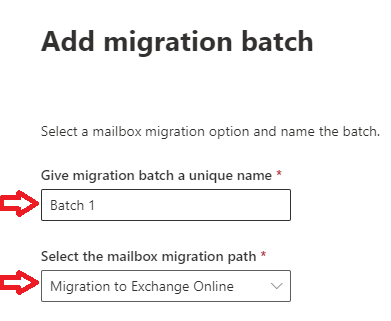
On the Add migration batch page, type batch name under Give migration batch a unique name and select Migration to Exchange Online under Select the mailbox migration path and click Next.
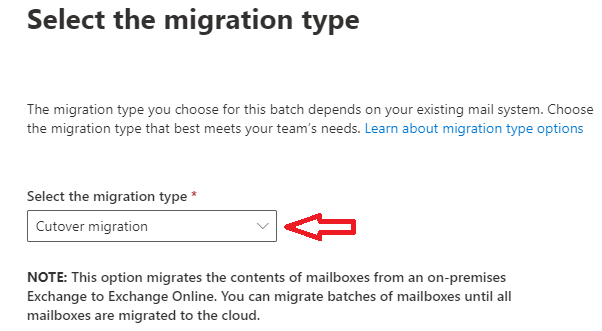
On the Select the migration type page, select Cutover migration and click Next.
On the Prerequisites for cutover migration page click Next.
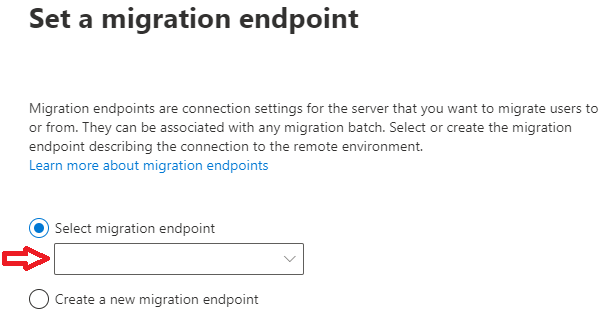
On Set a migration endpoint page select the migration endpoint that we created in step 7.
Follow the instructions on the next page and start the batch.
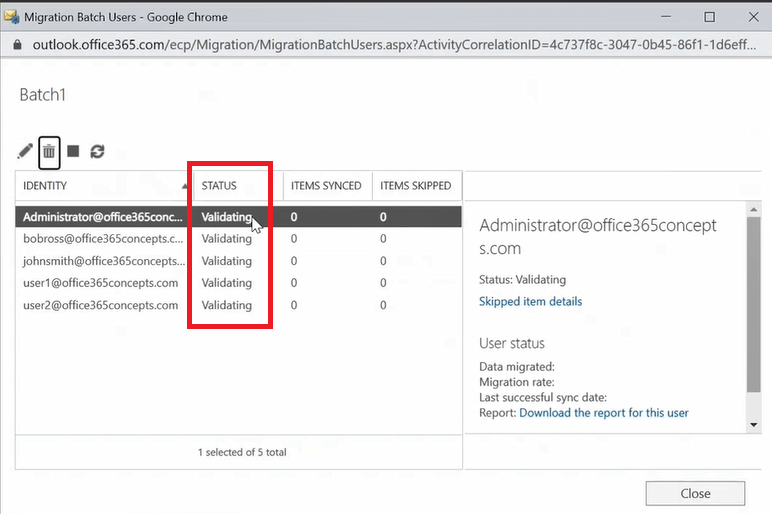
As soon as you will start the batch, the initial status of the mailboxes will be Validating as shown below:
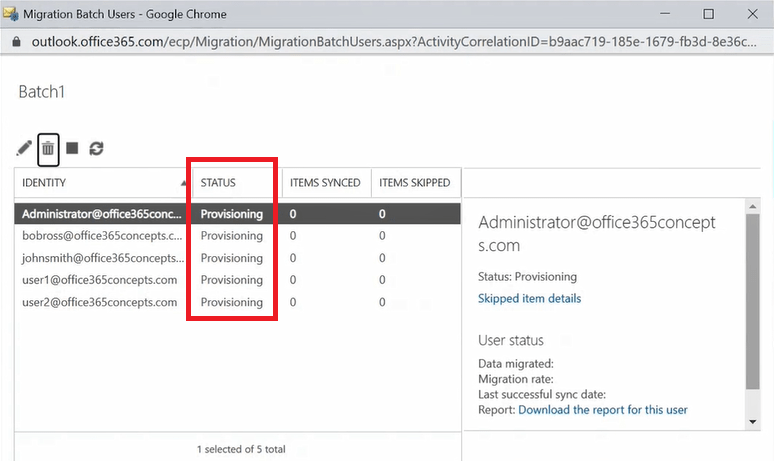
Once the user accounts in migration batch are validated, the migration status will change to Provisioning as shown below:
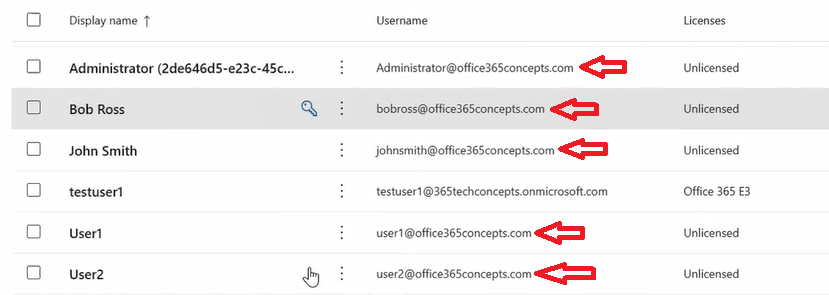
And if you will go to Active Users in Microsoft 365 Admin Center, you will be able to see the on-premises Exchange server users being provisioned as shown in below image:
Step 9: Assign Exchange Online licenses
Once the migration batch is completed, assign licenses to the user accounts that have Exchange online service included so that a mailbox can be provisioned for these accounts.
Step 10. Point MX record to EOP
Now its time to route all the external incoming emails to Exchange Online Protection (EOP). Go to the domain provider portal and create a MX record with below details:
Type: MX
Name: @
Priority: 10
Value: domain-com.mail.protection.com
TTL: 1 Hour
Step 11. Decommission on-premises Exchange server
At this point of time you can decommission your Exchange server since all the recipients of your on-premises Exchange server are now migrated to Microsoft 365.
Conclusion
In this blog you learnt what is cutover migration, we learnt how cutover migration works, de talked about the prerequisites for the cutover migration and we learnt how to perform cutover migration step by step.
If you found this article helpful, please share it within your community and do not forget to mention your feedback in the comments. Join us on our YouTube channel for latest videos on Cloud technology and join our Newsletter for early access of the blogs and updates.
Exchange Server 2019 related articles
We welcome you to browse our other articles on Exchange Server 2019 and Exchange Hybrid deployment:
Install Active Directory on Windows Server 2019 and promote to Domain Controller
DNS records in Active Directory
Exchange Server Roles, Architecture, and Functionality Explained
Exchange Server 2019 prerequisites
Install Exchange Server 2019 on Windows Server 2019. A step by step Guide
How to configure Exchange Server 2019 post installation
Transport Pipeline in Exchange Server 2019
Configure Mail Flow in Exchange Server 2019
Create FREE Let’s Encrypt certificate and install on Exchange Server
What is Edge Transport Server
How to install Edge Transport Server in Exchange 2019 organization
Setup EOP as a smart host in Exchange Server 2019
How to configure SMTP relay in Exchange server 2019
Demystifying Autodiscover. A Deep Dive into Autodiscover
Configure Client Access Services in Exchange 2019
Difference between RPC over HTTP and MAPI over HTTP
Configure IMAP and POP services in Exchange Server 2019
Happy Learning!!