
Configure Mail Flow in Exchange Server 2019
In this blog we will learn how to configure mail flow in Exchange Server 2019. We will discuss the prerequisites required for inbound and outbound mail flow in Exchange 2019 and we will configure inbound and outbound email flow in Exchange Server 2019.
This is the 8th article of Exchange Server 2019 and Exchange Hybrid series. Please refer to below links if you want to go through the previous articles:
Install Active Directory on Windows Server 2019 and promote to Domain Controller
DNS records in Active Directory
Demystifying Exchange Server: Roles, Architecture, and Functionality Explained
Exchange Server 2019 prerequisites
Install Exchange Server 2019 on Windows Server 2019. A step by step Guide
How to configure Exchange Server 2019 post installation
Transport Pipeline in Exchange Server 2019
Table of Contents
Watch video
Join us on our YouTube channel and learn how to configure mail flow in Exchange Server 2019.
Important points to consider
Before we learn how to configure mail flow in Exchange Server 2019, I would like to discuss couple of important things that you should consider if you want to set up a fully functional Exchange mail flow.
There are multiple platforms where you can create virtual machines and you can host Exchange server.
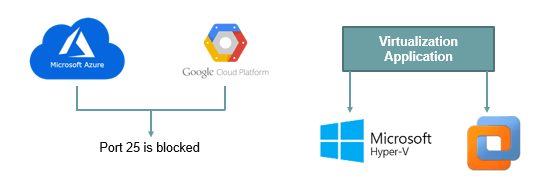
Exchange Server hosted on Azure or Google Cloud
You can use Azure, Google Cloud platform or if you have your own machine with a good configuration, you can install a virtualization software like, Hyper-V or VMware and you can host Exchange Server.
If you are planning to use Azure or Google Cloud as a trial subscription or pay-as-you-go subscription with Azure, you will not be able to send emails from your Exchange organization to the Internet and you will not be able to receive emails from Internet to your Exchange organization. Because both Azure and Google Cloud block port 25. You can still publish your Exchange URLs to the Internet, you can perform mailbox migration from your Exchange server, you can even use free/busy or cross-premises permissions because port 80 and 443 can be opened on both platforms. But port 25 will be blocked.
And if you have a paid subscription with Azure or Google Cloud, you will get port 25 opened on all the virtual machines.
Exchange Server hosted on Virtualization Application
You can install a virtualization application on your own machine or a server and you can set up an Exchange server environment. But here also you need to consider few things if you want to deploy a fully functional Exchange organization.
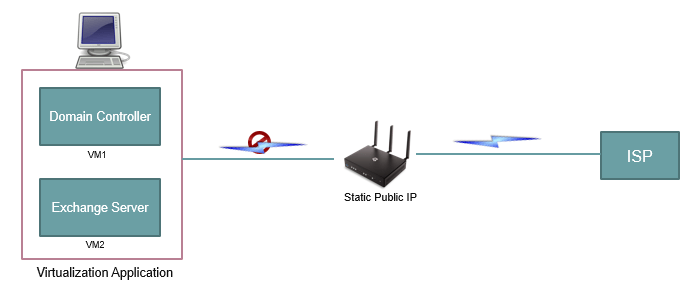
Let’s assume you have 2 virtual machines created on your own server, where VM1 is a Domain Controller and VM2 is Exchange Server. And you are using an ISP for Internet.
Every ISP provides dynamic public IP address to your router. And when your router has a dynamic public IP address assigned, all of the ports are blocked on the router by default. Also, with dynamic IP address you cannot do port forwarding. Port forwarding means, you can forward the traffic from the router to your host machine or to the virtual machine that is running on the virtualization application.
But with Dynamic IP address, port forwarding is not possible. That means you will not be able to send or receive any traffic from your virtual machine to/from the Internet. In short, your Exchange organization will not be accessible from the Internet.
So to overcome this situation, you need to purchase a static public IP address from your ISP. Depending on your ISP, you can either pay monthly or annually and you can get a Static Public IP address. Once you have a static public IP address, all of the ports can be opened on your router and you can forward the traffic from the router to your virtual machine using port forwarding.
Prerequisites for Exchange Server mail flow
To send emails among internal users or within the Exchange organization, you do not have to make any changes. But if you want to send emails to the Internet or you want to receive emails from the Internet, in that case you need to meet certain pre-requisites.
- You need to make sure that port 25 is open and your Exchange server can send and receive traffic from the Internet on port 25.
- You need to create A, MX, and SPF records on public DNS.
- You need to create a send connector to send emails from Exchange server to Internet. To receive emails from the Internet, you do not have to create a connector in your Exchange server. But to send emails to the internet, you need to create a send connector.
Configure mail flow in Exchange Server 2019
Now let’s move to the Exchange server and let me show you practically how to meet above prerequisites and how to configure external inbound and outbound email flow for you Exchange organization.
Verify Port 25 is open: To verify if ports are open on your Exchange server, go to browser and type port checker and type 25 next to Port Number as shown in below image.

You can also verify if port 25 is open by running netstat -ab in Windows PowerShell on Exchange server.

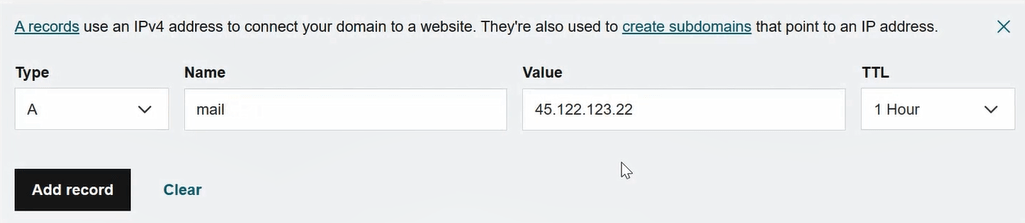
Create A, MX, and SPF records: Now let’s go to Public DNS and let’s create required DNS records.
First we will create A record with below details:
Type: A
Name: mail
Value: external IP of Exchange server
TTL: 1 Hour
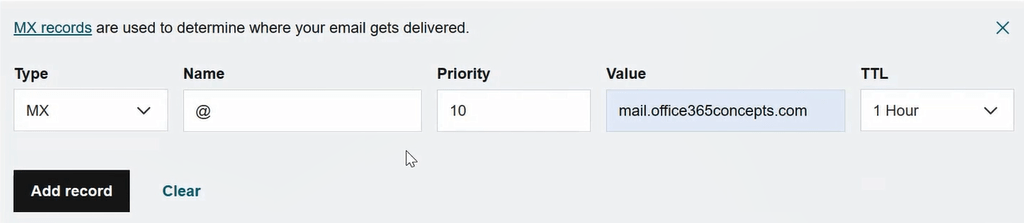
Next we will create MX record with below details:
Type: MX
Name: @
Priority: 10
Value: mail.office365concepts.com
TTL: 1 Hour
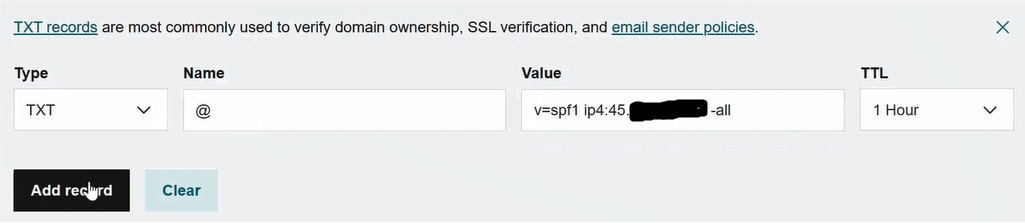
And finally we will create SPF record with below details:
Type: TXT
Name: @
Value: v=spf1 ip4:1.2.3.4 -all (where 1.2.3.4 is the external IP address of Exchange Server)
TTL: 1 Hour
Create Outbound Connector: To create send connector in Exchange Server 2019, go to Exchange Admin Center > Mail Flow, and click Send Connector.
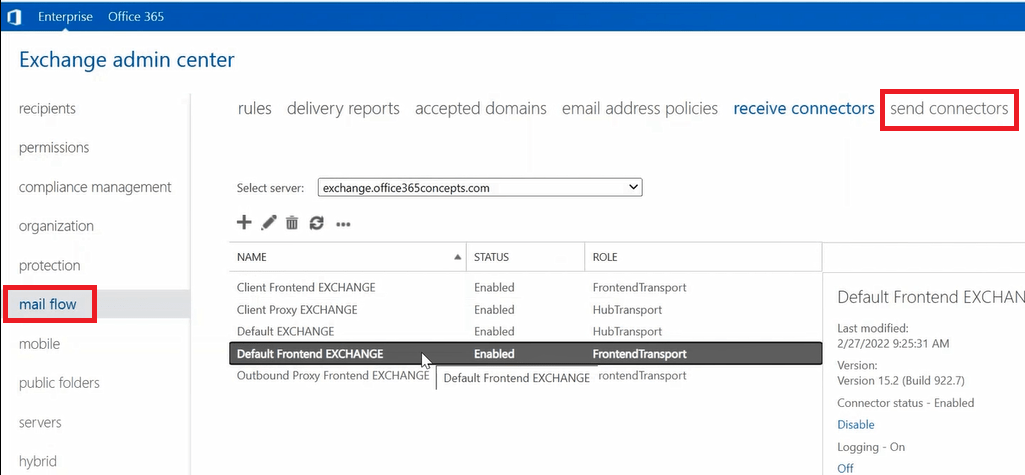
Follow below instructions to create Outbound connector to send emails from Exchange server to Internet:
Name: Give a name to Send Connector
Type: Internet
On the next page, verify that MX record associated with recipient domain is selected.
Click Next
On the next page, enter the following information:
In the Address space section, click Add +.
In the Add domain dialog box that appears, in Fully Qualified Domain Name (FQDN), enter an asterisk (*)
Click Save
On the next page, in the Source server section, click Add +.
In the Select a Server dialog box that appears, select one or more Mailbox servers that you want to use to send mail to the internet.
Click Add, click OK
Click Finish.
Test mail flow in Exchange Server
To test inbound and outbound email flow in Exchange Server, you can use Microsoft Remote Connectivity Analyzer.
Test inbound email flow: Use this link.
Test outbound email flow: Use this link.
Conclusion
In this article we learnt what are the prerequisites for mail flow in Exchange Server 2019 and how to configure mail flow in Exchange Server 2019.
Found this article helpful and informative? You may also like MS-203: Microsoft 365 Messaging: Questions and Answers. Please follow us on our YouTube channel for videos on Cloud technology and join our Newsletter for early access to the blogs and updates.
Related articles
We welcome you to browse our articles on Microsoft exams and certifications:
SC-900 Exam Questions and Answers
MS-203: Microsoft 365 Messaging: Questions and Answers
Exam MS-102: Microsoft 365 Administrator questions and answers
Happy Learning!