
Setup EOP as a smart host in Exchange Server 2019
In this blog we will be talking about setting up EOP (Exchange Online Protection) as a smart host in Exchange Server 2019. We will learn what is a smart host in Exchange Server, we will learn how to set up EOP as a smart host in Exchange 2019, and we will talk about the complete process step by step.
Table of Contents
Watch video
Join us on YouTube and watch this video to learn how to set up EOP as a smart host in Exchange Server step by step.
What is a smart host in Exchange Server
In nutshell, A smart host is a server that sits between the email sending server and the receiving server. Any email that is sent from an email server, it is first delivered on the smart host, then smart host filters that email or applies the policies and delivers that email to the recipient email server.
Note: A smart host is always considered to be safe. Because it requires authentication of the sender to validate if the email sender is a valid sender or not.
Why do we need a smart host in Exchange Server
Now the question arises, we can send emails from our Exchange server, then why do we need a smart host in Exchange server environment.
- You need a smart host if you need a better email hygiene solution for your on-premise emails environment. If the on-premises Exchange server anti-spam or anti-malware agents are not solving your purpose for email hygiene, in that case you can use a 3rd party email filtering service as a smart host. Because a 3rd party email filtering service provides more advanced features and techniques to fight malicious emails as compare to the Exchange server.
- You need a smart host if your on-premises Exchange server is running on a bad reputation IP address, and the recipient email servers are not accepting your emails because of the bad reputation IP being used to send those emails.
Which smart host is better for Exchange Server
There are multiple email hygiene solutions available that you can use as a smart host for your on-premises Exchange server. Some of the examples are Sophos, Barracuda, Exchange Online Protection (EOP) and Sendgrid.
In this demo we will set up EOP as a smart host in Exchange Server 2019.
How EOP works as a smart host in Exchange Server
When you set up EOP as a smart host for your on-premises Exchange server, any email that you receive from the internet, that email is delivered to the EOP first. EOP will scan that email and if this email is passed from the checks, this will be delivered to your on-premises Exchange organization.
Same way if you send an email to Internet from your on-premises Exchange server, that email will first go to EOP. EOP will apply outbound spam filter policies on that email, and then this email will be delivered to the recipient.
But any email that you send among internal users that email will be processed and delivered by on-premises Exchange server itself.
Prerequisites for setting up EOP as a smart host in Exchange Server
Now let’s talk about the pre-requisites those are required to be met before you start using EOP as a smart host for your on-premises Exchange organization.
- You need to sign up for Microsoft 365 tenant. You will get a free subscription for Microsoft 365 tenant for first 30 days, and EOP is enabled by default with every Microsoft 365 tenant.
- Make sure that external inbound and outbound email flow is working in your on-premises Exchange organization.
- You need to verify on-premises Exchange server domain in Microsoft 365 tenant.
- Once you have verified the domain in Microsoft 365 tenant, the next step is to synchronize on-premises users to Microsoft 365. If you do not have much users in your on-premises organization or you do not want to deploy Microsoft Entra Connect (Azure AD Connect), in that case you can create mail-user accounts manually in Exchange Online for your on-premises mailboxes.
- You need to create 2 mail flow connectors in EOP. One connector will be inbound connector that will receive emails from the on-premises Exchange. And the second connector will be outbound connector that will send emails to your on-premises Exchange organization.
- We will point MX record for our domain to EOP so that all inbound external emails are routed to EOP first. So that EOP can filter these emails and then route them to on-premises Exchange with the help of outbound connector.
- And finally, you need to create a Send connector in on-premises Exchange server. This send connector will send all the external emails to EOP.
Important: To receive emails from EOP, you do not have to create a receive connector. The default FrontEnd Receive Connector is sufficient to receive emails from EOP.
How to set up EOP as a smart host in Exchange 2019
Step 1: Create Microsoft 365 tenant
Please watch this video to learn how to create Microsoft 365 trial tenant.
Step 2: Verify on-premises Exchange domain in Microsoft 365 tenant
Please refer to this link for the step by step instructions to verify a domain in Microsoft 365 tenant.
Step 3: Verify if Exchange server can send and receive emails from Internet
To verify if your Exchange server can send and receive emails from Internet, you can use Microsoft Remote Connectivity Analyzer and you can check external email flow.
Test email flow from on-premises Exchange server to Internet
Test email flow from Internet to on-premises Exchange server
Step 4: Synchronize on-premise users to Microsoft 365 or create mail users in Exchange Online
For this demo I will be creating mail users in Exchange Online. If you want to synchronize users from on-premises Exchange Server, you can deploy Azure AD Connect and synchronize the users to Microsoft 365.
To create mail users in Exchange Online, go to Exchange Admin Center, click Recipients, click Contacts. Click Add a contact and under Contact type select Mail user. Fill in the details and click Add.
Step 5: Point MX record for the domain to EOP
In the next step you need to point MX record of your domain to Exchange Online Protection. Go to Microsoft 365 Admin Center, click Settings, click Domains and click the domain for which you want to modify the MX record.
On the domains page, click DNS records and copy MX record value as shown in below image.
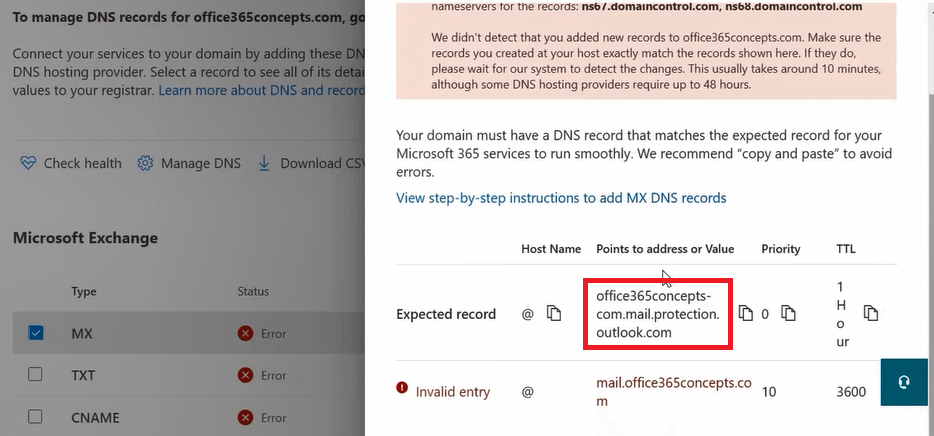
Now go to your DNS provider and create a MX record with below details:
Type: MX
Name: @
Priority: 10
Value: MX record copied from M365 Domains section
TTL: 1 Hour
Note: If you already have a MX record for on-premises Exchange server, do not create a new MX record. Instead modify the existing MX record’s Value to the value that is copied from Domains section in Microsoft Admin Center.
Step 6: Create inbound and outbound connector in Exchange Online
In the next step we will create inbound and outbound connector in Exchange Online to receive emails from Exchange server to Exchange Online, and to send emails Exchange Online to on-premises Exchange server.
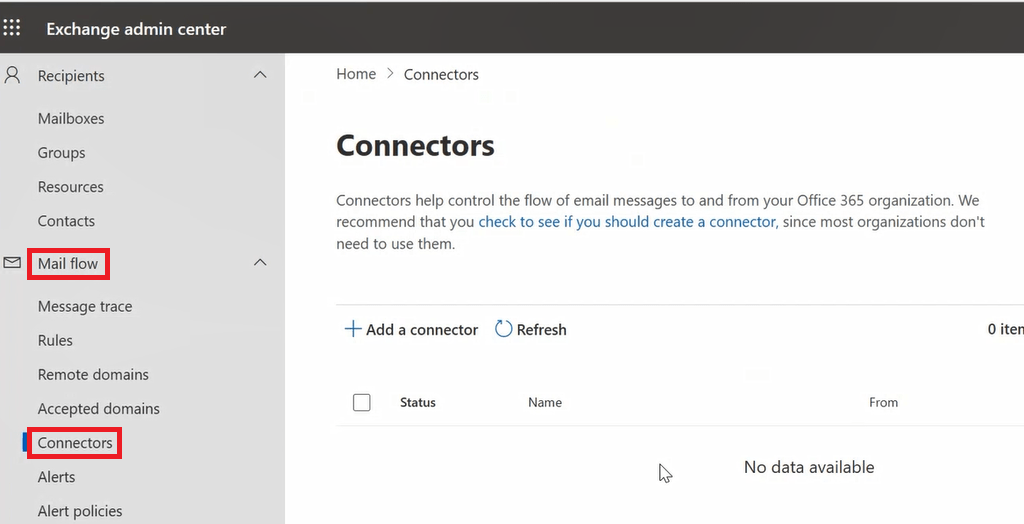
Create Outbound Connector in Exchange Online:
To create outbound connector in Exchange Online, go to Exchange Admin Center, click Mail Flow and click Connectors.
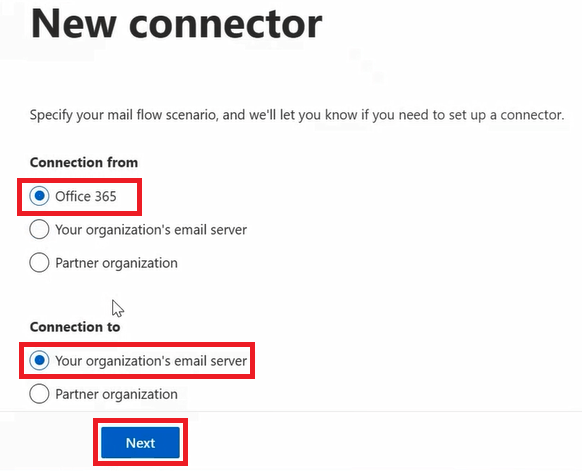
Click Add a connector. On the New Connector page, under Connection from select Office 365 and under Connection to select Your organization’s email server and select Next.
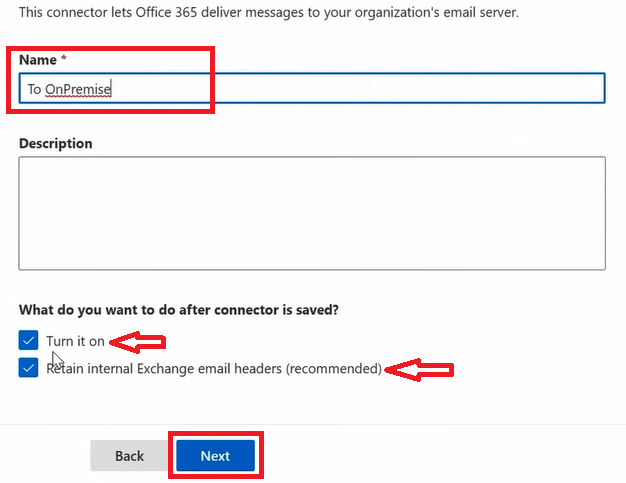
On the Connection name page, type a name for the outbound connector. Also make sure Turn it on and Retain internal Exchange email headers (recommended) options are checked and click Next.
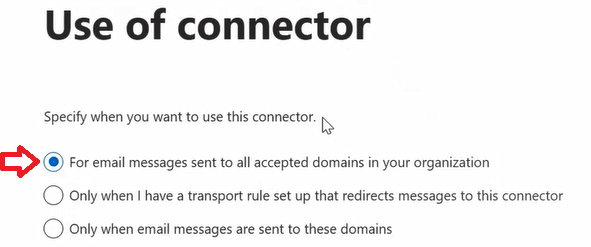
On the User of connector page select For email messages sent to all accepted domains in your organization and click Next.
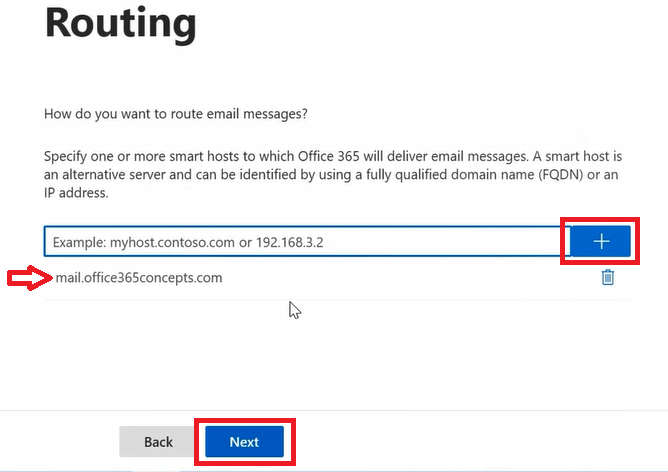
On the Routing page, add on-premises Exchange server hostname and click Add. Click Next.
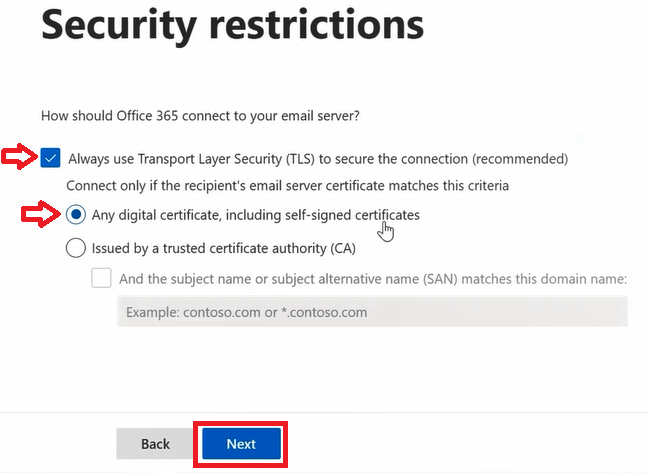
On the Security restrictions page, make sure Always use TLS is checked, and select Any digital certificate, including self-signed certificate. Click Next.
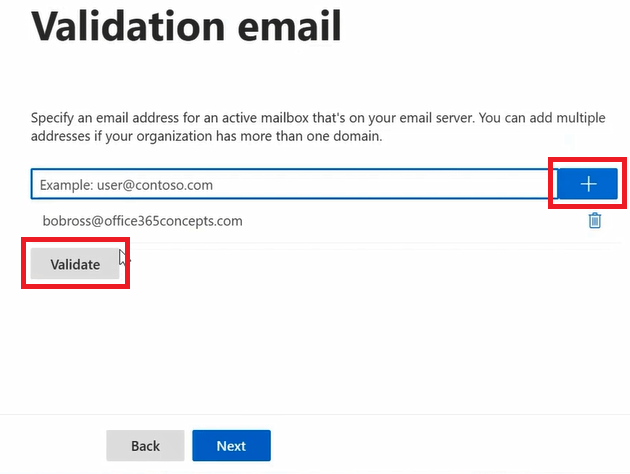
On the Validation email page, add one of the on-premises Exchange mailbox email addresses and click Add. Click Validate.
Once the validation is successful, click Next and click Create connector on Review connector page.

Create inbound connector in Exchange Online:
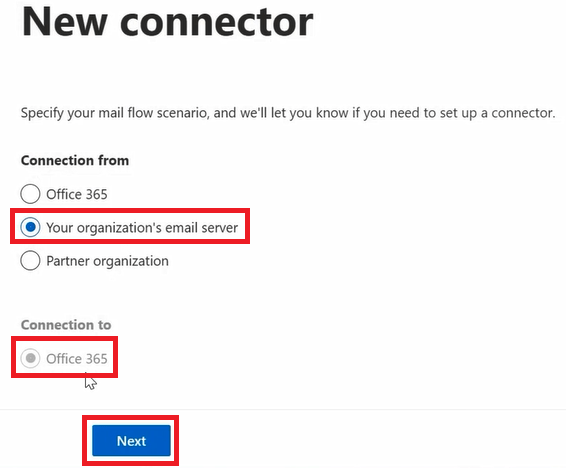
To create outbound connector in Exchange Online, go to Exchange Admin Center, click Mail Flow, click Connectors and click Add a connector.
On the New connector page, under Connection from select Your organization’s email server and under Connection to select Office 365. Click Next.
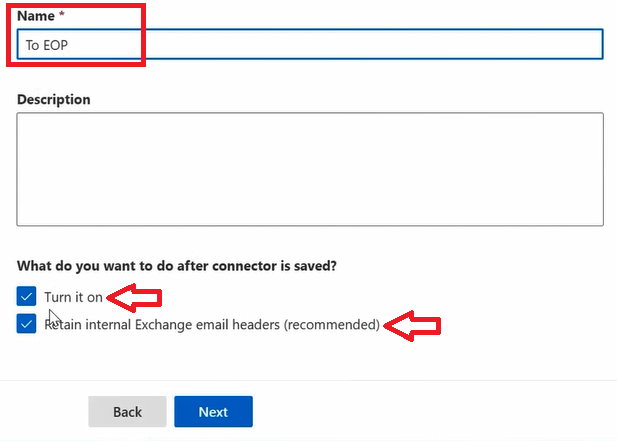
On the Connection name page, type a name for the outbound connector. Also make sure Turn it on and Retain internal Exchange email headers (recommended) options are checked and click Next.
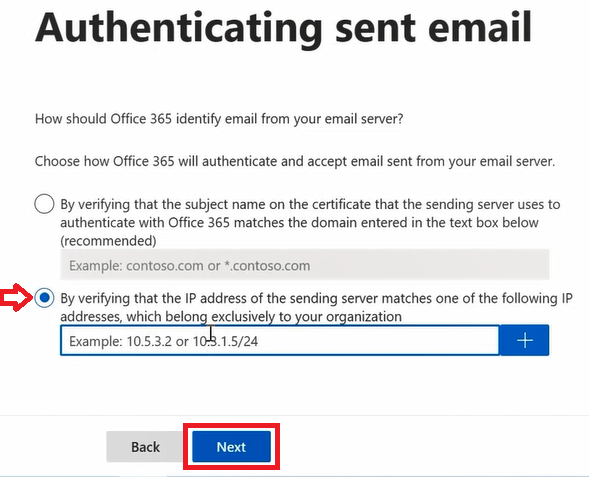
On the Authenticating sent email page, select By verifying that IP address of the sending server matches one of the following IP addresses, and type the public IP address of Exchange server and click Add. Click Next.
On the Review connector page, click create connector.
Step 7: Create a Send connector to route outbound mail through a smart host
To create a send connector in Exchange Server 2019, run below PowerShell command in Exchange Management Shell:
New-SendConnector -Name "To EOP" -AddressSpaces * -CloudServicesMailEnabled $True -FQDN "mail.domain.com" -RequireTLS $True -SmartHosts "MX record value of your domain" -TlsAuthLevel CertificateValidationAnd with this we have successfully set up EOP as a smart host in Exchange 2019.
Test email flow
Now let’s test email flow from external domain to on-premises Exchange server and from Exchange server to external domains.
Test email flow from Internet to on-premises Exchange server
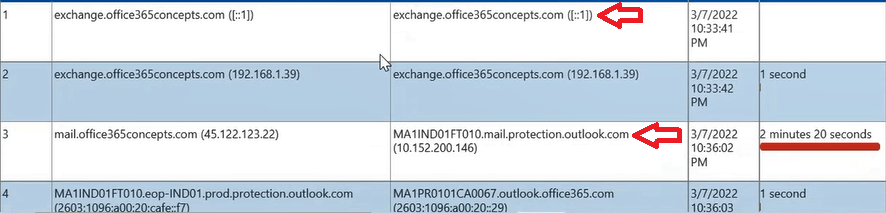
For testing the mail flow from external domain to on-premises Exchange server, I sent an email from Gmail to one of the on-premises Exchange server mailboxes.
In the below image you can see the email is sent from Gmail and is received by MX record which is pointed to Exchange Online Protection (mail.protection.outlook.com).
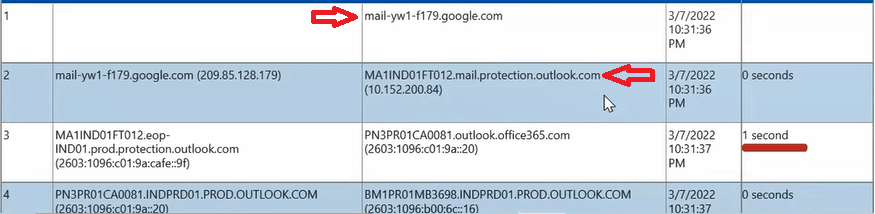
And this email was sent from EOP to on-premises Exchange server.

Test email flow from on-premises Exchange server to Internet
To test email from on-premises Exchange server to external domain, I sent an email from one of the on-premises Exchange server mailboxes to Gmail account.
In below image you can see the email was sent from on-premises Exchange Server and it was delivered to EOP.
And from EOP this email was sent to Gmail.

So if you are sending emails from on-premises Exchange server to Internet or from Internet to on-premises Exchange server, all the emails will be processed by Exchange Online Protection.
Conclusion
In this blog we learnt what is a smart host in Exchange server, we learnt how to set up EOP as a smart host in Exchange 2019, we created inbound and outbound connectors in Exchange Online and a send connector in on-premises Exchange server, and we tested mail flow from on-premises Exchange to Internet and from Internet to on-premises Exchange server.
Found this article helpful and informative? Please share this article within your community and do not forget to share your feedback in comments. Join us on YouTube for latest video on Cloud technology and join our Newsletter for early access of the blogs.
Exchange Server 2019 related articles
We welcome you to browse our other articles on Exchange Server 2019 and Exchange Hybrid deployment:
Install Active Directory on Windows Server 2019 and promote to Domain Controller
DNS records in Active Directory
Exchange Server Roles, Architecture, and Functionality Explained
Exchange Server 2019 prerequisites
Install Exchange Server 2019 on Windows Server 2019. A step by step Guide
How to configure Exchange Server 2019 post installation
Transport Pipeline in Exchange Server 2019
Configure Mail Flow in Exchange Server 2019
Create FREE Let’s Encrypt certificate and install on Exchange Server
What is Edge Transport Server
How to install Edge Transport Server in Exchange 2019 organization
Happy Learning!!