
Sophos Central Email Security integration with Exchange Online – Step by step guide.
Delve into the powerful collaboration between Sophos Central and Exchange Online, reinforcing your email security. This blog uncovers the seamless integration, revealing how these platforms combine forces to establish an ironclad defense against ever-evolving cyber threats.
Table of Contents
Watch the video
Watch this video to learn how to integrate Sophos Central with Exchange Online step by step.
What is Sophos Central Email Security
When we create a Microsoft 365 Tenant, we get Exchange Online Protection (EOP) by default. Exchange Online Protection (EOP) scans all incoming and outgoing emails and it protects our organization from receiving or sending spam, malware, or any other malicious content. However with cyberattacks becoming more sophisticated, we need an extra line of defense to protect emails.
There are multiple 3rd party solutions available that can be used for the email security along with Exchange Online Protection. One of these email security solutions is Sophos Central. Sophos Email Security is a cybersecurity solution, that is designed to protect organizations from multiple types of email-based threats. It is specifically focused on safeguarding email communication and it ensures that emails are free from malware, phishing attempts, spam, and other malicious content.
Email Flow with and without Sophos Email Security
When we integrate Sophos with Exchange Online and when we send an email from Microsoft 365 Tenant to Internet, that email is first scanned by Exchange Online Protection (EOP). After email is scanned by EOP, email is routed to Sophos with the help of outbound connector. Then Sophos will scan the email and it will route the email to Internet.
And when an email is sent from Internet to your Microsoft 365 organization, that email is first delivered to Sophos. Because when we integrate Sophos with Exchange Online Protection, we point MX record to Sophos. Sophos scans the email, if it finds email is spam, phish, or it has any other type of malicious content, it blocks the email. And if email is legitimate, then email is handed over to Exchange Online Protection. Exchange Online Protection receives this email from Sophos over the inbound connector, EOP scans the email, if it finds the email is legitimate, email is delivered to the mailbox.
Note: The connectors that we create between Exchange Online Protection (EOP) and Sophos, these connectors are partner organization connectors.
Sophos Central integration with Exchange Online
You can either purchase Sophos Email Security or you can use it for 30 days as a free trial subscription.
Verify domain in Sophos Central
Once you have access to Sophos Central, the first step that you need to do is, we need to verify our domain in Sophos. So that Sophos can scan all incoming and outgoing emails those are sent to or from these domains. But this doesn’t mean you don’t have to verify domains in M365. You will first verify domain in M365, and in Sophos as well you need to verify the domains to prove the ownership of your domains.
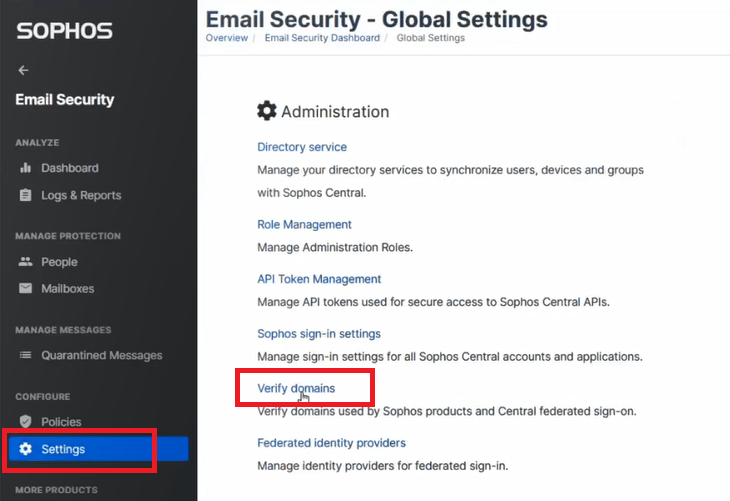
To verify your domain in Sophos Central, go to Sophos Dashboard, go to Email Security > Settings > Verify Domains.
Click Add Domain. Enter your domain name and click Save.

Now you need to copy the value that is shown on your screen and you need to create a TXT record on your domain provider portal. Once you create a TXT record in domain provider portal, come back to Sophos Verify domain ownership page and click verify.

Add users in Sophos Email Security
The next step is, we need to add our users in Sophos that we want to protect. This is an important step. Because if we do not add users in Sophos, Sophos will not process any email for that particular user.
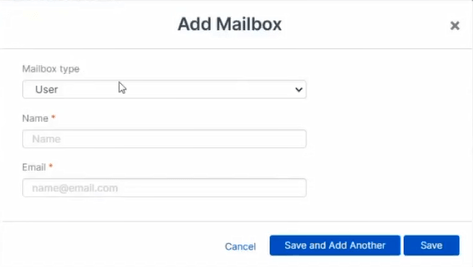
To add users in Sophos you will go to Email Security and go to Mailboxes. If you have few users in your tenant, you can add them manually one-by-one. But if you have a large number of users, then you can import those users with the help of CSV file. You will click Add > Import Mailboxes & Aliases, and from here you can browse the CSV file. But for this demo I am going to use only one user, so I will add it manually. Click Add and click Add Mailbox.
Note: You can also add distribution groups and public folders in Sophos. Because we use distribution list and public folders for the emails.
Fill in user details and click Save.
Configure Sophos as email gateway
Now we will configure Sophos as email gateway. Go to Email Security > Settings > Domain Settings/Status. Click Set up email gateway settings. Under email domain, type your domain, click verify domain ownership, copy TXT record value, go to hour domain provider portal, create one more TXT record and add value. Go back to Sophos and click verify.
Now your domain is verified to use as email gateway in Sophos. Under Direction we will select Inbound and Outbound.
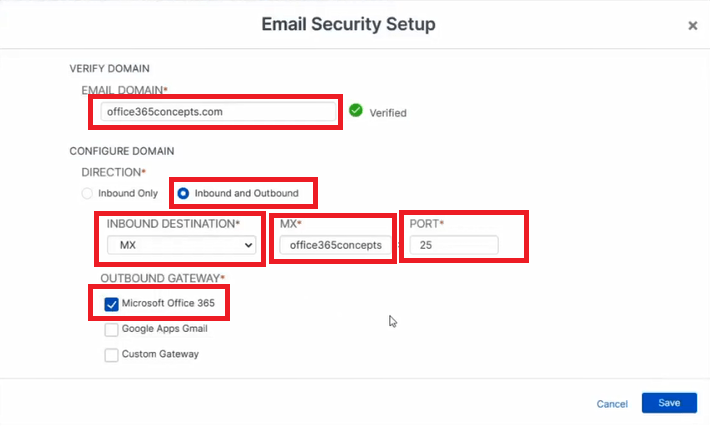
Inbound Destination will be MX, and under MX we will type MX record for our domain that is given by Microsoft 365. If you are not sure what is the MX record for your domain, go to M365 Admin Center > Settings > Domains > select domain > DNS records, and there you can see the MX record value. Copy the value, go back to Sophos and type the value here. Port will be 25, and under Outbound Gateway you will select Microsoft Office 365. Click Save.
On the next screen you will see both Inbound and Outbound settings. Copy these values in a notepad.
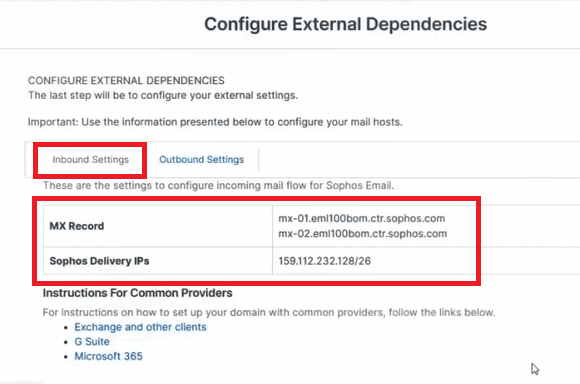
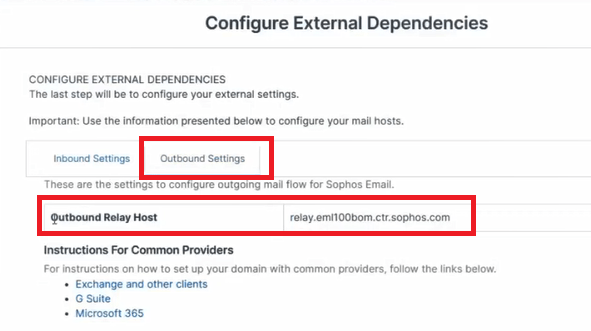
Under Inbound Settings we have 2 MX record values (so we will create 2 MX records), we have IP address range (we will use this IP range in Inbound connector), and under Outbound Settings we have Outbound Relay Host (fully qualified domain name of Sophos). We will use this in outbound connector.
Create Inbound Connector in Exchange Online
Now we will go to Exchange Admin Center, and we will create one Inbound Connector, to receive emails from Sophos.
- Go to Mail Flow > Connectors.
- Click Add a connector.
- Select From Partner Organization To Office 365.
- Give it a Name, make sure it is set to Turn On, and click Next.
- Under Authenticating Sent email, make sure you select by verifying that the sender domain matches one of the following domains, and type *
- Click Add.
- Click Next.
- Under Security Restrictions, make sure Reject email messages if they are not sent over TLS is checked.
- Check Reject email messages if they are not sent from within this IP address range, and here we will type the IP addresses of Sophos 159.112.232.128/26.
- Click Add and click Save.
Point MX record to Sophos
Now we need to point MX record to Sophos Central Email Security so that any email that is sent from Internet to our M365 organization is first delivered to Sophos Email Security for scanning purposes.
Go to your domain provider portal and add 2 MX records.
| Priority | MX Value |
| 10 | mx-01.eml100bom.ctr.sophos.com |
| 20 | mx-02.eml100bom.ctr.sophos.com |
And with this we have configured Inbound Email flow with Sophos Email Security and Exchange Online Protection (EOP).
Create Outbound Connector in Exchange Online
Now we will configure Outbound email flow and we will create an outbound connector so that any email that is sent from our M365 organization is sent to Sophos Email Security and from there it is sent to the recipients.
So we will go Exchange Admin Center and we will create Outbound Connector.
- Click Add a connector.
- Give it a name, make sure this is turned on, click Next.
- Under Use of connector you need to specify what sort of emails you want to route through Sophos. Here we have 2 options. When I have a transport rule to redirect emails to connector or I can simply specify my domains. You can create a transport rule and you can specify conditions like, if email is sent from this domain of my organization I want to route these emails through this connector. So i can route only specific emails. But if I want to route all outgoing emails to Sophos, I can either add all my domains here or I can simply add *
- Click Add.
- Under Routing select Route email through these smart hosts.
- Copy outbound relay host value that you got from Sophos Email Gateway configuration, paste it here and click Add.
- Click Next.
- Under Security Restrictions check the option always use TLS.
- Select any digital certificate.
- Click Next.
- Under Validation Email you will type an email address of any external domain.
- Click Validate. Once this connector is validated, click Next and click Create Connector.
Update SPF record
The next step that we need to do is, we need to modify the SPF record. Earlier we were sending emails from Exchange Online and Exchange Online Protection was scanning the emails. But now we will route emails to Sophos and Sophos will send these emails to Internet. So we need to add Sophos Gateway within SPF record.
In your existing SPF record, you need to add _spf.eml100bom.ctr.sophos.com if your M365 Tenant is hosted in India. If your tenant is hosted in a different region, please refer to this article for SPF record values as per your region.
Sophos Exceptions
So the configuration is almost done. But there is one more step that we not to do. We need to allow Sophos in Exchange Online Protection so that Exchange Online Protection can trust the emails those will be sent from Sophos to EOP.
There are 2 ways you can allow Sophos Email Security in EOP. You can either allow Sophos IP addresses in Connection Filter in EOP or you can create a Mail Flow Rule to bypass Spam Filtering on emails those are sent from Sophos to EOP.
Allow Sophos Email Security in Connection Filter (EOP)
To allow Sophos Email Security in connection filter in Exchange Online Protection (EOP), follow below steps:
- Go to Microsoft 365 Defender
- Click Policies and Rules
- Click Threat Policies4
- Click Anti-Spam5
- Click Connection Filter Policy6
- Click Edit and add 159.112.232.128/26 in allow list. This is the same IP range that we used in connector.
- Click Save.
Allow Sophos Email Security in EOP with mail flow rule
To allow Sophos Email Security using mail flow rule, follow below steps:
- Go to Exchange Admin Center > Mail Flow > Rules
- Give it a Name
- Under Condition select Apply to all messages
- Under Action select Modify the message properties and select Set the Spam Confidence Level (SCL) and add -1.
- Select Enfore
- Under Auditing select High
- Check Stop processing more rules
- Click Create
So now your organization has an extra layer of protection against email threats, phishing attacks, and malicious content.
Related articles
We welcome you to browse our other articles on Exchange Online:
Demystifying Autodiscover. A Deep Dive into Autodiscover
Troubleshooting Inbound connector in Exchange Online
Troubleshooting Exchange Online Mail Flow: A Comprehensive Guide
Exchange Online Protection (EOP) interview questions and answers
Demystifying the High Risk Delivery Pool (HRDP) in Exchange Online
Exploring the Power of Public Folders in Exchange Online, Office 365 and Microsoft 365
50+ Exchange Online Mail Flow Interview questions and answers
What is Exchange Online
What is DMARC record
What is DKIM (DomainKeys Identified Mail) and how does it work
What is MX record (Mail Exchange)
Set up SPF record for Office 365 domains
How does SPF work (Sender Policy Framework)
Happy Learning!!