
How to configure SMTP relay in Exchange server 2019
In this article we will learn how to configure SMTP relay in Exchange server 2019. We will talk about open relay in Exchange server and anonymous relay in Exchange server. We will also learn how to allow anonymous relay on Exchange server.
Table of Contents
Watch video
Watch this video to learn open relay and anonymous relay in Exchange server. And learn how to allow anonymous relay on Exchange server.
Open Relay
What is Open Relay in Exchange server
If your Exchange Server mail flow is configured properly, then exchange server will accept only the emails those are sent to the recipients who are available in your Exchange organization. And if an email is sent to the user who doesn’t belong to your organization, that email will be rejected by the Exchange server.
But just assume, what if a random user from Internet connects to your Exchange server and sends an email to a user who doesn’t belong to your organization. Do you think this is possible?
Yes, this is possible.
If your Exchange server is configured for open relay, anyone from Internet can connect to your Exchange server and can send email to anyone on the Internet using your Exchange server MX record.
You should never configure your Exchange server for open relay. Because anyone from outside your organization can connect to your Exchange server and can send emails to the users who do not even belong to your organization. Spammers can use your exchange server to send spam emails or malicious emails or even malware to the users using your Exchange server.
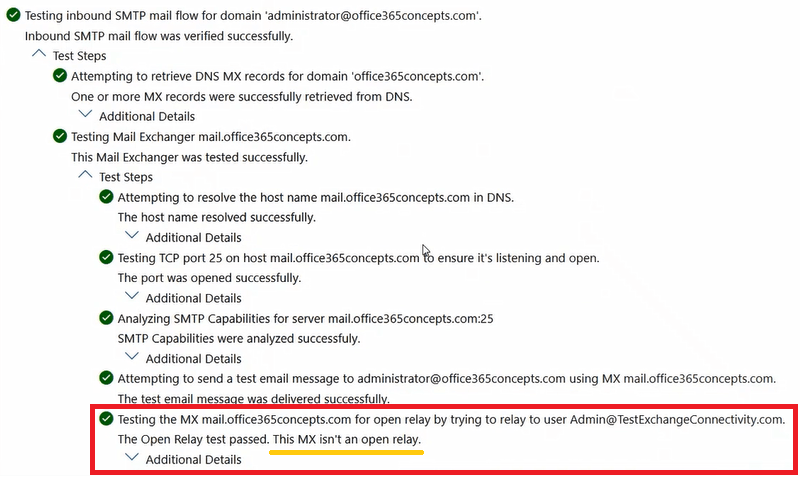
Use Microsoft Remote Connectivity Analyzer to test Open Relay in Exchange server
To verify if Exchange server is configured for open relay, run this test on Microsoft Remote Connectivity Analyzer and look for results as shown below:
Use Telnet to test Open Relay in Exchange server
The another way to verify if Exchange server is configured for open relay is to use Telnet. Using Telnet commands you can test if you can send emails to someone connecting your Exchange server.
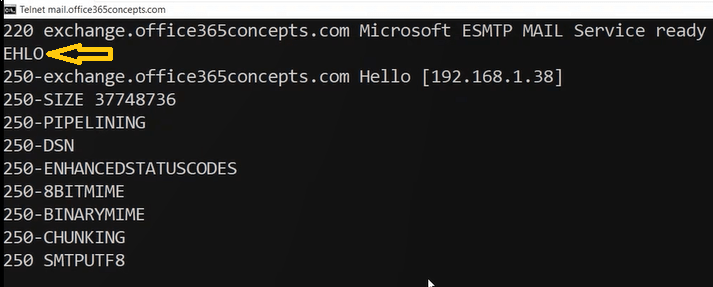
Open Command Prompt on a machine and type Telnet mail.domain.com 25 where mail.domain.com is the value of MX record for the accepted domain configured in your Exchange server.

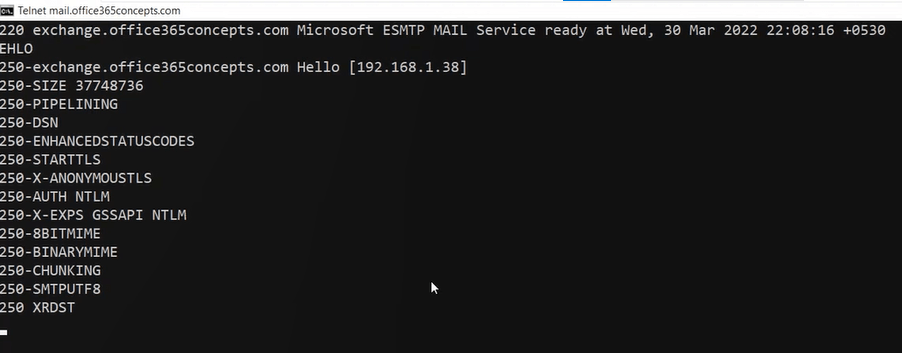
Press Enter. You will see a message on command prompt as shown below that indicates you are successfully connected to the Exchange server on port 25.

Type EHLO and press Enter.
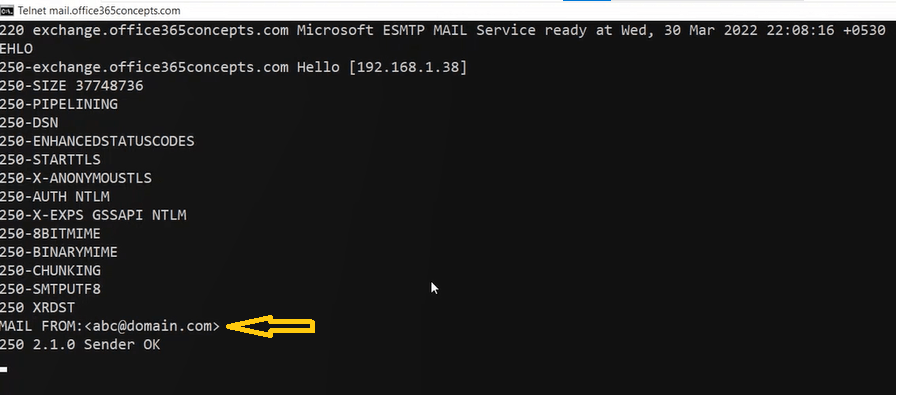
On the next prompt type Mail FROM <abc@domain.com> where abc@domain.com is a random user with a random domain.
On the next prompt type RCPT TO <xyz@domain.com> where xyz@domain.com is a random user of a random domain.
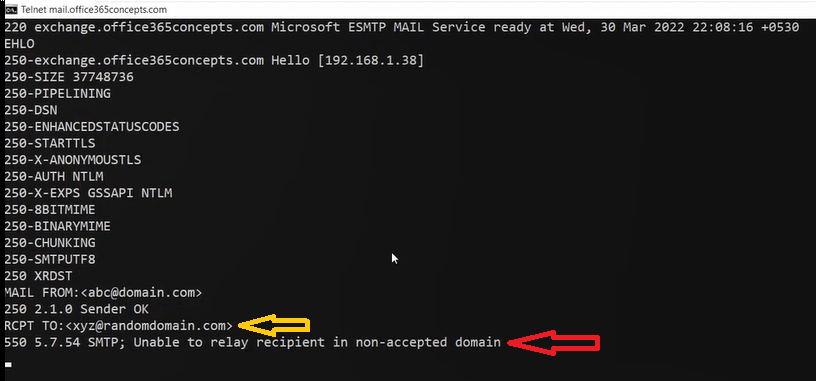
Now in the above image you can see I am getting an error 550 5.7.54 SMTP; Unable to relay recipient in non-accepted domain. This error indicates that the user to whom I am sending this email, this domain does not belong to the accepted domains of my Exchange server. That means my Exchange server is not configured for either open relay or anonymous relay. External user’s can connect to my Exchange server but they cannot use my Exchange server to send emails to someone or to relay emails.
Anonymous Relay or SMTP Relay
What is Anonymous Relay in Exchange server
Anonymous relay is also called SMTP relay. Anonymous relay allows you to send emails from a website, an application or a device, like a printer or scanner.
Let’s assume you have a printer application and you want to send emails to the internal users or to the Internet using this printer application.
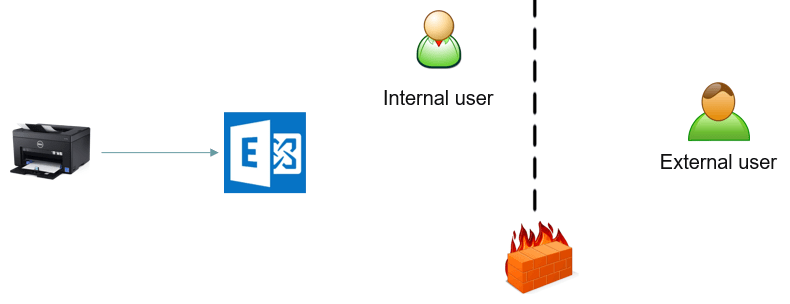
We do not want to let anyone else to send emails to someone using our Exchange server. So will allow only this printer application to connect to the Exchange server and to send emails to the users.
You can send emails to the internal users or even to the external users from this application. Not only printer application, you can even use a PowerShell script that connects to your Exchange server and it sends email to the recipients.
How does SMTP relay work in Exchange server
In exchange server we create a receive connector in which we specify the IP address of the machine where this application is hosted. Or sometimes we use IP address of the application itself. This completely depends what type of application you are using to relay emails.
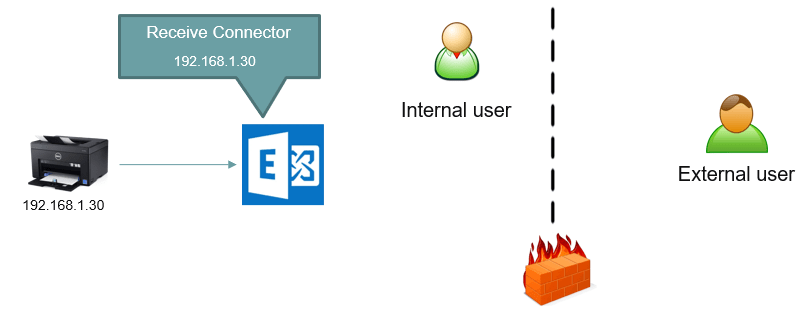
So this way we allow only certain applications to send emails to the users using our Exchange server. And apart from these applications, no one else will be able to connect to our Exchange organization to send spam or malicious emails.
Difference between Open Relay and SMTP Relay
Open Relay:
- An open relay is a misconfiguration or security vulnerability in an email server that allows it to forward emails from anyone to anyone without any restrictions.
- In the context of SMTP (Simple Mail Transfer Protocol), which is the protocol used for email communication, an open relay essentially means that the server is open to being used by unauthorized parties to send emails.
- Open relays are a significant security risk because they can be exploited by spammers to send large volumes of unsolicited and often malicious emails, a practice known as email spamming.
SMTP Relay:
- SMTP relay, on the other hand, is a legitimate and necessary function in email systems. An SMTP relay is a server or service that takes email messages from a client (sender) and forwards them to their destination (recipient) on behalf of the sender.
- In the context of Microsoft Exchange Server, SMTP relay is often used for sending emails to external domains, especially when the sender is not directly connected to the internet or doesn’t have a publicly accessible IP address.
- SMTP relay can be configured with authentication and authorization mechanisms to ensure that only authorized users or devices are allowed to use the relay services.
In summary, an open relay is an undesirable security vulnerability where an email server allows unauthorized parties to send emails through it, often leading to spam-related issues. SMTP relay, on the other hand, is a legitimate feature that allows email servers to forward messages to their intended recipients.
How to configure SMTP relay in Exchange server 2019
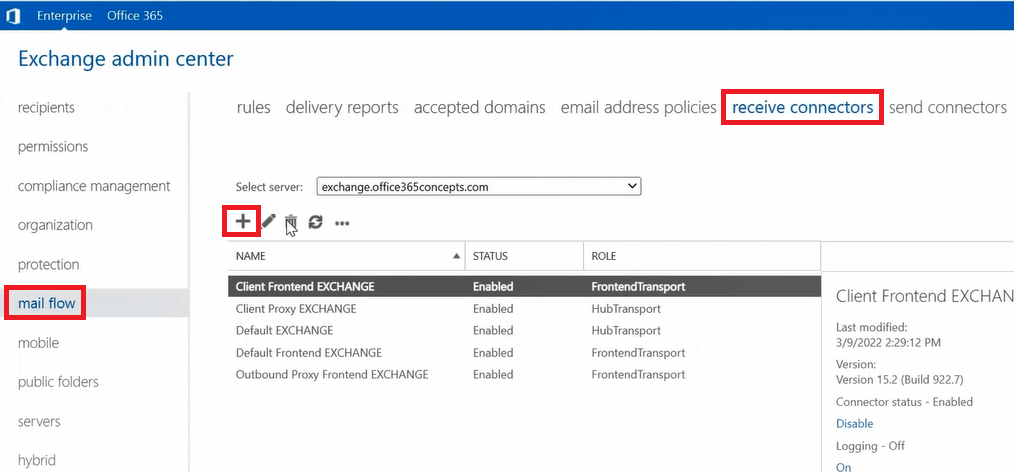
Step 1: Create a dedicated receive connector for anonymous relay in Exchange server
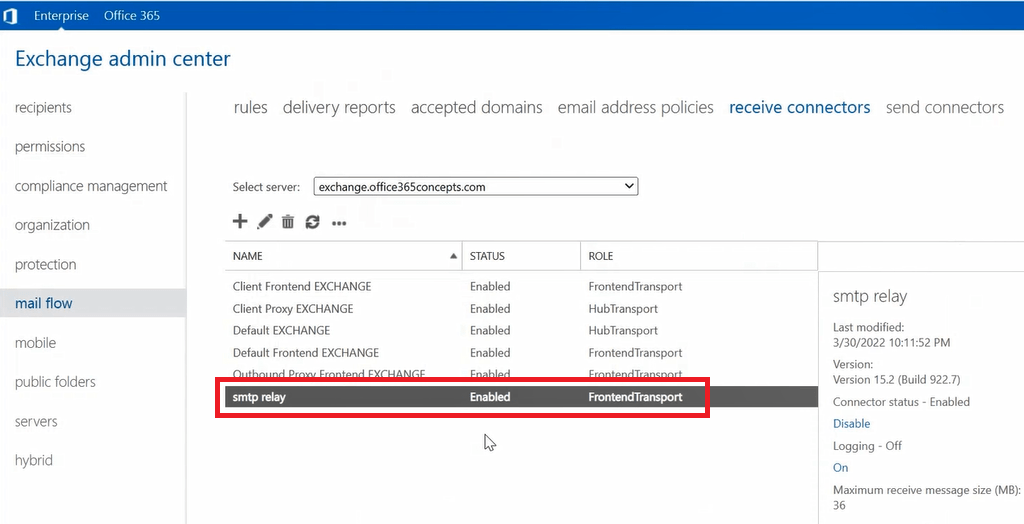
To create a receive connector in Exchange server, go to Exchange admin center, click Mail Flow, click receive connectors and click Add +.
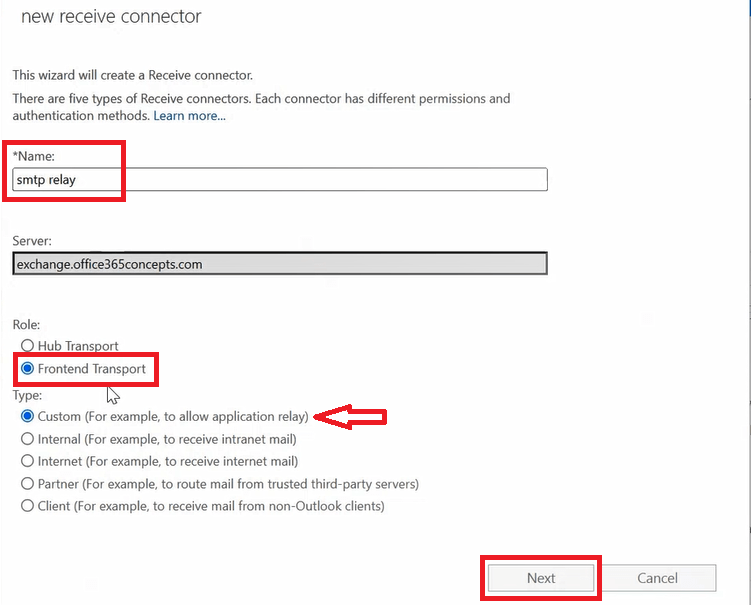
On the new receive connector wizard, type a name for the connector under Name, under Roles select Frontend transport, under Type select Custom and click Next.
Leave default settings under Network adapter bindings and click Next.
On the Remote network settings page, you need to specify the IP address of the application from which you will be relaying emails using the MX record of your domain.
By default, under Remote network settings you will see IP addresses range 0.0.0.0 – 255.255.255.255 as shown below:
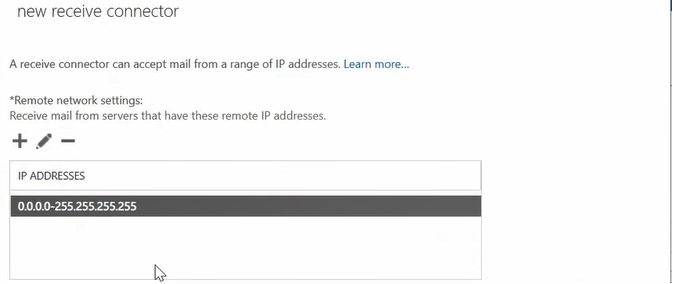
Important: If you leave this default IP address range and enable this connector, your Exchange server will be configured for open relay. And anyone can send emails to anyone by connecting to the MX record of your Exchange server domain.
Remove the default IP address range by clicking – and add the IP address of the application or the machine from where you will relay emails. Once done click Finish to close the wizard.
You will see a FrontendTransport receive connector under receive connectors as shown below:
Step 2: Configure the permissions for anonymous relay on the dedicated Receive connector
Go to Exchange Management Shell and run below commands one by one to assign permissions on the receive connector that will be used for SMTP relay:
Set-ReceiveConnector "smtp relay" -PermissionGroups AnonymousUsers

Get-ReceiveConnector "smtp relay" | Add-ADPermission -User "NT AUTHORITY\ANONYMOUS LOGON" -ExtendedRights "Ms-Exch-SMTP-Accept-Any-Recipient"

Set-ReceiveConnector "smtp relay" -AuthMechanism ExternalAuthoritative -PermissionGroups ExchangeServers
Test SMTP relay or anonymous relay in Exchange server
Use Telnet to test anonymous relay in Exchange server
Now that we have successfully configured anonymous relay in Exchange server, let’s test it. Open command prompt on the machine whose IP address is added in the smtp relay receive connector that we created in step 1, and run Telnet mail.domain.com 25 to connect to the MX record for Exchange server domain on port 25.
This will open Telnet session and will connect to your domain MX record over port 25.
Type EHLO and press Enter.
In the next prompt, type MAIL FROM:<abc@domain.com> where abc@domain.com is a random email address.

In the next prompt type RCPT TO:<abc@randomdomain.com> where abc@randomdomain.com is another random domain that I used for testing purpose.
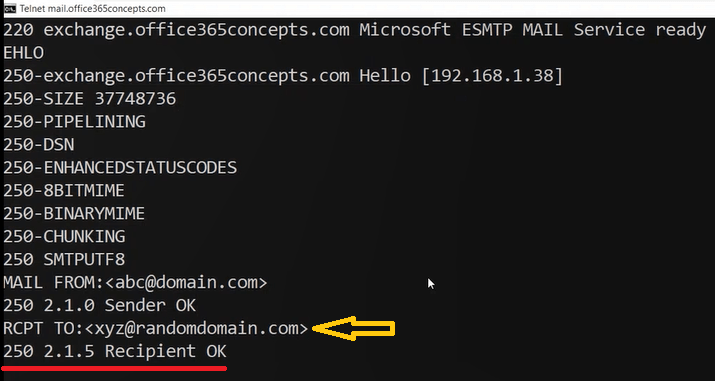
In the above image you can see we are receiving 250 2.1.5 Recipient OK response but when we tested open relay in our Exchange server in previous steps, we received Unable to relay recipients on non-accepted domain error. Because this time we are connecting to our domain’s MX record from the machine whose IP address is added within the FrontendTransport receive connector. And this indicates that our Exchange server is configured for anonymous relay or SMTP relay.
If you want to send email to someone using Telnet, in the next prompt type DATA and press Enter. On the next prompt type SUBJECT: “This is a test email” and press Enter. On the next prompt type This is a test email and press Enter.
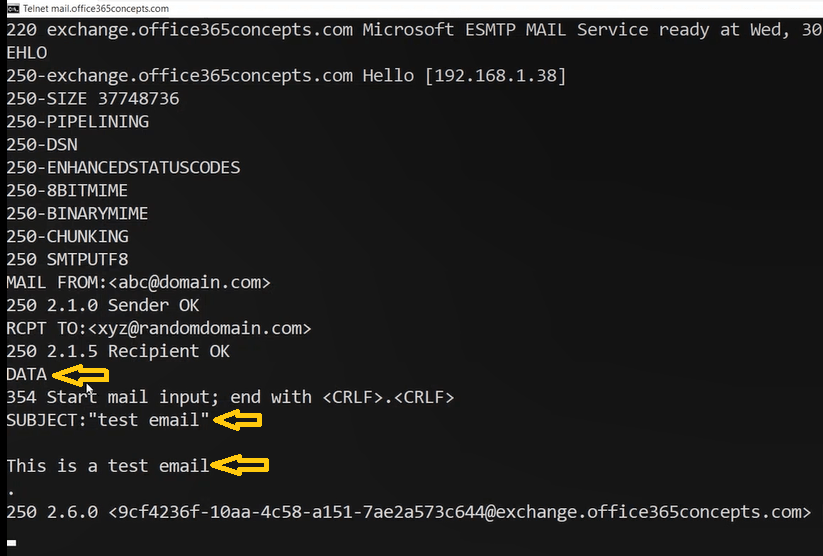
That’s it. The email is sent.
Note: If you will try to connect to the MX record of your Exchange server’s accepted domain from another machine, you will get error 550 5.7.54 Unable to relay recipients on non-accepted domain.
Use PowerShell script to test anonymous relay in Exchange server
To test anonymous relay using PowerShell script, go to the same machine whose IP address is mentioned in the receive connector and run below script in Windows PowerShell.
Send-MailMessage -From 'bobrross@o365techlabs.com' -To 'testuser@gmail.com' -Subject 'Test email' -Body "This is a test email" -DeliveryNotificationOption OnSuccess, OnFailure -SmtpServer 'mail.office365concepts.com'Where bobross@o365techlabs.com is one of the mailboxes in on-premises Exchange server and @o365techlabs.com is one of the accepted domains in Exchange server. And mail.office365concepts.com is the MX record of a domain of my Exchange server.
You can send emails to multiple users (internal and external) using this script.
Conclusion
In this blog we learnt what is open relay and anonymous relay, we talked about difference between open relay and anonymous relay, we learnt how to test open relay in Exchange server, we learnt how to configure SMTP relay or anonymous relay in Exchange server, and we tested anonymous relay using Telnet and PowerShell script.
Found this article helpful and informative? Please share it within your community and do not forget to share feedback in the comments. Join us on YouTube for valuable videos on Cloud technology and join our Newsletter for early access to the blogs and updates.
Exchange Server related articles
We welcome you to browse our other articles on Exchange Server 2019 and Exchange Hybrid deployment:
Install Active Directory on Windows Server 2019 and promote to Domain Controller
DNS records in Active Directory
Exchange Server Roles, Architecture, and Functionality Explained
Exchange Server 2019 prerequisites
Install Exchange Server 2019 on Windows Server 2019. A step by step Guide
How to configure Exchange Server 2019 post installation
Transport Pipeline in Exchange Server 2019
Configure Mail Flow in Exchange Server 2019
Create FREE Let’s Encrypt certificate and install on Exchange Server
What is Edge Transport Server
How to install Edge Transport Server in Exchange 2019 organization
Setup EOP as a smart host in Exchange Server 2019
Happy Learning!!