
Configure IMAP and POP in Exchange Server 2019
In this blog we will talk about IMAP and POP protocols. We will learn what is the difference between IMAP and POP protocols, and we will configure IMAP and POP in Exchange Server 2019.
IMAP and POP are email protocols. You can use either one of these protocols and you can configure your Exchange mailbox in Outlook client. But there are few advantages and dis-advantages of using these 2 protocols.
Table of Contents
Watch video
Watch this video and learn what is the difference between IMAP and POP protocols and how to setup IMAP and POP protocols in Exchange Server 2019.
What is the difference between IMAP and POP protocols
What is POP protocol
POP protocol is designed for offline message processing. That means POP protocol doesn’t synchronize your mailbox. When you configure your mailbox in Outlook client using POP protocol, it downloads your emails to the local machine, and the same email is removed from the email server. And if you will configure the same mailbox on a different machine, you will not find those emails in your inbox. Because your emails were removed from the email server.
Moreover, POP protocol downloads emails only from your inbox folder. It doesn’t download emails from your spam folder, deleted items folder or other folders of your mailbox.
POP protocol doesn’t offer advanced collaboration features. For example, calendaring, contacts, and tasks.
But there are couple of advantages of using POP protocol. For example, POP protocol works well when you have a slow Internet connection. And there is no limitation on the size of the Inbox folder if you are using POP protocol.
What is IMAP protocol
IMAP protocol offers offline and online message processing. Whenever you read an email from the email server, that email is not downloaded to your local machine (until you download it manually). But still if you download an email from the email server, a copy of that email stays within the email server. So if you will configure the same mailbox on a different machine, you will get same emails on the other machine as well.
IMAP can synchronize your emails from multiple folders of your mailbox. But when you are using IMAP protocol, if you delete an email from your mailbox, that email will be deleted from the email server as well. And you will not be able to recover those emails.
Like POP protocol, IMAP protocol also doesn’t support collaboration features like, calendaring, contacts, and tasks.
Configure IMAP and POP in Exchange Server 2019
Step 1: Enable IMAP and POP services in Exchange server
Before you configure IMAP and POP in Exchange server 2019, you need to start both the services in Exchange server. By default both IMAP and POP services are disabled and their Startup type is set to manual.
Go to RUN and type services.msc and press Enter.
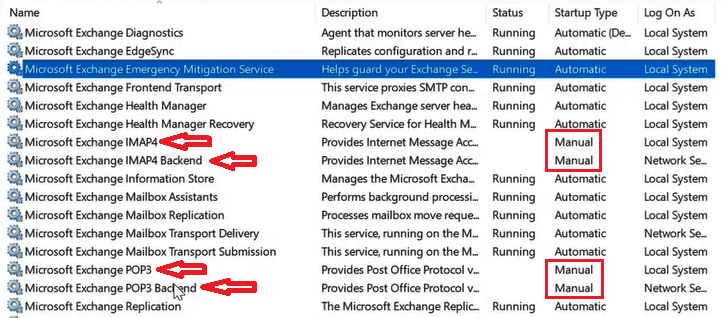
In the above image you can see Microsoft Exchange IMAP4, Microsoft Exchange IMAP4 Backend, Microsoft Exchange POP3, and Microsoft Exchange POP3 Backend services are not running and the Startup Type is set to Manual.
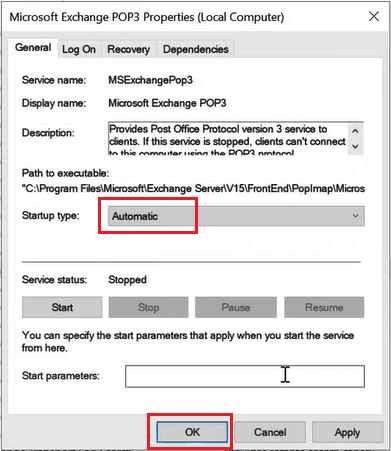
To change their startup type, double click on the service and on the Service Properties page select Automatic next to Startup type.
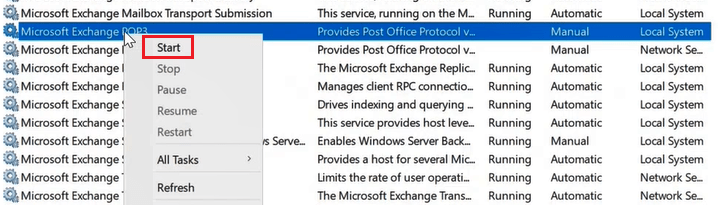
Now when you will restart Exchange server, these services will start automatically. But for now you need to start all these services manually. Right click on a service and click Start.
Step 2: Assign IMAP and POP services in Exchange server SSL certificate
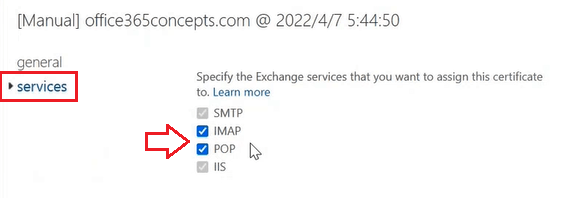
In the next step we need to assign IMAP and POP services in Exchange server SSL certificate. To do this, go to Exchange admin center, click servers, click certificates.
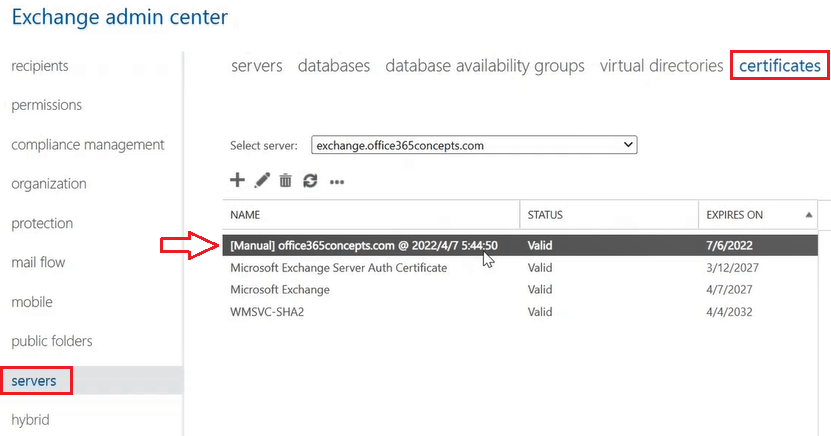
Double click on the SSL certificate and go to services, and check IMAP and POP as shown in below image. Click Save.
Step 3: Setup POP service in Exchange Server 2019
In the next step we will configure POP service in Exchange server. Go to Exchange Management Shell and run below command:
Set-PopSettings -ExternalConnectionSettings "mail.office365concepts.com:995:SSL","mail.office365concepts.com:110:TLS" -X509CertificateName office365concepts.comIn the above command we are setting up our Exchange server hostname with port 995 and 110, and we are configuring POP service to use Exchange server SSL certificate for the communication.
Run below command to restart POP service:
Restart-Service MSExchangePOP3; Restart-Service MSExchangePOP3BE
Step 4: Setup IMAP service in Exchange server 2019
To setup IMAP service in Exchange server 2019, run below command in Exchange Management Shell:
Set-ImapSettings -ExternalConnectionSettings "mail.office365concepts.com:993:SSL","mail.office365concepts.com:143:TLS" -X509CertificateName office365concepts.comIn the above command we are setting up Exchange server hostname with port 993 and 143, and we are configuring IMAP service with the SSL certificate of Exchange server.
Run below command to restart IMAP service:
Restart-Service MSExchangeIMAP4; Restart-Service MSExchangeIMAP4BEStep 5: Open ports on the network
After configuring IMAP and POP services in Exchange server, you need to open port 993, 995, 143 and 110 on your network.
Step 6: Setup Authenticated SMTP settings for IMAP and POP
Once you have configured IMAP and POP protocols, you need to setup Authenticated SMTP settings for IMAP and POP clients so that they can send email messages.
If you go to connectors in your Exchange server, you will find a receive connector with name Client Frontend as shown below:
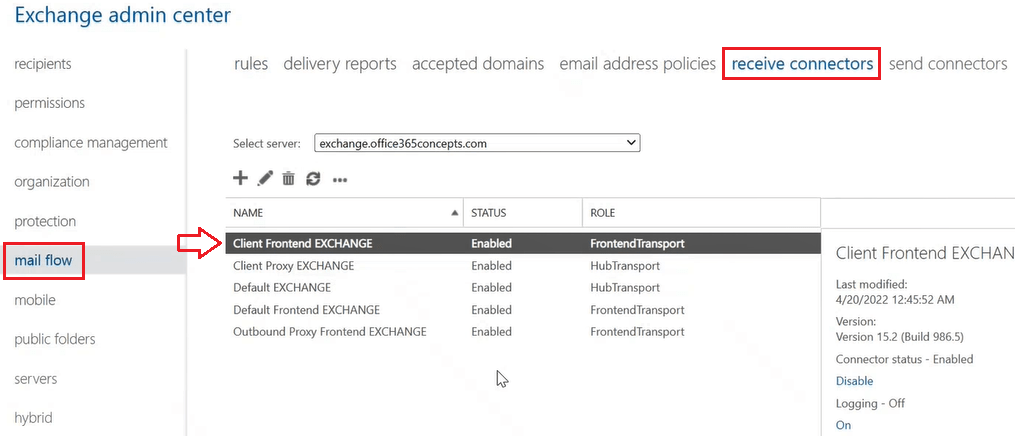
This connector accepts the requests on port 587. POP and IMAP protocols will use this connector to receive emails on port 587.
You need to update the FQDN of this connector to the URL that matches to the public DNS record. Double click on the Client Frontend connector, click scoping, and under FQDN type the hostname of your Exchange server for which you have configured DNS records.

Step 7: Bind SSL certificate with receive connector
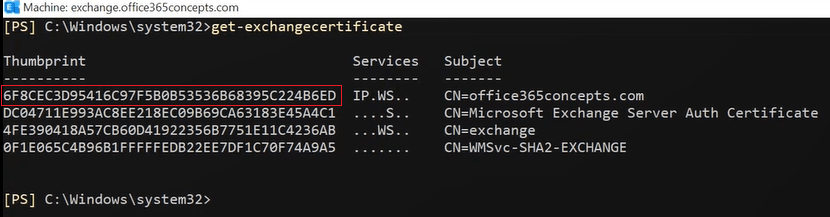
Next, we will bind the SSL certificate with Client Frontend receive connector. Go to Exchange Management Shell and run below command to list all the certificates of your Exchange server along with their thumbprints.
Get-ExchangeCertificateLook for the SSL certificate and copy the thumbprint and paste it on a notepad.
Run below commands to bind the SSL certificate with the receive connector:
$TLSCert = Get-ExchangeCertificate -Thumbprint "Thumbprint of the certificate"

$TLSCertName = "<I>$($TLSCert.Issuer)<S>$($TLSCert.Subject)"

Get-ReceiveConnector -Identity "Client Frontend Exchange" | Set-ReceiveConnector -TlsCertificateName $TLSCertName
To verify if SSL certificate is configured with the Client Frontend receive connector, run below command:
Get-ReceiveConnector -Identity "Client Frontend Exchange" | fl FQDN,TlsCertificateName
Step 8: Test IMAP and POP connectivity in Exchange server
So we have successfully configured IMAP and POP services in Exchange server, and now let’s test these services.
Go to Exchange Management Shell and run below command to test POP connectivity.
Test-PopConnectivity -ClientAccessServer Exchange -MailboxCredential (Get-Credential office365concepts.com\johnsmith)
To test IMAP connectivity, run below command in Exchange Management Shell:
Test-ImapConnectivity -ClientAccessServer Exchange -MailboxCredential (Get-Credential office365concepts.com\johnsmith)
Conclusion
In this blog we learnt what is the difference between IMAP and POP services and how to configure IMAP and POP in Exchange server 2019.
Found this article helpful and informative, please share it within your community. Join us on our YouTube channel and join our Newsletter for early access of the blogs and updates.
Exchange server related articles
We welcome you to browse our other articles on Exchange Server 2019 and Exchange Hybrid deployment:
Install Active Directory on Windows Server 2019 and promote to Domain Controller
DNS records in Active Directory
Exchange Server Roles, Architecture, and Functionality Explained
Exchange Server 2019 prerequisites
Install Exchange Server 2019 on Windows Server 2019. A step by step Guide
How to configure Exchange Server 2019 post installation
Transport Pipeline in Exchange Server 2019
Configure Mail Flow in Exchange Server 2019
Create FREE Let’s Encrypt certificate and install on Exchange Server
What is Edge Transport Server
How to install Edge Transport Server in Exchange 2019 organization
Setup EOP as a smart host in Exchange Server 2019
How to configure SMTP relay in Exchange server 2019
Demystifying Autodiscover. A Deep Dive into Autodiscover
Configure Client Access Services in Exchange 2019
Difference between RPC over HTTP and MAPI over HTTP
Happy Learning!!