SMTP Relay Office 365 – A complete Guide
In this blog we will learn how to use an application to relay emails using Microsoft 365. You will learn what is Direct Send, SMTP Client Submission and SMTP relay with connector. You will also learn how to test SMTP relay using Microsoft 365.
Table of Contents
Watch the video
Watch this video on our YouTube channel and learn how to relay emails from an application using Microsoft 365.
SMTP Relay Office 365
You can come across a scenario where you want to send invoices or printed documents from a printer or a scanner to Microsoft 365 users or to external users. Microsoft 365 provide 3 methods to relay emails from an application/device to Microsoft 365 users or external users. SMTP Client Submission, Direct Send, and SMTP relay with connector. You can use any one of these 3 methods and you can send emails to the users. But the question is which option out of these 3 you should choose. So let’s talk about these 3 methods in detail.
SMTP Client Submission
SMTP Client Submission or SMTP Auth Client Submission method is suitable when your requirement is to send emails to both internal and external users.
Important: If you want to use SMTP Auth Client Submission method, you need to make sure that Modern Authentication is enabled for the account that you want to use to send emails from your device. In SMTP Auth Client Submission method, you cannot use the password of the mailbox account. You need to enable modern authentication on the account, and you need to create an app password for that account. And you will use the app password to authenticate the user in your device. Security defaults are not supported in SMTP AUTH Client Submission.
- If you want to use SMTP AUTH Client Submission method to relay emails, you need email address and the password of a mailbox that is hosted in Office 365.
- If you want to use SMTP AUTH Client Submission, make sure SMTP Authentication is enabled on the mailbox that you are using to send emails from the device.
- Make sure the device you are using to relay emails, supports TLS 1.2. If this doesn’t support TLS1.2, then you can either use Direct Send or SMTP relay with connector method.
- SMTP Auth client submission doesn’t allow to send bulk emails. If your requirement is to send bulk emails from the device, you can use Direct Send method.
How does SMTP Client Submission work
SMTP Auth Client Submission uses the credentials of a mailbox that is hosted on Office 365 to connect to Office 365 server, and once you are authenticated with Office 365 mailbox credentials, you can send emails to internal and external users.
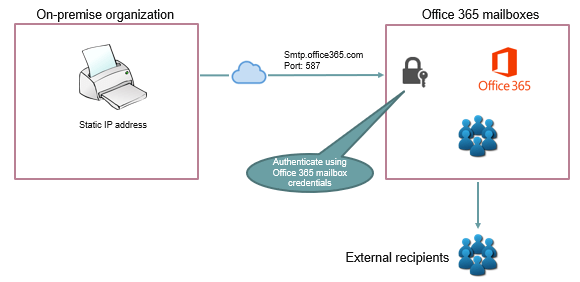
The communication in SMTP Client Submission method works on port 587. If your application is hosted in Microsoft Azure, you can use this option to send emails from that application. Because 587 port is open in Azure but port 25 remains blocked.
SMTP Client Submission method settings
If you are planning to use SMTP Auth Client Submission method, use below settings in your application to relay emails:
| Device or Application settings | Value |
| Server/smart host | smtp.office365.com |
| Port | Port 587 (recommended) or port 25 |
| TLS/StartTLS | Enabled |
| Username/email address and password | Enter the sign-in credentials of Exchange Online hosted mailbox. |
Features of SMTP Client Submission
- SMTP AUTH client submission enables you to send emails to both internal and external recipients, regardless of their location.
- By using this method, emails sent to individuals within your organization are often exempted from standard spam checks, thereby safeguarding your company’s IP addresses from potential blacklisting by spam filters.
- SMTP Auth Client Submission method allows you to send emails from various locations or IP addresses, such as your organization’s on-premises network or a third-party cloud hosting service like Microsoft Azure.
Office 365 Direct Send
You can use Direct Send method if:
- SMTP Authentication is disabled in your tenant and you do not want to enable SMTP authentication.
- You can use this method if your device doesn’t support TLS 1.2.
- You want to send emails only to internal users. Direct Send method doesn’t allow to send emails to the external users. By using this method you can send emails only to Office 365 users.
- Direct Send method is suitable if your requirement is to send bulk emails or newsletters.
Important: If you want to use Direct Send method, you need a static public IP address for your device or the application that will be sending emails. Because when you will send emails from the device using Direct Send method, you will connect to the MX record of your Office 365 domain, and the SPF record should include the IP address of the device or the application. If you will not configure SPF record, the emails that you will send from the application, these emails will be delivered to the junk folder of the users.
How does Office 365 Direct Send method works
In Direct Send method you can use any email address of your Office 365 accepted domain. This email address doesn’t need to have a mailbox. You can use any email address that is using one of the accepted domains in Microsoft 365 tenant.
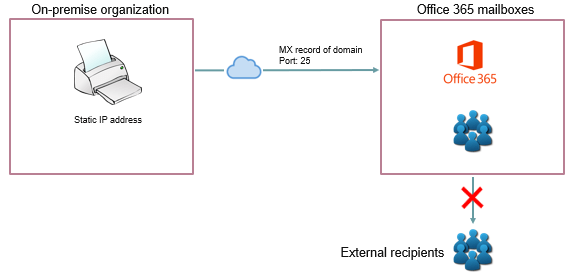
In Direct Send method, you use MX record of your Office 365 domain to connect to your Office 365 tenant. This communication works on port 25. So you need to make sure that port 25 is open on your network. You cannot send emails to the external users using Direct Send method. In case you will send emails to the external users, you will receive an NDR or non delivery report.
Office 365 Direct Send method settings
If you want to use Direct Send method, use below settings in the application from where you want to relay emails:
| Device or application setting | Value |
| Server/smart host | Your domain’s MX endpoint, for example, domain-com.mail.protection.outlook.com |
| Port | Port 25 |
| TLS/StartTLS | Optional |
| Email address | Any email address for one of your Microsoft 365 accepted domains. This email address doesn’t need to have a mailbox. |
| SPF record | v=spf1 ip4: include:spf.protection.outlook.com -all |
Features of Office 365 Direct Send method
- Direct Send method uses Office 365 to send emails but doesn’t require a dedicated Office 365 mailbox.
- It is recommended for your device or application to have a static IP address, if possible and add it in SPF record.
- Direct Send method doesn’t work with a connector. Do not configure a device to use a connector with direct send method because such a configuration can cause problems.
- Direct Send doesn’t require your device to support TLS.
- Direct send has higher sending limits than SMTP client submission. Senders aren’t bound by the limits as we discussed in Client Submission method above.
Limitations of Direct Send method
- Direct send method cannot be used to deliver emails to external recipients.
- The emails sent using Direct Send method will be subject to antispam checks if SPF record is not correctly published for your domain.
- Sent emails might be disrupted if your IP address is blocked by a spam list.
- Microsoft 365 and Office 365 use throttling policies to protect the performance of the service.
SMTP Relay with Connector
You can use SMTP Relay with connector method if:
- Your device or the application doesn’t support TLS 1.2.
- You want to send emails to both internal and external users.
- SMTP Authentication is disabled in your Office 365 tenant.
Important: In SMTP relay method you need to use a static IP address. Because you need to add the static IP address of your device in the SPF record so that any email that is coming from this IP address will be considered as a legitimate email.
How SMTP Relay method works
In SMTP relay method you can use any email address of Office 365 accepted domains in your device to send emails. It is not mandatory for the email address to be associated with a mailbox. But this email address should be using one of your accepted domains in Office 365. SMTP Relay method is more difficult than Direct Send and Client submission methods because in SMTP relay you create a mail flow connector in Exchange Online with the public IP address or a TLS certificate.
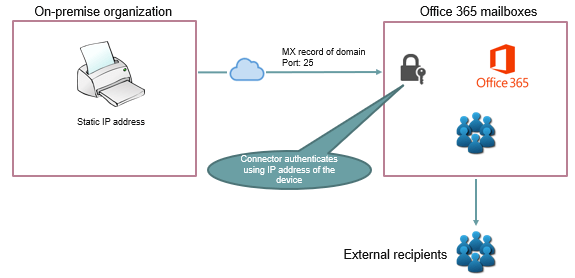
In SMTP relay you connect to your Office 365 tenant using the MX record of your domain, and this communication occurs on port 25. So that means port 25 should be open in your network. In SMTP relay, authentication is performed by the Office 365 connector using the IP address of your device, that you configured within the connector. And basis on this authentication, the emails are sent to the external recipients as well.
SMTP Relay with connector method settings
If you are planning to use SMTP relay with connector method to send emails, use below settings in your device or the application:
| Device or application setting | Value |
| Server/smart host | Your domain’s MX endpoint, for example, domain-com.mail.protection.outlook.com |
| Port | Port 25 |
| TLS/StartTLS | Optional |
| Email address | Any email address for one of your Microsoft 365 accepted domains. This email address doesn’t need to have a mailbox. |
| SPF record | v=spf1 ip4: include:spf.protection.outlook.com -all |
Features of Office 365 SMTP Relay method
- Office 365 SMTP relay doesn’t require the use of a licensed Office 365 mailbox to send emails.
- Office 365 SMTP relay has higher sending limits than SMTP client submission. Senders aren’t subject to the limits as discussed in Client Submission method.
Limitations of Office 365 SMTP Relay method
- Sent emails can be disrupted if your IP address is blocked by a spam list.
- Reasonable limits are imposed for sending. Your emails might route through High-risk delivery pool ID addresses.
- Requires static IP address.
Create mail flow connector for SMTP relay
To create a mail flow connector for SMTP relay method, go to Exchange Admin Center, click Mail Flow, click Connectors, and click Add a connector.
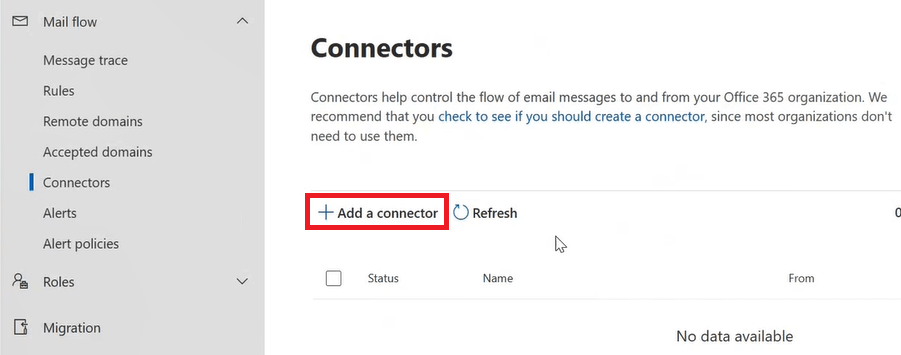
On the New connector page under Connection from select Your organization’s email server and under Connection to select Office 365.
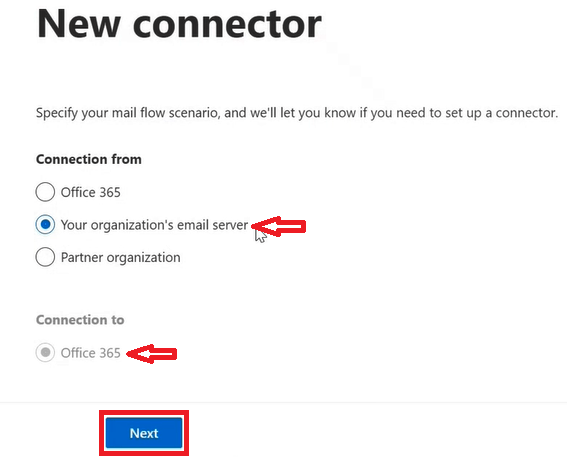
Type and name for the connector and make sure it is turned on and click Next.
On the Authenticating sent email page, add the IP address of your devices/application under By verifying that the IP address of the sending server matches one of the following IP addresses and click Next.
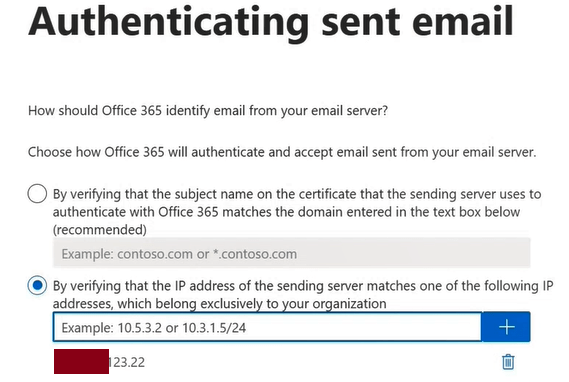
Click Create connector and click Done.
How to test Office 365 SMTP relay
You can use the below PowerShell script to test SMTP relay.
$cred = Get-Credential -UserName "Office 365 email address to send emails" -Message "Enter Password for account"

$mailParams = @{
    smtpServer         = "mx record of Office 365 domain"
    Port               = '25'
    UseSSL=$true
    Credential = $cred
    From = "office 365 email address to send emails"
    To="internal email", "external email"
    Subject = "Test Email"
    Body="This is a test email"
    DeliveryNotificationOption='onFailure','OnSuccess'
}
Send-MailMessage @mailParams
Conclusion
In this blog you learnt what is Office 365 SMTP relay, you learn what is SMTP Client Submission, Direct Send, and SMTP relay with connector. You might like our other article on Setup EOP as a Smart Host for Exchange Server 2019 and Integrate Sophos with EOP.
If you found this article helpful and informative, please share it within your community and do not forget to share your feedback in the comments below. Please join our YouTube channel for the latest videos on the Cloud technology and join our Newsletter for the early access of the updates and blogs.
Happy Learning!!
