
Microsoft 365 Tenant to Tenant Migration. A Comprehensive Guide to Mailbox Migration.
Our blog takes a deep dive into the world of tenant to tenant migration within Office 365. Whether you’re shifting data, applications, or settings from one tenant to another, this guide is your go-to resource. We’ll break down the why behind these moves, walk you through each step, discuss common challenges, and share top tips to make this process smooth sailing for businesses, IT pros, and admins alike. Get ready to ace Office 365 tenant migrations effortlessly!
Table of Contents
Watch video
Watch this video on our YouTube channel and learn ins-and-outs of Microsoft 365 Tenant to Tenant Migration.
What is Cross Tenant Mailbox Migration
Being an administrator you can come across a scenario where you want to move mailboxes from one Microsoft 365 Tenant to another Microsoft 365 Tenant. For example when 2 companies are merged together. In this scenario you might need to move mailboxes from one Microsoft 365 Tenant to another Micrsoft 365 Tenant. And this type of mailbox migration is called Cross Tenant mailbox migration.
How Tenant to Tenant Migration works
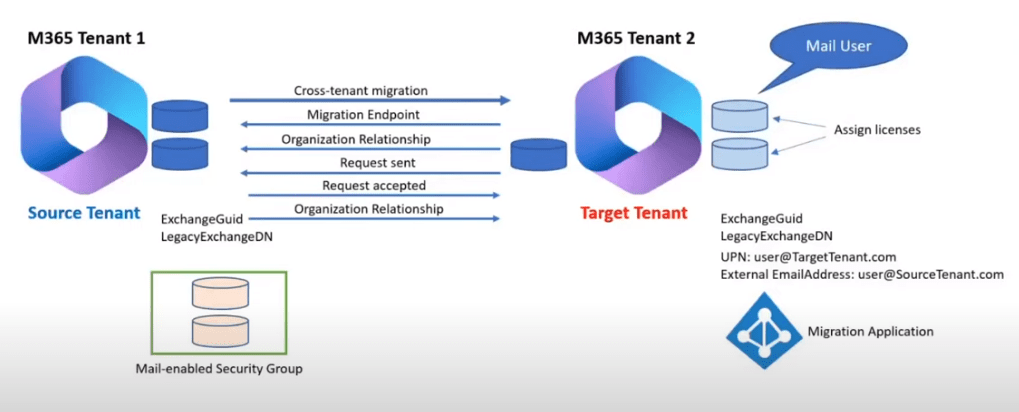
Cross tenant mailbox migration employ an invitation and consent approach to set up an Azure Active Directory (Microsoft Entra ID) application for authentication across tenants. By leveraging the Azure Enterprise Application along with Mailbox Migration permissions and a client secret, administrators gain the capability to oversee the authorization and specification of Exchange Online mailbox migrations between different tenants. The process requires other elements as well, including an organizational relationship and a migration endpoint.
So let’s understand how does cross tenant migration work.
Lets’s assume we have 2 Microsoft 365 Tenants those are merged. And we are planning to move mailboxes from Tenant 1 to Tenant 2. In this example, the Tenant 1 will be the source tenant (from where we are migrating mailboxes) and tenant 2 will be the target tenant (to where we are migrating mailboxes).
- Purchase license. Starting from November 2022, the Cross-Tenant User Data Migration has been introduced as an additional option for Enterprise Agreement customers subscribing to specific Microsoft 365 plans. It becomes a mandatory component for conducting cross-tenant migrations. User licenses are priced per migration, as a one-time fee, and can be allocated to either the source or destination user object. This license also includes coverage for migrating OneDrive for Business. For further information, reach out to your Microsoft account team. The Cross-Tenant User Data Migration add-on is available for separate purchase across various subscription plans, including Microsoft 365 Business Basic, Standard, and Premium; Microsoft 365 F1/F3/E3/E5/; Office 365 F3/E1/E3/E5; Exchange Online; SharePoint Online; and OneDrive for Business.
- Create Mail Users. The first step in cross tenant mailbox migration is, we create mail user accounts in the target tenant for the mailboxes that we want to move from the source tenant. That means if you have 2 mailboxes in the source tenant that you want to migrate to the target tenant, you need to create 2 mail user accounts within the target tenant. Also, you need to copy few properties of the source mailboxes and you need to update those properties to the mailusers within the target tenant. These properties are Exchange Guid and LegacyExchangeDN.
- Create mail-enabled security group. The third step in cross tenant mailbox migration is, we create a mail-enabled security group within the source tenant and we add users within this security group that we want to migrate to the target tenant. So the users who are part of this security group, only these mailboxes will be moved to the target tenant. This way the source tenant admin can restrict or scope the specific set of mailboxes that need to be moved to the target tenant.
- Assign Exchange Online license. After these steps, we assign license to the mail user accounts within the target tenant. This license should have Exchange Online service included so that a mailbox can be provisioned for these accounts.
- Create Enterprise Application and assign permissions. Next, we create a Migration Application within the target tenant Azure AD (Microsoft Entra ID) and we assign Mailbox Migration permissions on this application.
- Create Migration Endpoint and Organization Relationship in target tenant. In the next step, we create a Migration Endpoint and Organization Relationship on the target tenant. This Migration Endpoint connects to the source tenant and enables the mailbox migration from the Source tenant to the target tenant. And the Organiation Relationship creates a relationship between the source tenant and the target tenant using the Tenant ID of the source Tenant.
- Send/accept migration request. In the next step, target tenant sends a request to the source tenant to accept the Migration Application that was created on the target tenant. By accepting this request, source tenant allows mailbox migration from the source tenant to the target tenant.
- Create Organization Relationship in source tenant. In the next step we prepare the source tenant for the migration. We create an Organization Relationship within the source tenant. This organization relationship creates a relationship between the source tenant and the target tenant using the Tenant ID of the target tenant.
Note: If you do not have the proper license assigned to the user being migrated, the migration fails, and you receive an error that is similar to the following:
Error: CrossTenantMigrationWithoutLicensePermanentException: No license was found for the source recipient, ’65c3c3ea-2b9a-44d0-a685-9bfe300f8c87′, or the target recipient, ’65c3c3ea-2b9a-44d0-a685-9bfe300f8c87′. A Cross-tenant User Data Migration license is required to move a mailbox between tenants.
Perform Tenant to Tenant migration
Step 1. We will create Mail Users in target tenant. In source tenant I have 2 mailboxes with name Migration1 and Migration2. I will be migrating these 2 mailboxes from this tenant to the target tenant.
In target tenant, go to Exchange Admin Center > Recipients > Contacts and click Add a mail user.
External Email Address will be the email address assigned in the source tenant.
Alias is the initial of the email address.
UserID will be same as source tenant (initials of the UPN).
Domain will be the Target Tenant Domain.
Give it a password.
Click Next and click Create.
Step 2. Now the next step is, we will copy ExchangeGuid and LegacyExchangeDN of the source tenant mailboxes and will update these values within the mail user accounts in the target tenant.
Open Windows PowerShell, connect to Exchange Online and run below command. This command will retrieve output for only 1 user.
Get-Mailbox -identity “migration1” | fl ExchangeGuid,LegacyExchangeDN
If you want to get output of all the mailboxes, then run below command:
Get-Mailbox -Resultsize Unlimited | select-object DisplayName, ExchangeGuid,LegacyExchangeDN
Next, we will open another PowerShell window and here we will connect to Exchange Online using Global Administrator of the Target Tenant.
To update ExchangeGuid and LegacyExchangeDN run below command:
(Set-MailUser -identity “Migration1” -ExchangeGuid “Value” -EmailAddresses “X500:legacyexchangedn value”)
You need to run this command one by one for other users also. If you want to update these properties for multiple users, you can use a script along with a CSV file.
Step 3. In the next step, we will assign license to the mail user accounts. Go to Microsoft Admin Center > Active Users, and we will assign a license to these users that have Exchange Online service included.
Step 4. Now we will create a Migration Application within the target tenant. We will go to Azure portal and go to Azure Active Directory.
Go to App Registrations > New Registration
Give it a Name
Select Accounts in any organizational directory
Under Redirect URI Select WEB and type https://office.com
Click Register.
Go back to App Registration option in Azure AD.
Under Owned Applications select the Application that you just created.
Under Essentials, copy the Application ID and paste it to a notepad. (You need this application ID later).
Under API Permission, remove User.Read permission.
Click ADD a Permission.
Under APIs my organization uses > type Office 365 Exchange Online and select it.
Select Application Permissions.
Under Select Permissions > expand Mailbox and select Mailbox.Migration > select Add Permission.
On the same page on the left, click Ceritificates & Secrets.
Click New Client Secret
Type a Name and click ADD.
And copy the password value to the notepad. We will need this password while creating the Migration Endpoint.
Step 5. Now the next step is to create an invitation link that we will give to the Source Tenant Admin, and the Source Tenant Admin will accept that invitation. It will allow required permissions for the application to enable the mailbox migration.
https://login.microsoftonline.com/contoso.onmicrosoft.com/adminconsent?client-id=[application_id_of_the_app_you_just_created]&redirect_uri=https://office.com
In above link, you need to modify the application-ID that you copied in the previous step and instead of contoso you need to type Source Tenant initial domain name.
Type the above link in a browser and login with the Global Administrator account of the source tenant. You need to allow permissions. That’s it. The source tenant has accepted this link and it has enabled mailbox migration.
Step 6. In the next step, we will create a Migration Endpoint so that the Target Tenant can connect to the Source Tenant where the mailboxes are hosted. Run below PowerShell script on Windows PowerShell where you are connected with the Target Tenant. You need to update Appplication ID (pasted on notepad), Password (pasted on notepad), SourceTenant.onmicrosoft.com, and Migration Endpoint name.
# Create Migration Endpoint
$dehydrated=Get-OrganizationConfig | select isdehydrated
if ($dehydrated.isdehydrated -eq $true) {Enable-OrganizationCustomization}
$AppId = "Migration Application ID"
$Credential = New-Object -TypeName System.Management.Automation.PSCredential -ArgumentList $AppId, (ConvertTo-SecureString -String "Password copied in previous step" -AsPlainText -Force)
New-MigrationEndpoint -RemoteServer outlook.office.com -RemoteTenant "SourceTenant.onmicrosoft.com" -Credentials $Credential -ExchangeRemoteMove:$true -Name "Name of your migration endpoint" -ApplicationId $AppId
Step 7. Next, we will create an Organization Relationship between the Traget Tenant and the Source Tenant. Run below script on the same PowerShell window where you are connected to the target tenant. You need to make some changes in the below script. Tenant ID of the Source Tenant, and Organization Relationship name.
# Create Organization Relationship
$sourceTenantId="Tenant ID of Source Tenant"
$orgrels=Get-OrganizationRelationship
$existingOrgRel = $orgrels | ?{$_.DomainNames -like $sourceTenantId}
If ($null -ne $existingOrgRel)
{
    Set-OrganizationRelationship $existingOrgRel.Name -Enabled:$true -MailboxMoveEnabled:$true -MailboxMoveCapability Inbound
}
If ($null -eq $existingOrgRel)
{
    New-OrganizationRelationship "Name of organization relationship" -Enabled:$true -MailboxMoveEnabled:$true -MailboxMoveCapability Inbound -DomainNames $sourceTenantId
}
Step 8. In the Source Tenant, we need to create a mail-enabled Security Group and we will add the mailboxes within the Security Group that we want to migrate to the Target Tenant. And you need to copy the email address of the Security Group that we will used in next step.
Step 9. Next we will create an Oragnization relationship with the Target Tenant. And for this we will run below PowerShell script in the source tenant. In below script you need to modify Tenant ID of the target Tenant, Migration Application ID, Security Group Email address, and Organization Relationship Name.
#Prepare Source tenant
$targetTenantId="Tenant id of the Target Tenant"
$appId="Migration Application ID"
$scope="Name of the Security Group"
New-DistributionGroup -Type Security -Name $scope
$orgrels=Get-OrganizationRelationship
$existingOrgRel = $orgrels | ?{$_.DomainNames -like $targetTenantId}
If ($null -ne $existingOrgRel)
{
    Set-OrganizationRelationship $existingOrgRel.Name -Enabled:$true -MailboxMoveEnabled:$true -MailboxMoveCapability RemoteOutbound -OAuthApplicationId $appId -MailboxMovePublishedScopes $scope
}
If ($null -eq $existingOrgRel)
{
    New-OrganizationRelationship "name of your organization relationship" -Enabled:$true -MailboxMoveEnabled:$true -MailboxMoveCapability RemoteOutbound -DomainNames $targetTenantId -OAuthApplicationId $appId -MailboxMovePublishedScopes $scope
}
Step 10. The last step in Tenant to Tenant migration is, we will create a CSV file that we will use while migrating the mailboxes. The column will be EmailAddress and then type email addresses in the rows.
EmailAddress
migration1@domain.onmicrosoft.com
migration2@domain.onmicrosoft.com
Step 11. So now we are good to go and we can perform Tenant to Tenant migration to migrate mailboxes from source tenant to the target tenant. I will be using a PowerShell command to start the migration. You need to run this PowerShell command in the Target Tenant.
#Create migration batch
New-MigrationBatch -Name "Batch Name" -SourceEndpoint "Migration Endpoint Name" -CSVData ([System.IO.File]::ReadAllBytes('c:\file.csv')) -Autostart -TargetDeliveryDomain "Target Tenant .onmicrosoft.com domain"
In the above script you need to make certain changes like, Batch Name, Migration Endpoint Name, Path of CSV file along with csv file name, and Target Delivery Domain Name.
To verify the status of the batch you can run Get-MigrationBatch “batch name” | fl or you can verify Migration Batch from Exchange Admin Center. Go to Exchange Admin Center > Migration > Migration Batch.
Conclusion
In this blog we learnt what is cross tenant mailbox migration, how cross tenant migration works, and how to migrate mailboxes from one tenant to another step by step.
Found this article helpful? You may also like Google Workspace to Microsoft 365 Migration. Don’t forget to follow us and share this article.
Related articles
We welcome you to browse our other blogs as well:
Google Workspace to Microsoft 365 Migration
Sophos Central Email Security integration with Exchange Online – Step by step guide.
Install Active Directory and promote to Domain Controller – Windows Server 2019
Demystifying Autodiscover. A Deep Dive into Autodiscover.
Happy Learning!!