
Mastering Exchange Server 2019 Interview Questions and Answers: Ultimate guide.
Welcome to our comprehensive guide on Exchange Server 2019 interview questions and answers. As organizations increasingly rely on robust email and collaboration platforms, Exchange Server 2019 has emerged as a powerful solution to meet their communication needs. Whether you are a seasoned IT professional preparing for a job interview or an aspiring Exchange Server administrator looking to expand your knowledge, this blog post is your gateway to success.
📌📌We have categorized Microsoft Exchange Server 2019 interview questions and answers in different categories as below:
Freshers
Intermediate Level
Experienced
Advanced Level
Common Exchange Server 2019 interview questions
Exchange Server 2019 troubleshooting questions
Exchange Server 2019 migration interview questions
Exchange Server 2019 architecture questions
Exchange Server 2019 deployment interview questions
Exchange Server 2019 administration questions
Exchange Server 2019 security interview questions
Top 10 frequently asked Microsoft Exchange Server 2019 interview questions and answers
- What are the key features of Exchange Server 2019?
- What is the difference between Exchange Server 2010 and 2019?
- How many roles are available in Microsoft Exchange Server 2019?
- How do you configure email forwarding in Exchange Server 2019?
- What is the role of transport rules in Exchange Server 2019?
- What is the difference between Exchange Server and Outlook?
- How do you create a mailbox in Exchange Server 2019?
- How do you grant mailbox access to another user in Exchange Server 2019?
- What are the different types of recipient objects in Exchange Server 2019?
- What is Autodiscover in Exchange Server?
📌 Learn Exchange Server 2019 + Exchange Hybrid deployment. Refer to free course on our YouTube channel.Microsoft Exchange Server 2019 interview questions and answers for freshers
1. What are the key features of Exchange Server 2019?
Exchange Server 2019 is a messaging and collaboration server developed by Microsoft. It is a part of the Microsoft Exchange Server product line, which provides email, calendar, contact management, and other collaboration services to organizations. Exchange Server is primarily used by businesses and enterprises to manage their internal and external email communication.
Here are some key features of Exchange Server 2019:
- Improved Security: Exchange Server 2019 offers enhanced security features to protect your organization’s email communication. It includes features such as anti-malware and anti-spam protection, built-in data loss prevention (DLP) capabilities, and improved auditing and reporting.
- Enhanced Performance and Scalability: Exchange Server 2019 is designed to handle large amounts of email traffic and offers improved performance and scalability compared to previous versions. It includes support for larger mailboxes and faster search and indexing capabilities, allowing users to access their email and perform searches more efficiently.
- Simplified Administration: Exchange Server 2019 includes administrative features that make it easier to manage and maintain your email environment. It includes an updated Exchange Admin Center (EAC) with a more intuitive and modern interface, making it simpler to perform common administrative tasks.
- Hybrid Deployment Options: Exchange Server 2019 provides seamless integration with Microsoft 365 (formerly Office 365) and supports hybrid deployments. This allows organizations to have a combination of on-premises Exchange servers and cloud-based mailboxes, providing flexibility and options for organizations with varying needs.
- Collaboration and Productivity: Exchange Server 2019 integrates with other Microsoft products and services to enhance collaboration and productivity. It offers integration with SharePoint and Skype for Business, enabling features such as document sharing and real-time communication.
- Improved Outlook Web App (OWA): The web-based interface for accessing Exchange, known as Outlook Web App or Outlook on the web, has been improved in Exchange Server 2019. It provides a modern and responsive interface, allowing users to access their email, calendars, contacts, and other features from any web browser.
- High Availability and Resilience: Exchange Server 2019 includes built-in high availability and resilience features to ensure the continuity of email services. It supports database availability groups (DAGs) for automatic database replication and failover, reducing the impact of hardware or software failures.
- Compliance and Archiving: Exchange Server 2019 offers features to help organizations meet compliance requirements and manage email retention. It includes retention policies, eDiscovery capabilities, and support for third-party archiving solutions, allowing organizations to enforce retention policies and ensure regulatory compliance.
2. What is the difference between Exchange Server 2010 and 2019?
Exchange Server 2010 and Exchange Server 2019 are two different versions of Microsoft’s messaging and collaboration server software. There are several key differences between these two versions. Here are some of the major differences:
- Architecture: Exchange Server 2010 has a traditional server architecture, where different server roles, such as Client Access, Mailbox, and Hub Transport, need to be installed on separate servers. In contrast, Exchange Server 2019 follows a simplified architecture with only two server roles: Mailbox and Edge Transport. This consolidation simplifies deployment and management.
- Security: Exchange Server 2019 provides enhanced security features compared to Exchange Server 2010. It includes features like anti-malware and anti-spam protection, built-in data loss prevention (DLP), and improved auditing and reporting capabilities to help organizations protect their email communication.
- Performance and Scalability: Exchange Server 2019 offers improved performance and scalability compared to Exchange Server 2010. It supports larger mailboxes, faster search and indexing, and has optimizations to handle large amounts of email traffic more efficiently.
- Administration: Exchange Server 2019 introduces an updated Exchange Admin Center (EAC) with a more intuitive and modern interface, making it easier for administrators to manage and maintain the email environment. The management tools and capabilities have been improved to simplify common administrative tasks.
- Hybrid Deployment: Exchange Server 2019 provides seamless integration with Microsoft 365 and supports hybrid deployments. This allows organizations to have a combination of on-premises Exchange servers and cloud-based mailboxes, providing flexibility and options for organizations with varying needs.
- Collaboration and Integration: Exchange Server 2019 integrates with other Microsoft products and services to enhance collaboration and productivity. It offers improved integration with SharePoint and Skype for Business, enabling features such as document sharing and real-time communication.
- Compliance and Archiving: Exchange Server 2019 includes features to help organizations meet compliance requirements and manage email retention. It provides retention policies, eDiscovery capabilities, and supports third-party archiving solutions for enforcing retention policies and ensuring regulatory compliance.
3. How many roles are available in Microsoft Exchange Server 2019?
Microsoft Exchange Server 2019 has 2 roles. Mailbox Server and Edge Transport Server.
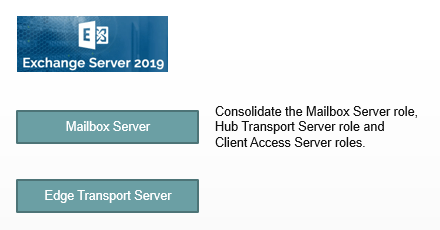
The Exchange Server 2019 mailbox server role includes multiple services and components that interact with each other and provides different messaging features. These services and component’s include client access services, transport services, and mailbox databases. So everything runs on mailbox server except the components of edge transport server role that runs in perimeter network.
4. How do you configure email forwarding in Exchange Server 2019?
To configure email forwarding in Exchange Server 2019, you can use the Exchange Admin Center (EAC) or the Exchange Management Shell (EMS). Here’s how you can accomplish this through both methods:
Using the Exchange Admin Center (EAC):
- Open a web browser and navigate to the Exchange Admin Center URL (e.g., https://<ExchangeServerFQDN>/ECP).
- Log in with appropriate credentials to access the EAC.
- In the EAC, navigate to the “Recipients” section.
- Click on “Mailboxes” to view a list of mailboxes in your organization.
- Select the mailbox for which you want to configure email forwarding.
- In the mailbox properties, click on “Mailbox Features” or “Mailbox Delegation” (depending on the Exchange Server version).
- Under the “Mail Flow” section, locate the option for email forwarding or “Forwarding address.”
- Enable forwarding by selecting the “Enable forwarding” option.
- Specify the email address to which you want to forward the emails.
- Choose whether you want to keep a copy of the forwarded messages in the original mailbox or not.
- Save the changes.
Using the Exchange Management Shell (EMS):
- Launch the Exchange Management Shell, which is the PowerShell interface for managing Exchange Server.
- Run the following command to enable email forwarding for a specific mailbox:
Set-Mailbox -Identity "<MailboxIdentity>" -ForwardingSmtpAddress "<ForwardingEmailAddress>"Replace<MailboxIdentity>with the identity or email address of the mailbox you want to configure, and<ForwardingEmailAddress>with the email address to which you want to forward the emails. - Optionally, you can use the
-DeliverToMailboxAndForward $trueparameter to keep a copy of the forwarded messages in the original mailbox. For exampleSet-Mailbox -Identity "<MailboxIdentity>" -ForwardingSmtpAddress "<ForwardingEmailAddress>" -DeliverToMailboxAndForward $true - Press Enter to execute the command and configure email forwarding for the specified mailbox.
Remember to adjust the commands based on your specific environment and mailbox configurations. Additionally, make sure you have the necessary permissions to perform these actions. Refer to this post to learn more about Se-Mailbox command.
5. What is the role of transport rules in Exchange Server 2019?
Transport rules in Exchange Server 2019 play a crucial role in managing and controlling email communication within an organization. They allow administrators to define and enforce specific conditions and actions on email messages as they pass through the Exchange transport pipeline. Here are some key roles and capabilities of transport rules:
- Message Routing: Transport rules help control the routing of email messages within the Exchange organization. Administrators can create rules based on criteria such as sender, recipient, subject, message content, or other message attributes. These rules can specify actions like redirecting, dropping, or forwarding messages based on the defined criteria.
- Email Security: Transport rules play an essential role in enforcing email security policies. Administrators can create rules to detect and block messages containing sensitive or malicious content, such as confidential information, malware, or phishing attempts. They can also add disclaimers, encryption, or digital signatures to outgoing messages to ensure compliance and protect against data leaks.
- Data Loss Prevention (DLP): Transport rules help implement data loss prevention policies by scanning email messages for specific patterns or sensitive information. Administrators can create rules to detect and prevent the unauthorized transmission of confidential data, such as credit card numbers, social security numbers, or other personally identifiable information (PII). These rules can trigger actions like blocking, redirecting, or notifying when sensitive information is detected.
- Compliance and Legal Requirements: Transport rules assist organizations in meeting compliance and legal requirements related to email communication. Administrators can create rules to enforce retention policies, apply legal disclaimers, or append specific headers to messages for compliance purposes. These rules can help organizations adhere to industry regulations or internal policies regarding email retention, archiving, or information disclosure.
- Message Filtering and Categorization: Transport rules enable advanced message filtering and categorization based on various criteria. Administrators can create rules to automatically tag messages, assign specific priorities, or move them to designated folders. These rules enhance email organization, streamline workflows, and improve message handling based on predefined criteria.
- Customized Email Handling: Transport rules provide the flexibility to customize email handling based on specific organizational requirements. Administrators can create rules to route messages to specific recipients or distribution lists, modify message attributes, or add custom actions based on unique business needs. This allows organizations to tailor email handling processes to their specific workflows.
Transport rules in Exchange Server 2019 are a powerful mechanism for controlling, securing, and managing email flow within an organization. They offer granular control over email routing, security policies, compliance requirements, and customization options. By effectively configuring and deploying transport rules, organizations can ensure efficient email management, compliance with regulations, and data protection.
6. What is the difference between Exchange Server and Outlook?
Exchange Server and Outlook are two distinct but interconnected components of Microsoft’s messaging and collaboration ecosystem. Here are the key differences between Exchange Server and Outlook:
Exchange Server:
- Server Software: Exchange Server is server software developed by Microsoft. It runs on a dedicated server infrastructure and is responsible for managing and storing email, calendars, contacts, and other collaboration data within an organization.
- Backend Infrastructure: Exchange Server acts as the backend infrastructure for email communication. It handles tasks such as receiving, delivering, and routing email messages, managing mailboxes and user accounts, enforcing security policies, and providing features like shared calendars, public folders, and distribution lists.
- On-Premises or Cloud-Based: Exchange Server can be deployed either on-premises or in the cloud. On-premises deployments involve setting up and maintaining dedicated servers within an organization’s own infrastructure. Cloud-based deployments leverage Microsoft 365 (formerly Office 365) as a service, where Exchange Server is hosted and managed by Microsoft in their data centers.
Outlook:
- Client Application: Outlook is a client application used to access and interact with Exchange Server or other email systems. It provides a user-friendly interface for managing email, calendars, contacts, tasks, and other collaboration features.
- Email Client: Outlook serves as an email client, allowing users to send, receive, and organize email messages. It offers features such as inbox management, email search, attachment handling, and support for multiple email accounts.
- Integration with Exchange Server: Outlook integrates tightly with Exchange Server, leveraging its features and capabilities. It provides enhanced functionality when connected to an Exchange Server, such as real-time synchronization of emails, calendars, and contacts, access to shared mailboxes and calendars, and support for Exchange-specific features like out-of-office replies and meeting scheduling.
- Multiple Platforms: Outlook is available as a desktop application for Windows and macOS, as well as a mobile app for iOS and Android devices. It provides a consistent user experience across these platforms and enables users to access their email and collaboration data from different devices.
7. How do you create a mailbox in Exchange Server 2019?
To create a mailbox in Exchange Server 2019, you can use the Exchange Admin Center (EAC) or the Exchange Management Shell (EMS). Here’s how you can create a mailbox through both methods:
Using the Exchange Admin Center (EAC):
- Open a web browser and navigate to the Exchange Admin Center URL (e.g., https://<ExchangeServerFQDN>/ECP).
- Log in with appropriate credentials to access the EAC.
- In the EAC, navigate to the “Recipients” section.
- Click on “Mailboxes” to view a list of existing mailboxes in your organization.
- Click on the “New” button to create a new mailbox.
- Select the mailbox type you want to create, such as “User mailbox,” “Room mailbox,” or “Shared mailbox.”
- Fill in the required information for the new mailbox, such as display name, email address, and password.
- Configure additional settings, such as mailbox size limits, email address policies, and mailbox permissions, as needed.
- Click on the “Save” or “Finish” button to create the mailbox.
Using the Exchange Management Shell (EMS):
- Launch the Exchange Management Shell, which is the PowerShell interface for managing Exchange Server.
- Run the following command to create a new user mailbox:
New-Mailbox -UserPrincipalName "<UserPrincipalName>" -Name "<DisplayName>" -Alias "<Alias>" -Password (ConvertTo-SecureString -String "<Password>" -AsPlainText -Force) -OrganizationalUnit "<OrganizationalUnit>"Replace<UserPrincipalName>with the user principal name for the mailbox,<DisplayName>with the display name for the mailbox,<Alias>with the mailbox alias,<Password>with the password for the mailbox, and<OrganizationalUnit>with the distinguished name (DN) of the organizational unit where the mailbox should be created. - Press Enter to execute the command and create the mailbox.
Learn more about New-Mailbox.
8. How do you grant mailbox access to another user in Exchange Server 2019?
To grant mailbox access to another user in Exchange Server 2019, you can use the Exchange Admin Center (EAC) or the Exchange Management Shell (EMS). Here’s how you can accomplish this through both methods:
Using the Exchange Admin Center (EAC):
- Open a web browser and navigate to the Exchange Admin Center URL (e.g., https://<ExchangeServerFQDN>/ECP).
- Log in with appropriate credentials to access the EAC.
- In the EAC, navigate to the “Recipients” section.
- Click on “Mailboxes” to view a list of existing mailboxes in your organization.
- Select the mailbox for which you want to grant access.
- In the mailbox properties, click on “Mailbox Delegation” or “Mailbox Permissions” (depending on the Exchange Server version).
- Locate the option to add mailbox access or grant permissions.
- Add the user or users to whom you want to grant access to the mailbox. You can search for users by name or email address.
- Specify the level of access permissions you want to grant, such as Full Access, Send As, or Send on Behalf.
- Save the changes.
Using the Exchange Management Shell (EMS):
- Launch the Exchange Management Shell, which is the PowerShell interface for managing Exchange Server.
- Run the following command to grant mailbox access to another user:
Add-MailboxPermission -Identity "<MailboxIdentity>" -User "<UserOrGroupIdentity>" -AccessRights "<AccessRights>"Replace<MailboxIdentity>with the identity or email address of the mailbox to which you want to grant access,<UserOrGroupIdentity>with the identity or email address of the user or security group you want to grant access to, and<AccessRights>with the specific access rights you want to grant, such as FullAccess, SendAs, or SendOnBehalf. - Press Enter to execute the command and grant mailbox access to the specified user or group.
Learn more about Add-MailboxPermission command.
9. What are the different types of recipient objects in Exchange Server 2019?
In Exchange Server 2019, there are several different types of recipient objects that can be created and managed. Each recipient object represents a specific entity or role within the Exchange organization. Here are the main types of recipient objects in Exchange Server 2019:
- User Mailbox: A user mailbox is associated with an individual user and contains their email messages, calendar, contacts, and other collaboration data. It is typically used for personal email communication and can be accessed through clients like Outlook or mobile devices.
- Room Mailbox: A room mailbox represents a physical location, such as a meeting room or conference room. It is used for scheduling and managing room reservations and can automatically accept or decline meeting requests based on availability. Room mailboxes help facilitate efficient meeting management within the organization.
- Equipment Mailbox: An equipment mailbox represents a shared resource, such as a projector, company vehicle, or other equipment. It is used for scheduling and managing the reservation of equipment resources within the organization. Equipment mailboxes can automatically accept or decline booking requests based on availability.
- Shared Mailbox: A shared mailbox is used to provide a centralized email address that multiple users can access and manage. It is typically used for shared departments or teams where multiple individuals need access to a common mailbox. Shared mailboxes do not have their own login credentials and are accessed through Outlook or other email clients.
- Distribution Group: A distribution group is a collection of email addresses that can be used to send emails to multiple recipients simultaneously. It is commonly used for group communication or for sharing information with a specific set of users. Distribution groups can be created as either a distribution group with email capabilities or a security group for granting permissions.
- Dynamic Distribution Group: A dynamic distribution group is similar to a distribution group, but its membership is based on specific criteria or filters rather than being manually managed. The membership of a dynamic distribution group is automatically determined based on attributes of recipient objects, such as department, location, or job title. This allows for dynamic updating of the group membership as users’ attributes change.
- Mail-Enabled Security Group: A mail-enabled security group combines the capabilities of a security group and a distribution group. It can be used to grant access permissions to resources while also allowing email communication to the group members. Mail-enabled security groups are commonly used for managing both security and distribution purposes.
10. What is Autodiscover in Exchange Server?
Autodiscover is a feature in Microsoft Exchange Server that allows client applications to automatically configure and discover the settings required to connect to an Exchange mailbox. It simplifies the process of setting up email clients such as Microsoft Outlook or mobile devices by automatically detecting the correct server and connection settings.
When a client application attempts to connect to an Exchange server, it sends an Autodiscover request to a predetermined URL (usually autodiscover.domain.com). The Autodiscover service responds with a set of configuration settings, including the server address, authentication methods, and other connection details.
Autodiscover relies on a series of predefined steps to determine the optimal configuration for the client. It first checks for a Service Connection Point (SCP) in Active Directory, which provides information about the Autodiscover service. If an SCP is not found or not accessible, it falls back to a series of other methods, such as querying the Domain Name System (DNS) for Autodiscover records or attempting to connect to specific URLs.
By using Autodiscover, users can simply enter their email address and password into their client application, and the necessary configuration settings are automatically retrieved, eliminating the need for manual setup and reducing the chance of errors. It also enables features like automatic account setup, out-of-office (OOF) settings, and offline address book (OAB) distribution.
Autodiscover is a crucial component of Exchange Server, especially in environments with multiple mailboxes and complex configurations. It streamlines the process of connecting clients to Exchange, improves user experience, and ensures consistent and accurate configuration across different devices and applications.
Microsoft Exchange Server 2019 interview questions and answers for intermediate level
11. How do you configure mobile device access in Exchange Server 2019?
To configure mobile device access in Exchange Server 2019, you can follow these general steps:
- Configure Exchange ActiveSync Policies: Exchange ActiveSync (EAS) is the protocol used by mobile devices to connect to Exchange Server. Start by creating and configuring EAS policies to control the features and settings available to mobile devices. You can define policies for device PIN requirements, device encryption, password complexity, and other security measures.
- Enable Exchange ActiveSync for Mailboxes: Once the EAS policies are in place, you need to enable Exchange ActiveSync for the desired user mailboxes. This can be done using the Exchange Admin Center (EAC) or PowerShell commands. Ensure that the relevant mailboxes have the necessary permissions to access Exchange ActiveSync.
- Configure Autodiscover: Autodiscover is a crucial component that helps mobile devices discover and connect to Exchange Server. Make sure that Autodiscover is properly configured on your Exchange Server by setting up the necessary DNS records and ensuring that the Autodiscover service is functioning correctly.
- Configure SSL Certificates: Secure Sockets Layer (SSL) certificates are essential for securing the communication between mobile devices and Exchange Server. Obtain a valid SSL certificate from a trusted certificate authority and install it on your Exchange Server. Ensure that the certificate is correctly configured for the required services, including Exchange ActiveSync.
- Test Mobile Device Connectivity: Once the configuration is complete, it’s important to test mobile device connectivity to verify that everything is working as expected. Use a test device or emulator to connect to Exchange Server using Exchange ActiveSync. Verify that email synchronization, calendar, contacts, and other features are functioning correctly.
- Monitor and Manage Mobile Devices: Exchange Server provides various tools and features to monitor and manage mobile devices. You can use the Exchange Admin Center or PowerShell to view and manage mobile devices connected to Exchange Server. Monitor device activity, enforce policies, and take necessary actions to maintain security and compliance.
12. What are the differences between Exchange Server 2019 and Exchange Server 2016?
Exchange Server 2019 and Exchange Server 2016 are two different versions of Microsoft’s email and collaboration platform. While they share many similarities, there are several notable differences between the two versions. Here are some of the key differences:
- Architecture: Exchange Server 2019 introduced a new server architecture called the “Modern Hybrid Topology,” which combines both on-premises and cloud-based features. This architecture allows for better integration with Office 365 and provides enhanced hybrid deployment capabilities. Exchange Server 2016, on the other hand, does not have this modern hybrid architecture.
- Support for Windows Server: Exchange Server 2019 requires Windows Server 2019 as the underlying operating system. Exchange Server 2016, on the other hand, is compatible with Windows Server 2012 and Windows Server 2016.
- Database Availability Group (DAG) Improvements: Exchange Server 2019 introduced several enhancements to the Database Availability Group (DAG) feature, which provides high availability and resilience for mailbox databases. These improvements include faster failover times and better overall database availability compared to Exchange Server 2016.
- Performance and Scalability: Exchange Server 2019 offers improved performance and scalability compared to Exchange Server 2016. It can handle larger mailboxes and provides better overall performance for both client connectivity and server operations.
- Enhanced Security: Exchange Server 2019 introduced several security enhancements, including the ability to enable Anti-Malware protection at the server level, support for disabling legacy authentication protocols, and better control over sensitive data through data loss prevention (DLP) policies.
- Outlook Web App (OWA) Features: Exchange Server 2019 includes an updated version of Outlook Web App (now called Outlook on the Web), which offers a more modern and responsive user interface. Exchange Server 2016 has an earlier version of OWA.
- Calendar Improvements: Exchange Server 2019 introduced new features for calendar management, such as simplified calendar sharing, enhanced calendar attachments, and better calendar search capabilities.
13. How do you configure database availability groups (DAGs) in Exchange Server 2019?
To configure a Database Availability Group (DAG) in Exchange Server 2019, you can follow these general steps:
- Prepare the Environment:
- Ensure that you have installed the required operating system (Windows Server 2019) on the servers that will be part of the DAG.
- Install the necessary Windows Server roles and features, such as Failover Clustering and .NET Framework.
- Configure the Network:
- Assign static IP addresses to each server that will be part of the DAG.
- Make sure that the servers can communicate with each other over the network and that any firewalls or network devices allow the necessary traffic.
- Create a DAG:
- Open the Exchange Management Shell, which is a PowerShell-based command-line interface for managing Exchange Server.
- Use the
New-DatabaseAvailabilityGroupcmdlet to create a new DAG. Specify a name for the DAG, an IP address for the DAG’s cluster, and any other desired parameters.
- Add Servers to the DAG:
- Use the
Add-DatabaseAvailabilityGroupServercmdlet to add Exchange servers to the newly created DAG. Specify the server name and the name of the DAG.
- Use the
- Configure Database Copies:
- Create mailbox databases on the servers within the DAG. You can use the Exchange Admin Center (EAC) or the Exchange Management Shell to create mailbox databases.
- Use the
Add-MailboxDatabaseCopycmdlet to add database copies to the DAG members. Specify the name of the database, the server, and the path where the database copy will be stored.
- Configure Database Activation Preference:
- Set the activation preference for each database copy within the DAG. This determines the preferred order in which database copies are activated in case of a failover. Use the
Set-MailboxDatabaseCopycmdlet with the-ActivationPreferenceparameter.
- Set the activation preference for each database copy within the DAG. This determines the preferred order in which database copies are activated in case of a failover. Use the
- Test and Monitor:
- Validate the DAG configuration by performing tests and failover simulations to ensure that mailbox databases are highly available and can fail over successfully.
- Monitor the DAG’s health and performance using Exchange Server tools, such as the Exchange Management Shell cmdlets, Exchange Admin Center, and third-party monitoring solutions.
14. How do you set up message tracking in Exchange Server 2019?
To set up message tracking in Exchange Server 2019 and enable the tracking of email messages within your organization, you can follow these steps:
- Verify Message Tracking Settings:
- Open the Exchange Management Shell, which is a PowerShell-based command-line interface for managing Exchange Server.
- Use the
Get-TransportServicecmdlet to check the message tracking settings on your Exchange servers. Ensure that theMessageTrackingLogEnabledparameter is set toTrue.
- Configure Message Tracking Logs:
- Use the
Set-TransportServicecmdlet to configure the location and maximum age of the message tracking logs. For example, you can set the log path and specify the maximum age in days using the-MessageTrackingLogPathand-MessageTrackingLogMaxAgeparameters.
- Use the
- Enable Message Tracking Log Search:
- By default, message tracking log search is enabled on Exchange Server 2019. However, you can verify the setting by using the
Get-TransportServercmdlet and ensuring that theMessageTrackingLogEnabledparameter is set toTrue.
- By default, message tracking log search is enabled on Exchange Server 2019. However, you can verify the setting by using the
- Search and Retrieve Message Tracking Logs:
- Use the
Get-MessageTrackingLogcmdlet to search and retrieve message tracking logs. This cmdlet allows you to specify various parameters to narrow down the search, such as sender, recipient, subject, date range, and more. - For example, you can use the following command to search for all messages sent by a specific sender within a specific time range:
Get-MessageTrackingLog -Sender "sender@example.com" -Start "2023-05-01 00:00:00" -End "2023-05-31 23:59:59"
- Use the
- Analyze and Interpret Message Tracking Results:
- Once you retrieve the message tracking logs, you can analyze the results to gather information about email message delivery, routing, and other details. The logs provide information such as the sender, recipient, subject, timestamps, message status, delivery events, and more.
- Export Message Tracking Logs (Optional):
- If needed, you can export the message tracking logs to a file for further analysis or archival purposes. You can use the
Export-Csvcmdlet to export the logs in CSV format or theOut-Filecmdlet to save them in a text file.
- If needed, you can export the message tracking logs to a file for further analysis or archival purposes. You can use the
15. How do you troubleshoot common mail flow issues in Exchange Server 2019?
When troubleshooting common mail flow issues in Exchange Server 2019, you can follow these general steps to identify and resolve the problems:
- Verify Network Connectivity:
- Ensure that there is proper network connectivity between the Exchange servers, as well as with external mail servers. Check for any network issues, such as firewall blocking or DNS resolution problems.
- Check Transport Service Status:
- Use the Exchange Management Shell to check the status of the Transport service on Exchange servers. Use the
Get-Servicecmdlet to verify if the Microsoft Exchange Transport service is running.
- Use the Exchange Management Shell to check the status of the Transport service on Exchange servers. Use the
- Review Event Logs:
- Check the Exchange server’s Event Viewer logs for any error messages or warnings related to mail flow. Look for events in the Application or System logs that may provide information about the specific issue.
- Test Message Flow Internally:
- Send test emails between mailboxes within the organization. Verify if the messages are being delivered successfully and check for any delay or non-delivery issues. Use message tracking logs (
Get-MessageTrackingLogcmdlet) to track the message flow.
- Send test emails between mailboxes within the organization. Verify if the messages are being delivered successfully and check for any delay or non-delivery issues. Use message tracking logs (
- Test Message Flow Externally:
- Send test emails from external sources (e.g., personal email account) to verify if incoming messages are reaching the Exchange server. Check for any error messages, non-delivery reports (NDRs), or delay in message delivery.
- Check DNS Configuration:
- Ensure that the Exchange server’s DNS configuration is correct. Verify the MX record, A record, and PTR record for the Exchange server’s domain. Use tools like nslookup or PowerShell cmdlets (
Test-NetConnection,Resolve-DnsName) to perform DNS checks.
- Ensure that the Exchange server’s DNS configuration is correct. Verify the MX record, A record, and PTR record for the Exchange server’s domain. Use tools like nslookup or PowerShell cmdlets (
- Review Send and Receive Connectors:
- Verify the configuration of send and receive connectors on the Exchange server. Check the settings for inbound and outbound mail flow, authentication methods, IP address restrictions, and transport rules. Ensure the connectors are correctly configured to handle incoming and outgoing mail.
- Check Mailbox and Database Settings:
- Review mailbox settings and database configuration to ensure there are no specific restrictions or issues affecting mail flow. Verify mailbox size limits, message delivery restrictions, and database availability.
- Antivirus and Anti-Spam Software:
- If you have antivirus or anti-spam software installed on the Exchange server, check the configuration and logs to ensure they are not causing mail flow issues. Temporarily disabling or adjusting the settings might help identify the problem.
16. How do you configure email archiving in Exchange Server 2019?
To configure email archiving in Exchange Server 2019, you can follow these steps, which include both the graphical interface (Exchange Admin Center) and PowerShell commands:
- Enable Archiving on a Mailbox Database:
- Exchange Admin Center:
- Navigate to Servers > Databases in the Exchange Admin Center (EAC).
- Select the mailbox database where you want to enable archiving.
- Click on the “…” (ellipsis) button and choose “Properties.”
- Under the “Maintenance” tab, check the “Enable archive mailbox” option.
- Save the changes.
- PowerShell Command:
Set-MailboxDatabase -Identity <DatabaseName> -Archive -ArchiveDomain <ArchiveDomain>
- Exchange Admin Center:
- Create a Retention Policy:
- Exchange Admin Center:
- Navigate to Compliance Management > Retention Policies in the EAC.
- Click on the “+” (plus) button to create a new retention policy.
- Specify a name and description for the policy.
- Add retention tags to the policy, defining the retention settings for specific types of items (e.g., Inbox, Sent Items, All Mail).
- Save the policy.
- PowerShell Command:
New-RetentionPolicy -Name <PolicyName> -RetentionPolicyTagLinks <Tag1>,<Tag2>,...
- Exchange Admin Center:
- Assign the Retention Policy to Mailboxes:
- Exchange Admin Center:
- Navigate to Recipients > Mailboxes in the EAC.
- Select the mailbox to which you want to assign the retention policy.
- Click on the “…” (ellipsis) button and choose “Properties.”
- Under the “Mailbox Settings” tab, select “Messaging Records Management.”
- Choose the retention policy from the list and click “OK.”
- Save the changes.
- PowerShell Command:
Set-Mailbox -Identity <MailboxIdentity> -RetentionPolicy "<PolicyName>"
- Exchange Admin Center:
- Verify and Test Archiving:
- Ensure that archiving is working as expected by sending test emails, verifying that the archiving policy is applied, and checking if the archived items appear in the respective archive mailbox.
17. How do you configure secure external sharing in Exchange Server 2019?
To configure secure external sharing in Exchange Server 2019, you can follow these steps:
- Configure External Access Control: Start by defining the level of external access allowed for your Exchange Server. You can specify this by configuring the ExternalAccessEnabled parameter on the OWA (Outlook Web App) virtual directory. For example, to allow external access for authenticated users only, use the following Exchange Management Shell command:
Set-OwaVirtualDirectory -Identity "owa (Default Web Site)" -ExternalAuthenticationMethods Fba - Enable Secure Sockets Layer (SSL) for External Access: SSL encryption is crucial to secure external communications. Ensure that you have an SSL certificate installed on your Exchange Server and enable SSL for the OWA virtual directory. Use the following command to enable SSL on the OWA virtual directory:
Set-OwaVirtualDirectory -Identity "owa (Default Web Site)" -ExternalUrl https://mail.contoso.com/owa - Enable Multi-Factor Authentication (MFA): To add an extra layer of security, consider implementing multi-factor authentication for external access. Exchange Server 2019 integrates with Azure Active Directory and supports MFA.You can enable MFA for users accessing Exchange Server externally through Azure Active Directory.
- Implement Transport Layer Security (TLS): TLS encryption ensures secure communication between Exchange servers and external systems. Configure Exchange Server to use TLS for external communication by enabling the required Receive connectors and Send connectors. For example, you can configure a Receive connector to use opportunistic TLS encryption with the following command:
Set-ReceiveConnector -Identity "Receive Connector" -RequireTLS $true - Implement Message Encryption: If you need to send sensitive or confidential information externally, consider implementing message encryption. Exchange Server 2019 supports S/MIME (Secure/Multipurpose Internet Mail Extensions) encryption. You can configure message encryption policies to automatically encrypt messages based on specified conditions, such as specific recipients or sensitive keywords.
- Regularly Update and Patch Exchange Server: To ensure the security of your Exchange Server environment, it’s essential to keep it up to date with the latest security patches and updates. Stay informed about security bulletins and apply updates promptly.
18. What is the role of Edge Transport server in Exchange Server 2019?
The Edge Transport server is a role within Exchange Server 2019 that is designed to provide enhanced security and protection for your organization’s messaging environment. Its primary role is to handle external mail flow and act as a secure boundary between your internal Exchange organization and the external network.
Here are some key functions and responsibilities of the Edge Transport server role:
- Secure Mail Flow: The Edge Transport server serves as the first point of contact for incoming and outgoing email messages from the internet. It applies various security measures, including anti-spam filtering, malware detection, and message hygiene checks, to protect your organization from unsolicited or malicious email threats.
- Spam and Malware Filtering: The Edge Transport server can be configured with anti-spam agents to filter and block unsolicited or spam emails. It uses various techniques such as IP blocklists, content filtering, sender reputation checks, and real-time blackhole lists (RBLs) to identify and discard spam messages. Additionally, it integrates with anti-malware solutions to scan email attachments for known viruses or malware.
- Transport Rule Enforcement: Exchange Server allows you to define transport rules that apply specific actions or conditions to email messages as they pass through the transport pipeline. The Edge Transport server enforces these transport rules for both inbound and outbound messages, allowing you to apply policy-based actions such as encryption, message classification, or blocking certain types of content.
- Secure Message Relay: The Edge Transport server acts as a relay point for messages between your internal Exchange organization and external entities, such as partner organizations or other email systems. It provides a secure and controlled communication channel, preventing direct access to your internal Exchange servers from the internet.
- Edge Synchronization: Exchange Server supports a feature called EdgeSync, which allows the Edge Transport server to synchronize recipient and configuration data with the internal Exchange organization. This synchronization ensures that the Edge Transport server has the most up-to-date information about mail-enabled recipients and transport configuration settings.
19. How do you perform mailbox migrations from older Exchange versions to Exchange Server 2019?
Performing mailbox migrations from older Exchange versions to Exchange Server 2019 can be done using different methods, depending on your specific requirements and the version of Exchange you are migrating from. Here are two common approaches for mailbox migration:
- Exchange Server Migration Assistant (ESMA) and Hybrid Migration:
- The Hybrid migration method is suitable if you have an existing on-premises Exchange organization and want to gradually move mailboxes to Exchange Server 2019 while maintaining coexistence with the older version.
- Start by setting up a hybrid deployment between your older Exchange version and Exchange Server 2019. This involves configuring the Exchange Server 2019 environment and establishing the necessary connectivity with Exchange Online (if you plan to move to Exchange Online as part of a hybrid setup).
- Use the Exchange Server Migration Assistant (ESMA) to perform mailbox migrations. ESMA is a free tool provided by Microsoft that simplifies the migration process. It can be used for migrating mailboxes from Exchange Server 2010 or later versions to Exchange Server 2019.
- With the hybrid configuration in place, you can move mailboxes in batches using the Exchange Admin Center (EAC) or PowerShell cmdlets, ensuring a smooth transition while maintaining coexistence and minimizing user disruption.
- PST File Import:
- The PST file import method is useful when migrating from older versions of Exchange that do not support hybrid deployments or when you want to perform a cutover migration without maintaining coexistence.
- Start by exporting mailboxes from the older Exchange version to PST files. This can be done using tools like the Exchange Admin Center (EAC) or the New-MailboxExportRequest PowerShell cmdlet.
- Once you have the PST files, create new mailboxes on Exchange Server 2019 for each user and use the Import-Mailbox or New-MailboxImportRequest cmdlet to import the PST data into the new mailboxes.
- Depending on the number of mailboxes, you can perform the PST imports manually or automate the process using scripts.
- After the PST imports are completed, reconfigure client devices (e.g., Outlook) to connect to the new Exchange Server.
20. How do you configure a hybrid deployment with Exchange Server 2019 and Office 365?
To configure a hybrid deployment with Exchange Server 2019 and Office 365, you need to perform several steps to establish the necessary connectivity and enable coexistence between the on-premises and cloud environments. Here’s a general overview of the configuration process:
- Verify Prerequisites:
- Ensure that your Exchange Server 2019 environment meets the system requirements and is updated with the latest service packs and cumulative updates.
- Verify that you have an Office 365 subscription with Exchange Online licenses and administrative access to both the on-premises and Office 365 environments.
- Configure Office 365 Tenant:
- Set up and configure your Office 365 tenant, including domain verification and adding the necessary DNS records to prove domain ownership.
- Assign appropriate licenses to users who will be migrated to Exchange Online.
- Establish Connectivity:
- Establish a secure and reliable network connection between your on-premises Exchange Server and Office 365. This may involve configuring a VPN, ExpressRoute, or other connectivity options.
- Ensure that your on-premises Exchange Server has a public certificate for secure communication with Exchange Online.
- Prepare On-Premises Exchange Server:
- Install the Hybrid Configuration Wizard (HCW) on a server in your on-premises Exchange organization.
- Run the HCW and follow the wizard to configure the hybrid deployment. This includes specifying the Office 365 tenant details, selecting the appropriate hybrid features, and configuring the Exchange Federation Trust.
- Configure Hybrid Features:
- Customize the hybrid configuration by enabling or disabling specific features based on your requirements. For example, you can configure shared free/busy calendar availability, cross-premises mail flow, and centralized mail transport.
- Decide whether you want to use a cloud-based archive or enable on-premises archiving with Exchange Online mailboxes.
- Test and Validate the Hybrid Configuration:
- Perform testing and validation to ensure the hybrid configuration is working as expected. This includes verifying mailbox moves, free/busy calendar sharing, mail flow, and other features.
- Use the Office 365 Hybrid Configuration Wizard or the Exchange Management Shell to troubleshoot and resolve any configuration issues.
- Migrate Mailboxes:
- Once the hybrid configuration is validated, you can begin migrating mailboxes from Exchange Server 2019 to Exchange Online.
- You can use various migration methods, such as remote mailbox move, staged migration, or cutover migration, depending on your migration strategy and the number of mailboxes to be moved.
- Monitor the migration process and ensure that all mailboxes are successfully moved to Exchange Online.
- Decommission On-Premises Exchange Servers (Optional):
- If you plan to fully migrate to Exchange Online, you can decommission your on-premises Exchange Server after verifying that all mailboxes and services are working correctly in the cloud.
Check our blog post on Exchange Hybrid interview question and answers.
Microsoft Exchange Server 2019 interview questions and answers for experienced
21. How do you configure database maintenance in Exchange Server 2019?
To configure database maintenance in Exchange Server 2019, you can follow these steps:
- Understand Database Maintenance in Exchange Server:
- Database maintenance refers to the regular tasks performed on Exchange Server databases to ensure their optimal performance, integrity, and recoverability.
- Key maintenance tasks include online maintenance (background database optimization), database and log file backups, and database integrity checks.
- Configure Online Maintenance:
- Online maintenance is an automated process that runs in the background to perform database optimization tasks.
- By default, Exchange Server 2019 performs online maintenance daily between 01:00 AM and 05:00 AM. You can modify the maintenance schedule if needed.
- To configure the maintenance schedule, use the Set-MailboxDatabase cmdlet:
Set-MailboxDatabase -Identity <DatabaseName> -MaintenanceSchedule "Sun.02:00-Sun.06:00,Mon.02:00-Mon.06:00,Tue.02:00-Tue.06:00"
- Schedule Database and Log File Backups:
- Regular backups are crucial for data protection and disaster recovery.
- Implement a backup solution that supports Exchange Server 2019 and schedule database and log file backups accordingly.
- Configure backup software to perform full and incremental backups of Exchange Server databases and log files on a regular basis, following best practices for your specific backup solution.
- Enable Circular Logging (Optional):
- By default, circular logging is disabled in Exchange Server, which means log files accumulate over time until a successful backup is performed.
- If you prefer to enable circular logging to minimize log file growth, keep in mind that you won’t be able to perform point-in-time recovery.
- To enable circular logging, use the following Exchange Management Shell command:
Set-MailboxDatabase -Identity <DatabaseName> -CircularLoggingEnabled $true
- Perform Regular Database Integrity Checks:
- Regular database integrity checks help identify and repair any corruption or inconsistencies in Exchange Server databases.
- You can use the Eseutil utility to perform offline integrity checks. It’s recommended to schedule integrity checks during periods of low user activity.
- Here’s an example of how to perform an offline database integrity check:
eseutil /g <DatabaseFile>.edb
- Monitor and Maintain Disk Space:
- Monitor the disk space usage on the server hosting Exchange Server databases.
- Ensure that you have enough free disk space to accommodate database growth and perform backups.
- Regularly monitor and manage transaction log files to prevent excessive growth and ensure sufficient disk space.
22. What are the considerations for deploying Exchange Server 2019 in a multi-site environment?
When deploying Exchange Server 2019 in a multi-site environment, there are several important considerations to take into account to ensure proper functionality, high availability, and efficient communication between sites. Here are key factors to consider:
- Active Directory (AD) Design:
- Plan your Active Directory infrastructure to support multiple sites. Implement multiple domain controllers across sites for redundancy and fault tolerance.
- Configure appropriate site links and define replication schedules to optimize AD replication between sites.
- Exchange Server Roles and Placement:
- Determine the appropriate placement of Exchange Server roles based on your multi-site architecture and requirements.
- Consider deploying Mailbox servers in each site to provide local mailbox access and reduce latency for users.
- Distribute Client Access servers (CAS) across sites to ensure optimal client connectivity and load balancing.
- Deploy Edge Transport servers at each site to handle external mail flow and provide a secure boundary.
- Network Connectivity and Bandwidth:
- Establish reliable and fast network connectivity between sites to support Exchange Server communication and replication.
- Evaluate the bandwidth requirements for inter-site traffic, including mailbox replication, public folder replication, and client connectivity.
- Consider implementing technologies like WAN optimization or QoS (Quality of Service) to optimize network performance and prioritize Exchange traffic.
- High Availability and Redundancy:
- Implement high availability mechanisms to ensure continuous availability of Exchange services across sites.
- Consider deploying Database Availability Groups (DAGs) for mailbox database replication and failover between sites.
- Configure database copies and database activation preferences to control failover behavior in a multi-site environment.
- Implement load balancing solutions for CAS servers to distribute client traffic and provide redundancy.
- Namespace Planning:
- Plan your namespace strategy to provide consistent and accessible URLs for Exchange services across sites.
- Use technologies like DNS round-robin, load balancers, or DNS-based GSLB (Global Server Load Balancing) to distribute client requests to the appropriate site.
- Consider implementing site-resilient namespaces to handle failover scenarios and ensure seamless client connectivity.
- Data Protection and Disaster Recovery:
- Implement backup and recovery strategies for Exchange Server databases and other critical components in each site.
- Consider deploying lagged database copies to provide additional protection against data corruption or accidental deletions.
- Implement disaster recovery plans that include procedures for site failover, data restoration, and service restoration in case of a major site outage.
- Monitoring and Management:
- Set up monitoring and management tools to ensure visibility and proactive monitoring of Exchange Server health and performance across sites.
- Utilize centralized management solutions, such as the Exchange Admin Center (EAC) or PowerShell remoting, to efficiently manage Exchange servers in a multi-site environment.
23. How do you configure Exchange Server 2019 for coexistence with legacy Exchange versions?
When configuring Exchange Server 2019 for coexistence with legacy Exchange versions, such as Exchange Server 2016 or Exchange Server 2013, you need to perform several steps to ensure smooth communication and seamless migration between the environments. Here’s a general overview of the configuration process:
- Verify System Requirements:
- Ensure that your Exchange Server 2019 environment meets the system requirements and is updated with the latest service packs and cumulative updates.
- Verify the system requirements for the legacy Exchange versions you are planning to coexist with.
- Configure Certificates and External Connectivity:
- Obtain and install a valid SSL certificate for Exchange Server 2019 that includes the required namespaces (e.g., autodiscover.domain.com, mail.domain.com).
- Configure the appropriate DNS records and firewall rules to allow external connectivity to Exchange Server 2019.
- Prepare Legacy Exchange Environment:
- Ensure that your legacy Exchange environment is updated with the latest service packs and cumulative updates.
- Configure the virtual directories (e.g., Autodiscover, OWA, ECP) in the legacy Exchange environment to use a different namespace than the Exchange Server 2019 environment.
- Configure Virtual Directories:
- In Exchange Server 2019, configure the virtual directories to use the appropriate namespace and URL paths.
- Ensure that the Autodiscover virtual directory in Exchange Server 2019 is set up properly to handle Autodiscover requests for both the legacy Exchange environment and Exchange Server 2019.
- Configure Organization Relationships:
- Create an organization relationship between the legacy Exchange environment and Exchange Server 2019.
- This relationship enables free/busy calendar sharing, mail flow, and other coexistence features between the two environments.
- Use the New-OrganizationRelationship cmdlet in Exchange Server 2019 to configure the relationship.
- Configure Mail Flow:
- Configure mail flow connectors to allow mail flow between the legacy Exchange environment and Exchange Server 2019.
- Create Send and Receive connectors to establish mail flow between the two environments.
- Ensure that mail routing is properly configured to handle recipient lookups and deliver messages to the appropriate environment.
- Test Coexistence Functionality:
- Perform testing to ensure that coexistence features, such as free/busy calendar sharing, mail flow, and cross-version mailbox moves, are functioning as expected.
- Test migration scenarios, including moving mailboxes from the legacy Exchange environment to Exchange Server 2019, to ensure a smooth transition.
24. How do you troubleshoot performance issues in Exchange Server 2019?
When troubleshooting performance issues in Exchange Server 2019, it’s important to follow a systematic approach to identify the root cause and implement appropriate solutions. Here are some steps you can take to troubleshoot performance issues:
- Define the Problem:
- Clearly define the performance issue you are experiencing, such as slow mailbox access, delayed message delivery, or high resource utilization.
- Gather specific details about the symptoms, affected users, and any error messages or event logs related to the issue.
- Monitor and Analyze Performance Metrics:
- Use performance monitoring tools, such as Performance Monitor (PerfMon) or Exchange Management Shell cmdlets, to collect performance data.
- Monitor key performance indicators (KPIs) such as CPU utilization, memory usage, disk I/O, and network utilization.
- Analyze performance data to identify any patterns, spikes, or abnormalities that may indicate the cause of the performance issue.
- Review Event Logs:
- Check the Exchange Server event logs for any error or warning messages that might provide insights into the performance issue.
- Look for event IDs related to performance, such as resource exhaustion, database failures, or connectivity issues.
- Investigate and address any identified errors or warnings.
- Check System Resources:
- Verify that the Exchange Server has sufficient system resources, including CPU, memory, disk space, and network bandwidth.
- Ensure that the server hardware meets the recommended specifications for Exchange Server 2019.
- Identify any resource bottlenecks and take appropriate measures to address them, such as adding more resources or optimizing resource usage.
- Review Exchange Server Configuration:
- Review the configuration of Exchange Server components, including databases, virtual directories, connectors, and transport settings.
- Verify that the configuration aligns with best practices and is suitable for your environment.
- Make any necessary adjustments to optimize performance, such as adjusting mailbox database settings, optimizing virtual directory settings, or adjusting transport settings.
- Check for Mailbox and Database Issues:
- Investigate specific mailbox or database-related issues that may impact performance, such as large mailboxes, corrupt databases, or database fragmentation.
- Use Exchange Management Shell cmdlets, such as Get-MailboxStatistics and ESEUTIL, to check mailbox and database health.
- Take corrective actions, such as archiving or managing large mailboxes, running mailbox maintenance scripts, or performing database maintenance tasks.
- Review Third-Party Applications and Add-ins:
- Identify and evaluate any third-party applications or add-ins running on the Exchange Server.
- Determine if any of these applications are causing performance issues or conflicts.
- Consider disabling or removing any unnecessary or problematic third-party applications or add-ins.
- Analyze Network Connectivity:
- Verify the network connectivity between Exchange Server and other relevant components, such as domain controllers or external systems.
- Check for network latency, packet loss, or other network-related issues that can impact Exchange Server performance.
- Work with your network team to resolve any identified network connectivity problems.
- Implement Performance Optimization Techniques:
- Implement performance optimization techniques recommended by Microsoft, such as enabling caching, adjusting virtual memory settings, or optimizing Exchange Server services.
- Review and adjust resource utilization settings, such as throttling policies or message limits, to balance performance and resource usage.
- Test and Validate:
- After implementing changes or optimizations, monitor the performance of Exchange Server and validate that the performance issue has been resolved.
- Test and verify the performance of critical operations, such as mailbox access, message delivery, or database operations, to ensure satisfactory performance.
25. How do you configure high availability for Exchange Server 2019 using Database Availability Groups (DAGs)?
To configure high availability for Exchange Server 2019 using Database Availability Groups (DAGs), you can follow these steps:
- Verify Prerequisites:
- Ensure that your Exchange Server 2019 environment meets the system requirements and is updated with the latest service packs and cumulative updates.
- Verify that your Active Directory (AD) infrastructure is healthy and properly configured.
- Plan the DAG Architecture:
- Determine the number of DAG members you want to deploy and their placement across physical or virtual servers in your environment.
- Consider factors like datacenter locations, network connectivity, and hardware redundancy when planning the DAG architecture.
- Configure DAG Networks:
- Configure separate networks for replication traffic (referred to as Replication Network) and client traffic (referred to as MAPI Network).
- Assign appropriate IP addresses and subnet masks to each network interface of the DAG members.
- Ensure that the network connectivity and routing are properly configured between the DAG members.
- Create the DAG:
- Use the Exchange Admin Center (EAC) or Exchange Management Shell to create a new DAG.
- Specify a unique name for the DAG and configure the witness server and witness directory. The witness server can be an Exchange server or a File Share Witness (FSW).
- Add DAG Members:
- Add the Exchange Server 2019 mailbox servers to the DAG using the Add-DatabaseAvailabilityGroupMember cmdlet.
- Specify the appropriate parameters, including the DAG name, mailbox server name, and the networks to be used for replication and client traffic.
- Configure Database Copies:
- Create mailbox database copies on the DAG members using the Add-MailboxDatabaseCopy cmdlet.
- Specify the database name, server name, and the target server where you want to create the database copy.
- Repeat this step for each mailbox database you want to replicate within the DAG.
- Configure Database Activation Preference:
- Set the database activation preference to control the order in which databases are activated in case of a failover.
- Use the Set-MailboxDatabase cmdlet to specify the activation preference value for each mailbox database within the DAG.
- Test and Validate High Availability:
- Test the high availability configuration by simulating failover scenarios and verifying the automatic activation of database copies on the designated DAG members.
- Monitor the DAG status and database health using Exchange Management Shell cmdlets or the EAC.
- Monitor and Maintain the DAG:
- Regularly monitor the DAG members, database copies, and replication health to ensure the high availability configuration remains optimal.
- Monitor disk space, network connectivity, and server performance to identify and resolve any issues proactively.
- Perform regular backups of the databases and test the restore process to ensure recoverability.
26. How do you configure message size limits in Exchange Server 2019?
To configure message size limits in Exchange Server 2019, you can follow these steps:
- Open the Exchange Admin Center (EAC) or Exchange Management Shell (EMS), depending on your preference.
- Using Exchange Admin Center (EAC):
- Navigate to the “Mail flow” section in the EAC.
- Select “Receive connectors” or “Send connectors,” depending on where you want to configure message size limits.
- Edit the appropriate connector by double-clicking on it.
- In the connector properties, go to the “Limits” tab.
- Modify the “Maximum receive message size” or “Maximum send message size” values as desired.
- Save the changes.
- To configure receive connector limits, use the following cmdlet:
Set-ReceiveConnector -Identity <ConnectorIdentity> -MaxMessageSize <SizeInBytes>Replace<ConnectorIdentity>with the identity of the receive connector you want to modify, and<SizeInBytes>with the desired maximum message size in bytes. - To configure send connector limits, use the following cmdlet:
Set-SendConnector -Identity <ConnectorIdentity> -MaxMessageSize <SizeInBytes>Replace<ConnectorIdentity>with the identity of the send connector you want to modify, and<SizeInBytes>with the desired maximum message size in bytes.
- Optionally, you can also configure mailbox-specific message size limits for individual mailboxes or groups using the following cmdlet in Exchange Management Shell:
Set-Mailbox -Identity <MailboxIdentity> -MaxSendSize <SizeInBytes> -MaxReceiveSize <SizeInBytes>Replace<MailboxIdentity>with the identity of the mailbox you want to modify, and<SizeInBytes>with the desired maximum send and receive message size in bytes. - After making the necessary configuration changes, test the message size limits to ensure they are applied correctly. Send test messages that exceed the specified limits to verify if they are rejected or accepted based on the configured limits.
27. What are the security best practices for Exchange Server 2019?
Securing Exchange Server 2019 involves implementing various best practices to protect against threats, ensure data privacy, and maintain a robust security posture. Here are some important security best practices to consider:
- Keep Exchange Server Up-to-Date:
- Regularly apply the latest Exchange Server updates, cumulative updates, and security patches to address known vulnerabilities and security issues.
- Stay informed about Microsoft’s security advisories and subscribe to relevant notifications for timely updates.
- Implement Secure Network Infrastructure:
- Use firewalls, intrusion detection systems (IDS), and network segmentation to protect the Exchange Server environment from unauthorized access and network-based attacks.
- Implement appropriate network security measures such as strong passwords, two-factor authentication (2FA), and virtual private networks (VPNs) for secure remote access.
- Secure Administrative Access:
- Limit administrative access to Exchange Server using the principle of least privilege.
- Use separate administrative accounts with strong passwords for managing Exchange Server.
- Implement multi-factor authentication (MFA) for administrative accounts to enhance security.
- Protect Against Malware and Spam:
- Deploy and regularly update anti-malware software on Exchange Server to scan email messages and attachments for known malware.
- Enable built-in anti-spam features in Exchange Server and configure spam filters to reduce the impact of unsolicited and potentially malicious emails.
- Enable Message Encryption:
- Implement Transport Layer Security (TLS) encryption for secure email transmission between Exchange servers and external mail servers.
- Consider implementing S/MIME (Secure/Multipurpose Internet Mail Extensions) to enable end-to-end email message encryption between Exchange users.
- Use Secure Mail Flow:
- Configure Sender Policy Framework (SPF) to prevent email spoofing and enhance email authenticity verification.
- Implement transport rules and content filtering to detect and prevent sensitive data leakage.
- Secure Mailbox Access:
- Enable and enforce strong password policies for Exchange Server mailboxes.
- Encourage or enforce the use of multi-factor authentication (MFA) for mailbox access to enhance authentication security.
- Educate users about phishing attacks and best practices for identifying and reporting suspicious emails.
- Backup and Disaster Recovery:
- Regularly back up Exchange Server databases, configuration settings, and critical data to facilitate disaster recovery in case of data loss or system failure.
- Test backup restoration procedures periodically to ensure their effectiveness.
- Monitor and Audit Exchange Server:
- Enable logging and monitoring features in Exchange Server to detect and respond to security incidents promptly.
- Regularly review and analyze security logs, event logs, and performance metrics to identify anomalies, unauthorized access attempts, or potential security breaches.
- Stay Informed and Follow Best Practices:
- Stay up-to-date with industry best practices, security guidelines, and recommendations provided by Microsoft.
- Engage in ongoing security training and awareness programs for administrators and end-users to promote a security-conscious culture.
28. How do you configure Data Loss Prevention (DLP) policies in Exchange Server 2019?
Configuring Data Loss Prevention (DLP) policies in Exchange Server 2019 involves defining rules and actions to prevent the unauthorized disclosure of sensitive information in emails and attachments. Here’s a general overview of how to configure DLP policies:
- Define DLP Policy Requirements:
- Identify the types of sensitive information you want to protect, such as credit card numbers, social security numbers, or confidential company data.
- Determine the level of sensitivity and the appropriate actions to be taken when sensitive information is detected, such as notifying users, blocking messages, or applying encryption.
- Create DLP Policy Templates:
- Exchange Server 2019 provides built-in DLP policy templates that can be customized to suit your organization’s needs.
- Use the Exchange Admin Center (EAC) or Exchange Management Shell (EMS) to create or modify DLP policy templates.
- Specify the conditions and actions for each template based on your requirements.
- Customize DLP Rules:
- Review the predefined DLP rules in Exchange Server 2019 and customize them as needed.
- Create new rules to address specific requirements or compliance regulations.
- Specify the conditions and actions for each rule, such as keyword detection, regular expressions, or sensitive information types.
- Configure DLP Policy Tips:
- DLP Policy Tips provide real-time notifications to users when they are about to send an email containing sensitive information.
- Configure Policy Tips to inform users about potential violations and provide guidance on how to handle sensitive data.
- Specify the conditions under which Policy Tips should be displayed, such as when a message matches a specific DLP rule or contains sensitive information.
- Test and Refine DLP Policies:
- After configuring DLP policies, thoroughly test them in a controlled environment to ensure they function as intended.
- Monitor policy matches and evaluate the impact on email flow and user experience.
- Refine policies based on feedback, user behavior, and emerging data protection requirements.
- Monitor and Audit DLP Policy Compliance:
- Regularly monitor and audit DLP policy matches, false positives, and false negatives.
- Review the DLP reports and logs to identify trends, compliance violations, and areas where policy adjustments may be required.
- Take necessary actions to address policy violations, educate users, and improve policy effectiveness.
29. How do you configure database sizing and capacity planning for Exchange Server 2019?
Configuring database sizing and capacity planning for Exchange Server 2019 involves estimating the storage requirements and ensuring optimal performance for mailbox databases. Here are the key steps to configure database sizing and capacity planning:
- Determine User Requirements:
- Evaluate the number of users and their mailbox sizes.
- Identify the expected growth rate of mailboxes over time.
- Consider factors such as retention policies, archiving, and user behavior patterns that may impact mailbox size.
- Calculate Storage Requirements:
- Determine the average mailbox size and the expected growth per user.
- Multiply the average mailbox size by the number of users to estimate the total mailbox storage required.
- Consider the additional storage space required for features like deleted item retention, database whitespace, and transaction logs.
- Plan Database Placement:
- Evaluate your storage infrastructure and decide whether to use direct-attached storage (DAS), storage area network (SAN), or network-attached storage (NAS) for mailbox databases.
- Determine the number of mailbox databases required based on the total mailbox storage and desired database size.
- Distribute mailbox databases across disk spindles or storage arrays to optimize I/O performance.
- Configure Database Size and Growth Limits:
- Set appropriate mailbox database size limits to prevent databases from growing excessively and impacting performance.
- Consider the maximum recommended mailbox database size in Exchange Server 2019, which is 2 TB per database.
- Configure mailbox database size limits using the Set-MailboxDatabase cmdlet in the Exchange Management Shell.
- Implement Database Maintenance:
- Schedule regular maintenance tasks, such as online maintenance and database defragmentation, to optimize database performance and reclaim unused space.
- Configure the maintenance schedule using the Set-MailboxDatabase cmdlet or the Exchange Admin Center (EAC).
- Monitor and Adjust:
- Continuously monitor the growth of mailbox databases and track their usage patterns.
- Use Exchange Server performance monitoring tools to track database I/O, CPU utilization, and other performance metrics.
- Analyze the data and adjust your capacity planning as needed to ensure optimal performance and storage availability.
- Consider High Availability:
- If implementing a Database Availability Group (DAG) for high availability, plan for additional storage requirements to accommodate database copies and transaction logs.
- Ensure sufficient storage capacity to handle the increased data replication and redundancy in a DAG configuration.
- Plan for Backup and Recovery:
- Determine the backup strategy and retention requirements for mailbox databases.
- Estimate the storage space required for backups and consider factors like retention policies, recovery time objectives (RTO), and recovery point objectives (RPO).
30. How do you configure journaling and message archiving in Exchange Server 2019?
To configure journaling and message archiving in Exchange Server 2019, you can follow these steps:
- Determine the Journaling and Archiving Requirements:
- Identify the regulatory, compliance, and business requirements for journaling and message archiving.
- Determine the retention period for archived messages and the specific users or groups that need to be journaled or archived.
- Enable Journaling:
- Determine the journaling method based on your requirements:
- Standard Journaling: All messages sent or received by selected users or groups are copied to a designated journaling mailbox.
- Premium Journaling: In addition to copying messages, message properties, and additional metadata are captured and stored.
- Use the Exchange Admin Center (EAC) or Exchange Management Shell (EMS) to enable journaling.
- Configure journaling rules to specify the users or groups whose messages should be journaled and the destination journaling mailbox.
- Determine the journaling method based on your requirements:
- Configure Message Archiving:
- Determine the archiving method based on your requirements:
- In-Place Archiving: Messages are moved from the primary mailbox to the archive mailbox within Exchange Server.
- Third-Party Archiving: Messages are archived using a third-party archiving solution integrated with Exchange Server.
- Use the EAC or EMS to enable and configure In-Place Archiving or integrate with the third-party archiving solution.
- Specify the archiving policies, retention periods, and storage locations for archived messages.
- Determine the archiving method based on your requirements:
- Manage Journaling and Archiving Policies:
- Monitor and review the journaling and archiving policies regularly to ensure they align with the organization’s requirements.
- Adjust the policies as necessary, such as adding or removing users from the journaling or archiving rules.
- Consider automating the management of journaling and archiving policies using PowerShell scripts or third-party management tools.
- Perform Regular Maintenance and Monitoring:
- Monitor the journaling and archiving processes to ensure they are functioning correctly.
- Regularly review and manage the storage capacity of journaling mailboxes and archive mailboxes to prevent storage issues.
- Perform routine checks to validate the integrity and accessibility of archived messages.
- Comply with Legal and Regulatory Requirements:
- Understand and comply with applicable legal and regulatory requirements regarding message retention, privacy, and data protection.
- Consult legal and compliance professionals to ensure your journaling and archiving practices meet the necessary standards.
31. How do you configure anti-spam and anti-malware features in Exchange Server 2019?
To configure anti-spam and anti-malware features in Exchange Server 2019, you can follow these steps:
- Enable Anti-Spam and Anti-Malware Agents:
- Launch the Exchange Management Shell (EMS) as an administrator.
- Run the following command to enable the Anti-Spam and Anti-Malware agents:
Enable-AntispamAgent
- Configure Connection Filtering:
- Connection filtering helps block spam at the network level by filtering incoming connections based on IP reputation.
- Run the following command to configure connection filtering:
Set-IPBlockListProvider -Name <ProviderName> -IPAddresses <IPAddresses> -RejectionResponse <Response>Replace<ProviderName>with the name of the IP block list provider,<IPAddresses>with the IP addresses or ranges you want to block, and<Response>with the response message to send when a connection is blocked.
- Configure Content Filtering:
- Content filtering helps block spam based on message content, headers, and other characteristics.
- Run the following command to configure content filtering:
Set-SenderFilterConfig -BlockedSenders <Senders> -BlockedDomainsAndSubdomains <Domains>Replace<Senders>with the email addresses or domains you want to block, and<Domains>with the domains or subdomains you want to block.
- Enable and Configure Sender Filtering:
- Sender filtering helps block messages based on the sender’s email address or domain.
- Run the following commands to enable and configure sender filtering:
Set-SenderFilterConfig -Enabled $true Set-SenderFilterConfig -BlockedSenders <Senders> -BlockedDomainsAndSubdomains <Domains>Replace<Senders>with the email addresses or domains you want to block, and<Domains>with the domains or subdomains you want to block.
- Configure Recipient Filtering:
- Recipient filtering helps block messages sent to invalid or non-existent recipients in your organization.
- Run the following command to configure recipient filtering:
Set-RecipientFilterConfig -RecipientValidationEnabled $true
- Configure Anti-Malware Features:
- Exchange Server 2019 integrates with Microsoft Defender Antivirus (formerly Windows Defender Antivirus) for anti-malware protection.
- By default, Exchange Server 2019 enables real-time scanning of attachments and scanning of transport agents.
- Ensure that the Microsoft Defender Antivirus is properly configured and up to date on the Exchange Server.
- Test and Fine-Tune the Configuration:
- Monitor the anti-spam and anti-malware features to ensure they are functioning correctly.
- Regularly review the filtering logs and adjust the filtering settings as needed to minimize false positives and false negatives.
32. How do you configure Transport Layer Security (TLS) encryption for Exchange Server 2019?
To configure Transport Layer Security (TLS) encryption for Exchange Server 2019, you can follow these steps:
- Obtain and Install SSL/TLS Certificates:
- Acquire a valid SSL/TLS certificate from a trusted certificate authority (CA) for your Exchange Server.
- Install the SSL/TLS certificate on the Exchange Server using the Exchange Admin Center (EAC) or the Exchange Management Shell (EMS).
- Configure TLS Encryption for Specific Services:
- Determine which services you want to enable TLS encryption for, such as SMTP, POP3, IMAP4, or Exchange Web Services (EWS).
- Use the Exchange Admin Center (EAC) or the Exchange Management Shell (EMS) to configure TLS encryption for each service.
- For example, to configure TLS encryption for the SMTP service, you can use the following command in EMS:
Set-ReceiveConnector -Identity <ReceiveConnectorIdentity> -RequireTLS $trueReplace<ReceiveConnectorIdentity>with the identity of the receive connector you want to configure.
- Enable Opportunistic TLS:
- Opportunistic TLS allows Exchange Server to attempt a TLS connection when communicating with other email servers that support TLS encryption.
- Run the following command in the Exchange Management Shell (EMS) to enable Opportunistic TLS:
Set-SendConnector -Identity <SendConnectorIdentity> -DomainSecureEnabled $trueReplace<SendConnectorIdentity>with the identity of the send connector you want to configure.
- Configure Forced TLS:
- Forced TLS requires that all email communications with specific domains or recipients must be encrypted using TLS.
- Use the Exchange Admin Center (EAC) or the Exchange Management Shell (EMS) to configure Forced TLS.
- For example, to configure Forced TLS for a specific domain, you can use the following command in EMS:
Set-RemoteDomain -Identity <DomainName> -TlsAuthLevel <Level>Replace<DomainName>with the domain name you want to configure, and<Level>with the appropriate TLS authentication level (e.g.,Encrypt).
- Verify TLS Encryption:
- After configuring TLS encryption, it’s important to test and verify that the TLS connections are being established successfully.
- Monitor the Exchange Server logs and use network monitoring tools to confirm that TLS encryption is being used for the desired services.
Microsoft Exchange Server 2019 interview questions and answers for advanced level
33. How do you perform disaster recovery and backup for Exchange Server 2019?
Performing disaster recovery and backup for Exchange Server 2019 involves implementing strategies to protect your Exchange environment, ensure data availability, and recover from any unexpected incidents. Here are the key steps to perform disaster recovery and backup:
- Implement Regular Backups:
- Set up a backup solution that supports Exchange Server 2019 and provides the necessary features, such as mailbox database backup and recovery.
- Schedule regular backups of mailbox databases, transaction logs, and configuration settings.
- Consider using incremental or differential backups to optimize storage space and backup duration.
- Plan for Database Availability:
- Configure a Database Availability Group (DAG) to provide high availability for mailbox databases across multiple servers.
- Ensure that DAG members are distributed across different locations or data centers to protect against site-level failures.
- Test Backup and Recovery Procedures:
- Perform regular test restores to validate the integrity of your backups and ensure that the recovery process works as expected.
- Test the recovery of both individual mailboxes and entire mailbox databases.
- Maintain Transaction Log Files:
- Regularly monitor and manage transaction log files to prevent them from consuming excessive disk space.
- Consider implementing circular logging or truncating log files after successful backups to conserve disk space.
- Store Backups Offsite:
- Store backup copies in a secure offsite location to protect against site-level disasters, such as fire or flood.
- Utilize offsite storage options, such as cloud storage or remote data centers, to ensure data redundancy and availability.
- Document Disaster Recovery Procedures:
- Maintain detailed documentation of your disaster recovery procedures, including step-by-step instructions and contact information for key personnel.
- Document the necessary steps to rebuild Exchange servers, recover mailbox databases, and restore connectivity.
- Implement Monitoring and Alerting:
- Set up monitoring tools to proactively monitor the health and performance of Exchange Server 2019.
- Configure alerts to notify you of any potential issues or anomalies, such as database failures or backup failures.
- Develop a Disaster Recovery Plan:
- Create a comprehensive disaster recovery plan that outlines the procedures and steps to be followed in the event of a disaster.
- Define roles and responsibilities for the recovery team and establish communication channels.
- Regularly Review and Update the Disaster Recovery Plan:
- Periodically review and update your disaster recovery plan to incorporate any changes in your Exchange environment, infrastructure, or business requirements.
- Conduct drills and tabletop exercises to test the effectiveness of your plan and identify areas for improvement.
34. How do you configure Exchange Server 2019 to use external certificates?
To configure Exchange Server 2019 to use external certificates, you need to follow these steps:
- Obtain an External SSL/TLS Certificate:
- Purchase or obtain an SSL/TLS certificate from a trusted certificate authority (CA) that matches your Exchange Server’s external domain name.
- Ensure that the certificate is compatible with Exchange Server 2019.
- Import the SSL/TLS Certificate:
- Import the SSL/TLS certificate into the Exchange Server’s certificate store.
- You can use the Exchange Admin Center (EAC) or the Exchange Management Shell (EMS) to import the certificate.
- In EAC, go to Servers > Certificates and click on the “Import” button to import the certificate.
- In EMS, you can use the
Import-ExchangeCertificatecmdlet to import the certificate.
- Assign Services to the Certificate:
- After importing the certificate, you need to assign the appropriate Exchange services to use the certificate.
- In EAC, go to Servers > Certificates, select the certificate, and click on the “Edit” button to assign services.
- In EMS, you can use the
Enable-ExchangeCertificatecmdlet to assign services to the certificate.
- Configure Virtual Directories:
- Update the Exchange Server’s virtual directories to use the external certificate for secure communications.
- Use the Exchange Admin Center (EAC) or the Exchange Management Shell (EMS) to update the virtual directory settings.
- In EAC, go to Servers > Virtual Directories, select the virtual directory, and click on the “Edit” button to update the settings.
- In EMS, you can use various cmdlets like
Set-OwaVirtualDirectory,Set-EcpVirtualDirectory,Set-ActiveSyncVirtualDirectory, etc., to configure each virtual directory.
- Test Connectivity:
- After configuring the external certificate, perform thorough testing to ensure that all Exchange services are functioning correctly and securely.
- Test connectivity from internal and external networks to verify that clients can establish secure connections to Exchange services.
35. What are the considerations for deploying Exchange Server 2019 in a virtualized environment?
When deploying Exchange Server 2019 in a virtualized environment, there are several considerations you should keep in mind to ensure optimal performance, availability, and resource utilization. Here are some key considerations:
- Hardware Requirements:
- Ensure that the physical host servers running the virtualization platform meet the recommended hardware requirements for Exchange Server 2019.
- Consider factors such as CPU, memory, storage, and network capacity to accommodate the anticipated workload and user load.
- Virtualization Platform:
- Choose a virtualization platform that is compatible with Exchange Server 2019, such as VMware vSphere or Microsoft Hyper-V.
- Verify that the virtualization platform is officially supported by Microsoft and meets the necessary requirements.
- Virtual Machine Configuration:
- Configure virtual machines (VMs) for Exchange Server 2019 according to Microsoft’s recommended guidelines.
- Assign an appropriate amount of CPU cores, memory, and storage to each VM based on the anticipated workload and user load.
- Consider using fixed-size virtual disks rather than dynamically expanding disks for better performance.
- Virtual Network Configuration:
- Configure virtual networks to provide sufficient bandwidth and low latency for Exchange Server traffic.
- Consider using dedicated network interfaces or virtual switches for Exchange Server traffic to isolate it from other VM traffic.
- High Availability and Redundancy:
- Implement high availability features provided by the virtualization platform, such as clustering or fault tolerance, to ensure Exchange Server availability.
- Configure redundant host servers, storage, and network infrastructure to minimize single points of failure.
- Storage Considerations:
- Choose a storage solution that meets the performance requirements of Exchange Server, such as solid-state drives (SSDs) or high-performance storage arrays.
- Consider separating Exchange Server data (databases and logs) onto different storage volumes to optimize performance.
- Backup and Recovery:
- Implement a backup solution specifically designed for virtualized environments to ensure consistent and reliable backups of Exchange Server VMs.
- Test and verify the restore process to ensure you can recover Exchange Server VMs in case of a failure.
- Monitoring and Management:
- Utilize monitoring tools to monitor the health and performance of both the virtualization platform and Exchange Server VMs.
- Regularly monitor resource utilization, storage performance, and network latency to identify and address any potential issues.
- Licensing Considerations:
- Ensure that you comply with Microsoft’s licensing requirements for running Exchange Server 2019 in a virtualized environment.
- Understand the licensing implications when scaling up or scaling out Exchange Server VMs.
36. How do you configure database failover and switchover in Exchange Server 2019?
In Exchange Server 2019, you can configure database failover and switchover using Database Availability Groups (DAGs). DAGs provide high availability and automatic database failover capabilities. Here’s how you can configure database failover and switchover in Exchange Server 2019:
- Set up a Database Availability Group (DAG):
- Create a DAG using the Exchange Admin Center (EAC) or Exchange Management Shell (EMS).
- Specify the DAG’s name, witness server, and optional administrative access point (AAP) configuration.
- Add the Mailbox servers that will participate in the DAG.
- Configure Database Copies:
- Create multiple database copies on different Mailbox servers within the DAG.
- Use the Add-MailboxDatabaseCopy cmdlet in Exchange Management Shell to add database copies.
- Configure the number of copies you want to maintain based on your desired level of redundancy.
- Enable Automatic Database Activation:
- By default, Exchange Server 2019 uses automatic database activation to determine which database copy should be active on a specific server.
- If a database fails on one server, the DAG will automatically activate a copy of the database on another server within the DAG.
- Monitor Database Health and Replication:
- Regularly monitor the health and replication status of the databases within the DAG.
- Use tools such as the Exchange Management Shell cmdlets (e.g., Get-MailboxDatabaseCopyStatus) or Exchange Admin Center to monitor and troubleshoot replication issues.
- Perform Database Switchover:
- A database switchover allows you to manually activate a specific database copy on a different server within the DAG.
- You can perform a database switchover using the Exchange Admin Center or the Move-ActiveMailboxDatabase cmdlet in Exchange Management Shell.
- Test Database Failover:
- Periodically test the database failover capabilities to ensure that the failover process works as expected.
- Test the failover by simulating a server failure or manually initiating a database failover using the Remove-MailboxDatabaseCopy cmdlet.
37. How do you configure email retention and legal hold in Exchange Server 2019?
To configure email retention and legal hold in Exchange Server 2019, you can utilize features such as retention policies, retention tags, and litigation hold. Here’s how you can configure these features:
- Configure Retention Policies:
- Retention policies allow you to define how long messages should be retained in user mailboxes before they are automatically deleted or moved to the archive.
- In the Exchange Admin Center (EAC), go to Compliance Management > Retention Policies and click on the “New” button to create a new retention policy.
- Specify the policy name, retention action (delete or move to archive), retention period, and other settings as per your organization’s requirements.
- Apply the retention policy to the desired mailboxes or mailbox users.
- Configure Retention Tags:
- Retention tags are used to define specific retention settings for different types of items within a mailbox, such as emails, calendar items, or tasks.
- In the Exchange Admin Center (EAC), go to Compliance Management > Retention Tags and click on the “New” button to create a new retention tag.
- Specify the tag type (e.g., Default, Personal, or Recoverable Items), retention action, retention period, and other settings.
- Assign the retention tags to the appropriate retention policy.
- Enable Litigation Hold:
- Litigation hold allows you to place a legal hold on specific mailboxes to preserve mailbox content for legal or regulatory purposes.
- In the Exchange Admin Center (EAC), go to Recipients > Mailboxes, select the mailbox on which you want to enable litigation hold, and click on the “Edit” button.
- Go to the “Mailbox Features” section and enable the “Litigation Hold” feature.
- Specify the hold duration and other settings as required.
- Litigation hold retains all mailbox content, including deleted items, and prevents users from deleting or modifying the retained data.
- Monitor and Manage Retention:
- Regularly review and monitor the retention policies, tags, and litigation hold settings to ensure they align with your organization’s requirements and comply with any legal or regulatory obligations.
- Use tools such as the Exchange Admin Center or Exchange Management Shell to manage and modify retention policies and tags as needed.
38. How do you troubleshoot database and transaction log issues in Exchange Server 2019?
When troubleshooting database and transaction log issues in Exchange Server 2019, you can follow these steps to identify and resolve the problems:
- Check Database and Transaction Log Health:
- Use the Exchange Management Shell (EMS) cmdlets such as
Get-MailboxDatabaseCopyStatus,Get-MailboxDatabase, andGet-DatabaseAvailabilityGroupto check the health and replication status of the databases and transaction logs within the environment. - Look for any error messages or warnings that indicate issues with the databases or transaction logs.
- Use the Exchange Management Shell (EMS) cmdlets such as
- Analyze Event Logs:
- Review the Exchange Server event logs, including the Application and System logs, for any relevant error messages or warnings related to database or transaction log issues.
- Pay attention to events with event IDs specific to Exchange Server databases, such as 474, 490, 4113, 4131, and others.
- Monitor Database and Log Sizes:
- Monitor the sizes of the mailbox databases and transaction logs to ensure they are within acceptable limits.
- Consider using performance monitoring tools to track the growth of the databases and logs over time.
- Verify Disk Space Availability:
- Ensure that there is sufficient disk space available on the volumes where the databases and transaction logs are stored.
- Insufficient disk space can lead to issues with database or log file operations.
- Run Database Maintenance:
- Use the Exchange Management Shell cmdlets, such as
ESEUTILandISINTEG, to perform database maintenance tasks like defragmentation and integrity checks. - These tools can help repair or recover corrupted databases or transaction logs.
- Use the Exchange Management Shell cmdlets, such as
- Check Storage System Health:
- Monitor the health and performance of the storage system where the databases and logs reside.
- Check for any disk errors, latency issues, or other storage-related problems that can impact the Exchange Server environment.
- Review Backup and Restore Operations:
- If you have recently performed a backup or restore operation, verify that it completed successfully without any errors.
- Check for any issues with the backup or restore process that might have affected the databases or transaction logs.
- Consult Exchange Server Diagnostic Tools:
- Utilize built-in diagnostic tools such as the Exchange Troubleshooting Assistant (ExTRA) and Exchange Best Practices Analyzer (ExBPA) to help identify and resolve database and transaction log issues.
- These tools can provide valuable insights and recommendations based on the specific symptoms and configurations of your Exchange Server environment.
39. What are the best practices for monitoring and maintaining Exchange Server 2019?
Monitoring and maintaining Exchange Server 2019 is crucial to ensure its optimal performance, availability, and security. Here are some best practices for monitoring and maintaining Exchange Server 2019:
- Regularly Monitor Exchange Server:
- Implement a comprehensive monitoring solution to monitor the health, performance, and availability of Exchange Server 2019.
- Monitor key components such as server hardware, services, databases, network connectivity, and system resources.
- Set up alerts and notifications to promptly identify and address any issues or potential bottlenecks.
- Monitor Database Health:
- Monitor the health and status of Exchange databases using tools like the Exchange Management Shell cmdlets (
Get-MailboxDatabaseCopyStatus,Get-MailboxDatabase) or Exchange Admin Center (EAC). - Keep an eye on database size, free space, replication status, and database maintenance tasks.
- Monitor the health and status of Exchange databases using tools like the Exchange Management Shell cmdlets (
- Maintain Exchange Server Updates:
- Keep Exchange Server 2019 up to date with the latest cumulative updates (CUs) and security patches provided by Microsoft.
- Regularly review and apply updates to benefit from bug fixes, security enhancements, and performance improvements.
- Test updates in a non-production environment before deploying them in a production environment.
- Perform Regular Backup and Recovery Testing:
- Implement a reliable backup solution specifically designed for Exchange Server and regularly back up databases, logs, and configuration settings.
- Test the backup and restore process to ensure data integrity and the ability to recover Exchange Server in the event of a failure or disaster.
- Optimize Storage and Database Performance:
- Monitor storage system performance, including disk latency, IOPS, and available capacity.
- Optimize storage configurations to match Exchange Server requirements, such as separating database and log files, using high-performance disks (e.g., SSDs), and implementing RAID for redundancy.
- Regularly defragment and maintain Exchange databases using tools like
ESEUTILandISINTEGto optimize performance.
- Monitor and Manage Mailbox Quotas:
- Set appropriate mailbox quotas to manage mailbox size and prevent excessive storage consumption.
- Monitor mailbox quotas and take appropriate actions such as archiving or deleting unnecessary emails to prevent mailbox bloat.
- Implement Security Measures:
- Regularly review and update security measures, including antivirus and antimalware software, firewalls, and security policies.
- Monitor and analyze security logs for any suspicious activities or intrusion attempts.
- Enable auditing features and implement strong password policies to enhance security.
- Monitor and Optimize Performance:
- Monitor Exchange Server performance using built-in performance monitoring tools, such as Performance Monitor (PerfMon), to identify bottlenecks and resource usage patterns.
- Optimize Exchange Server performance by adjusting configurations, such as adjusting memory settings, processor utilization, and network settings.
- Stay Informed and Leverage Resources:
- Stay up to date with the latest Exchange Server documentation, knowledge base articles, and best practices published by Microsoft.
- Participate in community forums, attend webinars, and engage with fellow Exchange administrators to learn from their experiences and share knowledge.
40. Explain transport pipeline in Exchange Server 2019?
The transport pipeline in Exchange Server 2019 is a key component responsible for the processing and routing of email messages within the Exchange organization. It consists of a series of interconnected components and services that work together to handle the flow of messages through the Exchange Server environment. Here’s an overview of the transport pipeline in Exchange Server 2019:
- Receive Connectors:
- Incoming messages enter the transport pipeline through Receive Connectors.
- Receive Connectors define the network protocols (SMTP, HTTPS, etc.) and settings for accepting incoming email from various sources such as other mail servers, client devices, or applications.
- Receive Connectors perform initial validation and authentication checks on incoming messages.
- Transport Agents:
- Transport Agents are extensions to the transport pipeline that allow for additional processing and customization of email messages.
- They can be built-in agents provided by Microsoft or custom agents developed by third-party vendors or administrators.
- Transport Agents can perform various tasks such as applying disclaimers, message content inspection, applying transport rules, or enforcing email security measures.
- Content Filtering:
- Content Filtering is a built-in anti-spam feature in Exchange Server 2019.
- It scans inbound messages for spam, malware, and other undesirable content using various techniques like IP reputation, sender reputation, content analysis, and blacklists.
- Content Filtering assigns a spam confidence level (SCL) to each message, which can be used to apply different actions based on organizational policies.
- Transport Rules:
- Transport Rules, also known as mail flow rules, allow administrators to apply specific actions or conditions to messages passing through the transport pipeline.
- Transport Rules can be configured to perform actions such as applying message encryption, modifying message headers, redirecting messages, or blocking certain types of content.
- Journaling:
- Journaling is a feature that enables the automatic archiving of messages for compliance or record-keeping purposes.
- Messages can be journaled at the organization level, mailbox level, or based on specific criteria defined in transport rules.
- Routing Decisions:
- Based on the recipient information and organizational routing configuration, the transport pipeline determines the next hop for the message.
- Routing decisions take into account factors such as recipient location, message size, connector availability, and routing topology.
- Send Connectors:
- Once the routing decision is made, the message leaves the Exchange Server environment through Send Connectors.
- Send Connectors define the settings for delivering outgoing email to external destinations such as other mail servers or internet-based email services.
- Send Connectors use the appropriate network protocols (SMTP, DNS, TLS, etc.) to establish connections and deliver the messages.
Inbound email flow in Exchange Server 2019:
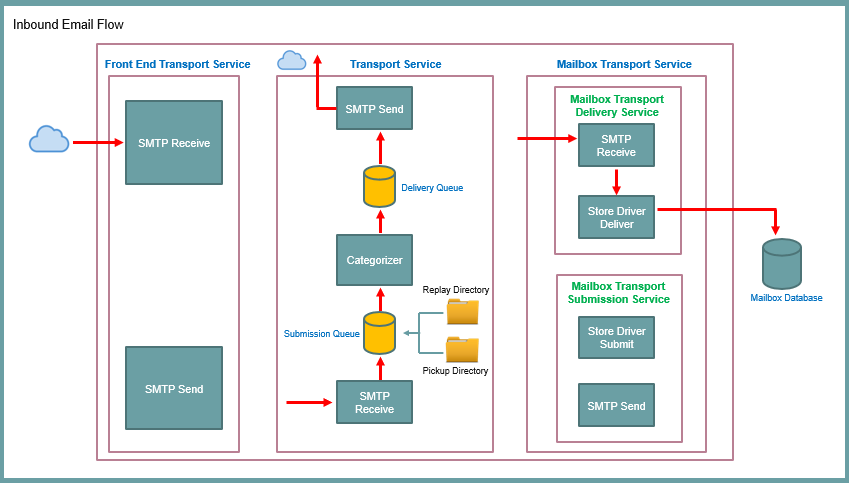
Outbound email flow in Exchange Server 2019:
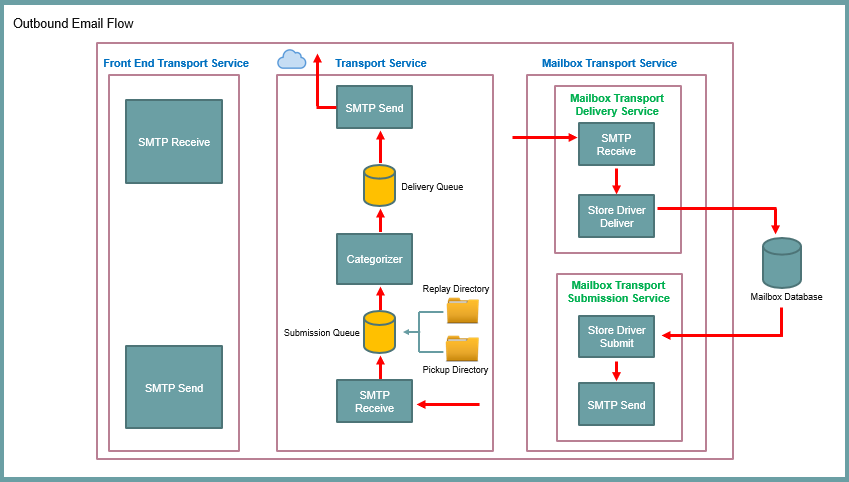
Learn mail flow and transport pipeline in Exchange Server 2019.Microsoft Exchange Server 2019 troubleshooting questions and answers
41. Why are users unable to send or receive emails in Exchange Server 2019?
There could be several reasons why users are unable to send or receive emails in Exchange Server 2019. Here are some possible causes to investigate:
- Connectivity issues: Check if there are any network connectivity problems between the Exchange Server and the email clients or other mail servers. Verify that the network adapters, routers, and firewalls are properly configured and functioning.
- DNS configuration: Ensure that the DNS settings on the Exchange Server are correct and that it can resolve domain names and MX records of the email recipients and sending domains.
- Mailbox database issues: Verify the status of the mailbox databases in Exchange Server. Check if the databases are mounted and accessible. Look for any errors or warnings related to the mailbox databases in the event logs.
- Transport service problems: Check the status of the Microsoft Exchange Transport service. Ensure that it is running and not experiencing any errors. Review the message queues to see if there are any issues with message delivery.
- Receive and Send Connector configurations: Verify the settings of the Receive and Send Connectors in Exchange Server. Ensure that they are properly configured and functioning correctly. Check for any restrictions, such as message size limits or authentication requirements.
To troubleshoot the issue further, you can use PowerShell commands to gather more information. For example:
- Check the status of mailbox databases:
Get-MailboxDatabase -Status - Verify Receive Connectors:
Get-ReceiveConnector - Check the Microsoft Exchange Transport service status:
Get-Service MSExchangeTransport - Examine message queues:
Get-Queue
42. Users are unable to access Outlook Web App (OWA) or receive emails in Exchange Server 2019. How would you troubleshoot this issue?
To troubleshoot the issue of users being unable to access Outlook Web App (OWA) or receive emails in Exchange Server 2019, you can follow these troubleshooting steps:
- Verify server connectivity:
- Ensure that the Exchange Server is powered on and accessible on the network.
- Check network connectivity between the client machines and the Exchange Server.
- Verify that the firewall is not blocking the necessary ports for OWA and email delivery (typically ports 80 and 443).
- Check Exchange services:
- Confirm that the necessary Exchange services are running on the server. You can use PowerShell command:
Get-Service *Exchange*.
- Confirm that the necessary Exchange services are running on the server. You can use PowerShell command:
- Review OWA settings:
- Check the OWA virtual directory settings using PowerShell command:
Get-OwaVirtualDirectory. - Ensure that the virtual directory is configured correctly and has the necessary permissions for user access.
- Check the OWA virtual directory settings using PowerShell command:
- Verify mailbox database status:
- Check the status of the mailbox databases using PowerShell command:
Get-MailboxDatabase -Status. - Ensure that the databases are mounted and healthy. Look for any errors or warnings related to the mailbox databases in the event logs.
- Check the status of the mailbox databases using PowerShell command:
- Examine user mailbox settings:
- Confirm that the affected users have active and accessible mailboxes in Exchange Server.
- Check the user’s mailbox size and limits to ensure they are not exceeding any storage restrictions.
- Investigate email flow and message queues:
- Review the Exchange message queues using PowerShell command:
Get-Queue. - Look for any stuck or queued messages that might be causing the issue.
- Check the status of Send Connectors using PowerShell command:
Get-SendConnector. Ensure they are properly configured.
- Review the Exchange message queues using PowerShell command:
- Analyze event logs:
- Check the Exchange Server event logs, specifically the Application and System logs, for any error or warning messages related to OWA or mail delivery.
- Investigate any relevant error codes or event descriptions to identify the underlying cause.
- Test with a different client:
- If possible, test OWA and email access using a different client machine or web browser to rule out any client-specific issues.
- Check DNS settings:
- Ensure that the DNS settings on the Exchange Server are correct and that it can resolve domain names and MX records of the email recipients and sending domains.
- Restart services:
- Restart the necessary Exchange services, such as the Microsoft Exchange Transport service or the World Wide Web Publishing service, to see if it resolves the issue.
By following these troubleshooting steps, you can identify and resolve common issues that might be preventing users from accessing OWA or receiving emails in Exchange Server 2019.
43. Emails are being delayed or stuck in the mail queue in Exchange Server 2019. Suggest me an action plan to fix this issue?
If emails are being delayed or stuck in the mail queue in Exchange Server 2019, you can perform the following troubleshooting steps to resolve the issue:
- Check mail flow:
- Use the PowerShell command
Get-Queueto view the status of the message queues. Look for any queues with a large number of messages or messages in a “Retry” state. - Identify any specific patterns or commonalities among the stuck messages, such as specific domains or recipients.
- Use the PowerShell command
- Verify connectivity:
- Check the network connectivity between the Exchange Server and the destination mail servers.
- Ensure that the firewall or any other security devices are not blocking the necessary ports for email delivery (typically ports 25 and 587 for SMTP).
- DNS configuration:
- Confirm that the DNS settings on the Exchange Server are correct and can resolve domain names and MX records of the email recipients and sending domains.
- Use the PowerShell command
Resolve-DnsName <DomainName>to perform DNS lookups and verify the results.
- Check Send Connectors:
- Review the configuration of the Send Connectors using the PowerShell command
Get-SendConnector. - Verify that the Send Connectors are properly configured and have the correct settings for routing email to external domains.
- Review the configuration of the Send Connectors using the PowerShell command
- Message size limits:
- Ensure that there are no message size restrictions or limits that might be causing the delay or queuing of messages. Use the PowerShell command
Get-TransportConfigto review the transport configuration.
- Ensure that there are no message size restrictions or limits that might be causing the delay or queuing of messages. Use the PowerShell command
- Message tracking and logging:
- Enable message tracking on the Exchange Server to gather more information about the email flow and any issues encountered.
- Review the message tracking logs to identify any specific errors or events related to the delayed or stuck messages.
- Anti-spam and anti-malware filters:
- Check if any anti-spam or anti-malware filters are causing the delay. Temporarily disable these filters to see if the issue resolves.
- Review the configuration of these filters and ensure they are properly set up and not overly aggressive in blocking legitimate emails.
- Restart services:
- Restart the necessary Exchange services, such as the Microsoft Exchange Transport service or the Microsoft Exchange Mailbox Transport Delivery service, to see if it resolves the issue.
- Seek external assistance:
- If the issue persists and you are unable to identify the root cause, consider reaching out to Microsoft Support or a qualified Exchange Server consultant for further assistance.
44. Users are experiencing slow performance when accessing their mailboxes in Exchange Server 2019. What we can do to improve the performance?
To improve the performance of user mailboxes in Exchange Server 2019 and address slow performance issues, you can take the following steps:
- Monitor server resources:
- Check the server’s CPU, memory, and disk usage using monitoring tools or Performance Monitor.
- Identify any resource bottlenecks or high utilization that might be impacting performance.
- Consider upgrading hardware if necessary or optimizing the server configuration based on resource utilization.
- Optimize mailbox database settings:
- Review the mailbox database settings, such as database size limits and storage quotas, to ensure they are appropriately configured.
- Distribute mailboxes evenly across multiple databases to balance the load.
- Enable caching:
- Configure Outlook clients to use Cached Exchange Mode, which stores a local copy of the user’s mailbox on their computer.
- This reduces the dependency on network latency and can improve the responsiveness of mailbox operations.
- Implement mailbox and database maintenance:
- Regularly perform maintenance tasks such as defragmenting and compacting mailbox databases.
- Use PowerShell commands like
New-MailboxRepairRequestandESEUtilto repair and optimize mailbox databases.
- Review anti-virus and anti-spam configurations:
- Ensure that any anti-virus or anti-spam software installed on the server is properly configured and not causing performance issues.
- Exclude Exchange-specific directories and processes from real-time scanning.
- Optimize network configuration:
- Check the network infrastructure for any bottlenecks, such as congested switches or routers.
- Ensure that the network connection between the client machines and the Exchange Server is fast and reliable.
- Monitor and analyze performance:
- Use Exchange Server performance monitoring tools, such as Performance Monitor or third-party monitoring solutions, to track and analyze performance metrics.
- Look for any patterns or trends that indicate performance degradation and investigate the underlying causes.
- Update Exchange Server and client software:
- Ensure that Exchange Server 2019 is running the latest cumulative updates and patches.
- Keep client applications, such as Outlook, up to date with the latest updates and service packs.
- Consider server optimization techniques:
- Implement database indexing and query optimization techniques for improved database performance.
- Fine-tune server settings, such as TCP/IP settings or registry parameters, based on Microsoft’s recommendations and best practices.
45. Users are not able to search emails in Outlook client in Exchange Server 2019 organization. How can you fix this issue?
To troubleshoot and fix the issue of users not being able to search emails in the Outlook client in an Exchange Server 2019 organization, you can take the following steps:
- Check Outlook Indexing:
- Verify that the Outlook client is actively indexing the mailbox content.
- In Outlook, go to File > Options > Search and ensure that indexing is enabled and the appropriate mailbox is selected for indexing.
- Monitor the indexing status in the Outlook client to ensure it completes successfully.
- Rebuild the Outlook Index:
- If indexing is enabled but not functioning correctly, rebuild the Outlook search index.
- In Outlook, go to File > Options > Search and click on the “Indexing Options” button.
- Select the mailbox and click on “Advanced” and then “Rebuild” to initiate the index rebuild process.
- Check Exchange Search Service:
- Verify that the Exchange Search service is running on the Exchange Server.
- Use the PowerShell command
Get-Service MSExchangeFastSearchto check the status of the Exchange Search service.
- Restart the Exchange Search Service:
- If the Exchange Search service is running but not functioning properly, restart it.
- Use the PowerShell command
Restart-Service MSExchangeFastSearchto restart the Exchange Search service.
- Check Indexing and Search Catalogs:
- Verify that the search catalogs are healthy and not corrupted.
- Use the PowerShell command
Get-MailboxDatabaseCopyStatusto check the status of the database copies and verify that the search catalog status is healthy.
- Rebuild the Exchange Search Index:
- If the search catalog is corrupted or not functioning correctly, you may need to rebuild the Exchange Search index for the affected mailbox database.
- Use the PowerShell command
ResetSearchIndex -Force -Allto rebuild the search index for all mailbox databases.
- Monitor Event Logs:
- Check the Exchange Server event logs for any related errors or warnings.
- Look for events related to indexing, search, or the Exchange Search service that might provide insights into the issue.
- Update Outlook Client:
- Ensure that the Outlook client is updated to the latest version and has all the necessary updates and patches.
- Outdated or incompatible Outlook versions may have known issues with search functionality.
46. All outbound emails from Exchange Server 2019 are being blocked or marked as spam. What could be the reason and how you can fix this issue?
If all outbound emails from Exchange Server 2019 are being blocked or marked as spam, the following reasons and fixes should be considered:
- Check IP reputation:
- Your server’s IP address may have a poor reputation due to previous spamming activity or being on a blacklist.
- Use online IP reputation check tools to verify the status of your server’s IP address.
- If your IP is listed on a blacklist, follow the instructions provided by the respective blacklist to request removal.
- Verify DNS configuration:
- Ensure that your Exchange Server has a valid and properly configured Reverse DNS (rDNS) record.
- Check that your server’s hostname matches the rDNS entry.
- Confirm that the forward DNS (MX, SPF) records are correctly configured.
- Set up Sender Policy Framework (SPF) records to specify which servers are authorized to send emails for your domain.
- Review email content and attachments:
- Check the content and attachments of your outbound emails for any spam-like characteristics.
- Avoid using spam trigger words or phrases, excessive capitalization, or excessive use of exclamation marks.
- Minimize the use of attachments or scan attachments for potential malware.
- Monitor blacklists:
- Regularly check if your server’s IP address is listed on any major email blacklists.
- Utilize tools and services that can monitor your IP’s reputation and provide alerts if it gets listed.
- Configure SMTP relay:
- Consider using a trusted and reputable SMTP relay service to send outbound emails.
- Configure your Exchange Server to relay outbound emails through the relay service, which can help improve delivery rates.
- Use a dedicated IP address:
- If possible, use a dedicated IP address for your Exchange Server rather than a shared IP.
- A dedicated IP can help maintain a good sending reputation and minimize the impact of other senders’ activities.
- Monitor email delivery and bouncebacks:
- Keep track of email delivery status and monitor bouncebacks or rejection messages.
- Analyze the bounceback messages to identify any specific reasons or error codes that indicate why your emails are being blocked.
- Consult with your ISP or email provider:
- Reach out to your Internet Service Provider (ISP) or email provider to ensure that there are no restrictions or limitations on outbound email sending.
- Confirm that your ISP is not blocking any outgoing ports (e.g., port 25) that are necessary for email delivery.
47. Some users are unable to access specific public folders in Exchange Server 2019. What will be your course of action towards this issue?
To troubleshoot the issue of users being unable to access specific public folders in Exchange Server 2019, you can take the following course of action:
- Check Public Folder Permissions:
- Verify that the affected users have the necessary permissions to access the specific public folders.
- Use PowerShell commands like
Get-PublicFolderClientPermissionorGet-MailboxFolderPermissionto review and verify the permissions.
- Compare Working and Non-working Users:
- Identify if there is a pattern among the affected users or if it is limited to specific users.
- Compare the permissions and settings of working users with those of non-working users to identify any differences.
- Verify Public Folder Replication:
- Ensure that the public folder hierarchy and content have replicated successfully across all Exchange servers.
- Use PowerShell commands like
Get-PublicFolderStatisticsorGet-PublicFolderDatabaseto check the replication status.
- Restart the Public Folder Mailbox:
- Restarting the public folder mailbox associated with the affected public folders can resolve certain issues.
- Use the PowerShell command
Restart-Service MSExchangeISto restart the relevant Exchange Information Store service.
- Rebuild Public Folder Index:
- If the issue persists, you can try rebuilding the public folder index to resolve any potential indexing problems.
- Use PowerShell commands like
Update-PublicFolderMailboxorUpdate-PublicFolderHierarchyto initiate the index rebuild process.
- Check Public Folder Database Health:
- Verify the health and status of the public folder database associated with the affected public folders.
- Use PowerShell commands like
Get-MailboxDatabaseCopyStatusto check the status of the database copies and any reported issues.
- Monitor Event Logs:
- Check the Exchange Server event logs for any relevant errors or warnings related to public folders.
- Look for events related to public folder access, replication, or database issues that might provide insights into the problem.
- Verify Public Folder Database Size and Limits:
- Ensure that the size of the public folder database is within the configured limits.
- Check if any quota limits are being exceeded, which might restrict access to specific public folders.
- Test from Different Clients:
- Test public folder access from different clients, such as Outlook desktop client, Outlook Web App, or mobile devices.
- Determine if the issue is specific to a particular client or if it affects all client types.
Microsoft Exchange Server 2019 migration interview questions and answers
48. What are the key considerations when planning a migration from a previous version of Exchange Server to Exchange Server 2019?
When planning a migration from a previous version of Exchange Server to Exchange Server 2019, there are several key considerations to keep in mind. Here are some of the important factors to consider:
- Supported Migration Paths: Review the supported migration paths provided by Microsoft to ensure a smooth and supported migration. Check if a direct migration to Exchange Server 2019 is possible from your current Exchange version or if an intermediate migration to a supported version is required.
- System Requirements: Verify that your infrastructure meets the system requirements for Exchange Server 2019, including hardware, operating system, and software prerequisites. Ensure that your servers have sufficient resources to accommodate the new Exchange Server version.
- Coexistence and Interoperability: Plan for coexistence between the old and new Exchange environments during the migration process. Consider how users from both environments will be able to communicate and access shared resources. Ensure proper interoperability with other systems such as Active Directory, Office 365, and third-party applications.
- Exchange Server Roles: Determine which Exchange Server roles (Mailbox, Client Access, Edge Transport) are required in the new Exchange Server 2019 environment. Consider any changes in role requirements or architectural improvements compared to your current Exchange version.
- Client Compatibility: Evaluate the compatibility of your client applications (Outlook versions and other email clients) with Exchange Server 2019. Ensure that your clients are compatible and supported to avoid any disruptions in email access and functionality.
- Mailbox Migration Strategy: Determine the approach for mailbox migration, whether it will be a staged migration, cutover migration, or hybrid deployment with Office 365. Evaluate the size and complexity of your mailbox database and plan for an appropriate migration method that minimizes downtime and disruption for end-users.
- Public Folder Migration: If your current Exchange environment includes public folders, plan for their migration to Exchange Server 2019. Consider the size and content of public folders, and choose the appropriate migration method, such as using native migration tools or third-party solutions.
- Security and Compliance: Take into account any security and compliance requirements that may impact the migration process. Consider the need for encryption, secure communication protocols, and compliance features like data loss prevention (DLP) and message archiving.
- Testing and Pilot Phase: Allocate sufficient time for testing and piloting the migration process before implementing it on a larger scale. Conduct thorough testing to identify and resolve any potential issues or compatibility conflicts before migrating critical data and mailboxes.
- Backup and Recovery: Ensure that proper backup and recovery mechanisms are in place to protect your data during the migration process. Have a backup strategy that includes regular backups of both the source and target Exchange environments to mitigate the risk of data loss.
49. Can you explain the step-by-step process of migrating mailboxes from Exchange Server 2010 to Exchange Server 2019?
Certainly! Here is a step-by-step process for migrating mailboxes from Exchange Server 2010 to Exchange Server 2019:
- Prepare the Exchange Server 2019 Environment:
- Install and configure Exchange Server 2019 on new servers according to the system requirements.
- Ensure proper connectivity and coexistence between the Exchange 2010 and Exchange 2019 environments.
- Set up the necessary DNS records and certificates for the new Exchange environment.
- Verify System Requirements:
- Ensure that the Exchange 2010 servers meet the minimum requirements for migration to Exchange 2019.
- Update the Exchange 2010 servers to the latest service pack and cumulative updates.
- Prepare Active Directory:
- Verify that the Active Directory forest and domain functional levels meet the requirements for Exchange Server 2019.
- Prepare the Active Directory schema by running the necessary schema update commands on the domain controller.
- Configure Certificates:
- Obtain and install the required SSL certificates on the Exchange Server 2019 servers.
- Ensure that the certificates are properly configured for services like Autodiscover, Outlook Web App, and SMTP.
- Migrate Mailboxes:
- Determine the migration method based on your organization’s requirements and size of mailboxes:
- Staged Migration: Migrate mailboxes in batches using the Exchange Admin Center (EAC) or PowerShell commands.
- Hybrid Deployment: Set up a hybrid deployment with Office 365 if you plan to migrate to a cloud-based solution.
- Third-Party Tools: Consider using third-party migration tools for more complex scenarios.
- Create migration batches and specify the mailboxes to be migrated from Exchange 2010 to Exchange 2019.
- Start the migration batches and monitor the progress. Monitor the logs and status to identify any errors or issues.
- Determine the migration method based on your organization’s requirements and size of mailboxes:
- Replicate Public Folders:
- If you have public folders in Exchange 2010, replicate them to Exchange Server 2019 using public folder replication methods.
- Verify the replication status and ensure that the content is successfully replicated to the new environment.
- Redirect Client Access:
- Update the DNS records and configure the virtual directories to redirect client access to Exchange Server 2019.
- Modify the Autodiscover service to point to the Exchange 2019 servers.
- Test and Verify:
- Conduct thorough testing to ensure that mail flow, mailbox access, and other Exchange features are functioning properly in the new environment.
- Test mailbox access, email delivery, Outlook connectivity, and other essential functionalities.
- Decommission Exchange 2010:
- After ensuring that all mailboxes and services are successfully migrated and functioning in Exchange Server 2019, decommission the Exchange 2010 servers.
- Remove Exchange 2010 from the environment following the proper decommissioning process.
50. What are the different coexistence scenarios during an Exchange Server 2019 migration, and how do you ensure smooth collaboration between the old and new environments?
During an Exchange Server 2019 migration, there are several coexistence scenarios that organizations may encounter. These scenarios define how the old and new Exchange environments work together during the migration process. Here are the common coexistence scenarios and ways to ensure smooth collaboration between the environments:
- Coexistence with Exchange Server 2010:
- If you have Exchange Server 2010 in your environment, you can establish coexistence between Exchange 2010 and Exchange 2019.
- Ensure that both Exchange environments are properly configured and able to communicate with each other.
- Configure mail flow connectors between the Exchange 2010 and Exchange 2019 servers to enable email communication.
- Update the Autodiscover service to include the new Exchange 2019 servers so that clients can connect to the correct server.
- Coexistence with Office 365:
- If you plan to migrate to Exchange Online (Office 365), you can set up a hybrid deployment with Exchange Server 2019.
- Establish a hybrid configuration between Exchange Server 2019 and Office 365 using the Hybrid Configuration Wizard.
- Configure mail flow connectors between the on-premises Exchange 2019 and Exchange Online to ensure seamless email flow.
- Implement the Hybrid Modern Authentication (HMA) to provide a smooth authentication experience for users in both environments.
- Coexistence with Exchange Server 2013 or 2016:
- If you have Exchange Server 2013 or 2016 in your environment, you can establish coexistence with Exchange Server 2019.
- Ensure that all Exchange servers are on supported versions and have the necessary updates installed.
- Configure mail flow connectors between the Exchange 2019 and older Exchange versions for seamless email communication.
- Update the Autodiscover service to include the Exchange 2019 servers for client connectivity.
To ensure smooth collaboration between the old and new Exchange environments during coexistence, consider the following:
- Communication and Collaboration:
- Ensure that users from both environments can communicate and collaborate seamlessly.
- Configure mail flow connectors or hybrid deployments to allow email exchange between users in different Exchange environments.
- Implement directory synchronization between on-premises Active Directory and Office 365 (if applicable) to synchronize user information.
- Addressing and Namespace Planning:
- Plan and configure proper addressing and namespace to avoid conflicts between the old and new Exchange environments.
- Update DNS records, virtual directories, and Autodiscover service settings to ensure clients connect to the appropriate servers.
- Shared Resources:
- Determine how shared resources like public folders, shared mailboxes, and distribution groups will be accessed and managed during the migration.
- Migrate shared resources to the new Exchange environment or establish cross-premises access if required.
- Testing and Validation:
- Conduct thorough testing to ensure that mail flow, mailbox access, calendar sharing, and other collaboration features work as expected.
- Test from various client types (Outlook, OWA, mobile devices) to verify seamless connectivity and functionality.
51. How do you handle the migration of public folders from Exchange Server 2013 to Exchange Server 2019?
When migrating public folders from Exchange Server 2013 to Exchange Server 2019, you can follow these steps:
- Prepare the Exchange Server 2019 Environment:
- Install and configure Exchange Server 2019 according to the system requirements.
- Verify the connectivity and coexistence between the Exchange 2013 and Exchange 2019 environments.
- Prepare the Public Folder Hierarchy:
- Ensure that the public folder hierarchy in Exchange Server 2013 is healthy and replicated across all servers.
- Use PowerShell commands to check the health of public folders and ensure proper replication.
- Configure Public Folder Replication:
- Create a public folder database on the Exchange Server 2019.
- Add the Exchange Server 2019 as a replica for all public folders in the Exchange 2013 environment.
- Initiate the replication process to synchronize the public folder content between the Exchange 2013 and Exchange 2019 servers.
- Migrate Public Folder Content:
- Use the PowerShell cmdlet “New-PublicFolderMigrationRequest” to create a public folder migration request.
- Specify the source and target databases, and other migration options such as batch size and content filtering.
- Start the migration request to transfer the public folder content from Exchange 2013 to Exchange 2019.
- Monitor the migration progress using PowerShell commands and check for any errors or warnings.
- Verify Public Folder Replication:
- After the migration is complete, verify that the public folder content is replicated and accessible on the Exchange Server 2019.
- Test access to public folders from both Exchange 2013 and Exchange 2019 clients to ensure seamless functionality.
- Redirect Client Access:
- Update the Autodiscover service and configure the necessary DNS records to redirect clients to the Exchange Server 2019 for public folder access.
- Modify the client access settings on Exchange 2019 to ensure proper redirection.
52. What tools and techniques do you use to monitor the progress and troubleshoot any issues during an Exchange Server 2019 migration?
During an Exchange Server 2019 migration, there are several tools and techniques that can be used to monitor the progress and troubleshoot any issues that may arise. Here are some commonly used tools and techniques:
- Exchange Management Shell (PowerShell):
- PowerShell commands provide extensive capabilities for monitoring and managing the Exchange Server environment during migration.
- Use cmdlets like Get-MigrationBatch, Get-MigrationUser, and Get-MigrationStatistics to monitor the progress of mailbox migrations and check for any errors or warnings.
- PowerShell commands can also be used to perform various migration-related tasks, such as creating migration batches, starting or stopping migrations, and reviewing migration logs.
- Exchange Admin Center (EAC):
- The Exchange Admin Center web interface provides a user-friendly interface for managing and monitoring migration-related activities.
- Use the EAC to create and manage migration batches, monitor the progress of mailbox migrations, and view migration reports.
- The EAC also provides built-in dashboards and reports for monitoring migration status and identifying any issues or errors.
- Message Tracking:
- Exchange Server has a built-in message tracking feature that allows you to track the path of an email message within the Exchange environment.
- Use the Get-MessageTrackingLog PowerShell cmdlet or the Message Tracking tool in the EAC to trace the flow of messages and troubleshoot mail flow issues during migration.
- Event Logs:
- Monitor the Exchange Server event logs for any error messages or warnings related to the migration process.
- Look for specific event IDs that indicate migration-related issues and use the information provided to troubleshoot and resolve the problems.
- Performance Monitoring:
- Monitor the performance of Exchange Server during the migration process to identify any performance bottlenecks or resource limitations.
- Use tools like Performance Monitor (Perfmon) or third-party monitoring solutions to monitor key performance counters related to CPU, memory, disk, and network usage.
- Exchange Health Check:
- Regularly perform health checks on the Exchange environment to identify any potential issues before or during the migration.
- Use built-in Exchange health check scripts or third-party tools to assess the overall health and readiness of the Exchange servers and databases.
- Diagnostic Logging and Logging Level Changes:
- Increase the diagnostic logging level for Exchange components involved in the migration process to gather more detailed information in the logs.
- Analyze the logs to identify any errors, warnings, or performance issues and take appropriate actions.
Microsoft Exchange Server 2019 architecture questions and answers
53. What are the key architectural components of Microsoft Exchange Server 2019?
The key architectural components of Microsoft Exchange Server 2019 include:
- Mailbox Server: The Mailbox Server hosts the mailbox databases where user mailboxes and public folders are stored. It handles all mailbox-related operations such as sending, receiving, and storing emails.
- Client Access Server (CAS): The CAS role provides client connectivity to Exchange Server. It handles client protocols such as Outlook, Outlook on the web (OWA), Exchange ActiveSync, and Exchange Web Services (EWS).
- Transport Server: The Transport Server is responsible for message routing and delivery within the Exchange organization. It includes the Mailbox Transport service for internal mail flow and the Frontend Transport service for external mail flow.
- Edge Transport Server: The Edge Transport Server is deployed at the perimeter of the network to provide enhanced security and protection against spam, viruses, and other threats. It acts as a gateway for external mail flow.
- Public Folder Server: The Public Folder Server stores and manages public folders, which are shared folders for collaborative content like calendars, contacts, and documents. In Exchange Server 2019, public folders are stored in mailbox databases.
These components work together to provide a robust and scalable email and collaboration platform. Each component has its specific roles and responsibilities in the Exchange Server architecture, ensuring efficient message delivery, client connectivity, and data storage.
54. What is the role of the Client Access Server (CAS) in Exchange Server 2019 architecture?
In Exchange Server 2019 architecture, the Client Access Server (CAS) role plays a crucial role in handling client connectivity to the Exchange environment. The CAS acts as a gateway or entry point for client protocols and services, facilitating communication between clients and the Exchange infrastructure. Here are the key roles and responsibilities of the CAS:
- Client Protocol Support: The CAS role supports various client protocols, including Microsoft Outlook, Outlook on the web (OWA), Exchange ActiveSync, Exchange Web Services (EWS), and POP/IMAP. It enables clients to connect and interact with Exchange Server using their preferred protocols.
- Authentication and Authorization: The CAS handles client authentication and authorization processes, ensuring secure access to mailboxes and other resources. It validates user credentials, enforces security policies, and grants appropriate permissions based on user roles and permissions.
- Load Balancing: In a multi-server environment, the CAS role provides load balancing capabilities to distribute client connections across multiple CAS servers. It helps optimize performance, ensure high availability, and prevent overloading of individual servers.
- Proxying and Redirection: The CAS role acts as a proxy server, redirecting client requests to the appropriate server or service within the Exchange infrastructure. For example, when a client sends an email, the CAS determines the destination mailbox server and forwards the message accordingly.
- Outlook Anywhere: CAS enables Outlook Anywhere, which allows users to connect to their Exchange mailboxes securely from remote locations without requiring a virtual private network (VPN) connection. It provides remote access to Exchange features and data through the Outlook client.
55. How does the Mailbox Server role handle mailbox databases and user mailboxes in Exchange Server 2019?
In Exchange Server 2019, the Mailbox Server role plays a central role in handling mailbox databases and user mailboxes. It is responsible for storing, managing, and processing all mailbox-related data and operations. Here’s how the Mailbox Server role handles mailbox databases and user mailboxes:
- Mailbox Databases: The Mailbox Server hosts one or more mailbox databases, which are logical containers that store user mailboxes, public folders, and other related data. Each mailbox database is associated with a specific storage volume or storage area.
- Storage Management: The Mailbox Server role manages the physical storage of mailbox databases. It handles the allocation of disk space, management of transaction logs, and management of database file (.edb) and index files (.stm, .edb) for each mailbox database.
- Mailbox Creation and Management: The Mailbox Server role handles the creation, modification, and deletion of user mailboxes. It provides administrative tools, such as Exchange Management Shell (PowerShell) or Exchange Admin Center (EAC), to create and manage mailboxes, set mailbox properties, and apply mailbox policies.
- Mailbox Access: The Mailbox Server enables client access to user mailboxes through the Client Access Server (CAS) role. It works in conjunction with CAS to handle client connectivity, authentication, and authorization processes, ensuring secure access to user mailboxes.
- Mailbox Processing: The Mailbox Server role processes various mailbox-related operations, including sending and receiving emails, storing messages, managing mailbox rules, handling calendar events, and performing mailbox maintenance tasks (such as mailbox moves or database maintenance).
- High Availability: The Mailbox Server role supports high availability features, such as Database Availability Groups (DAGs), which allow for automatic database failover and replication across multiple Mailbox Servers. This ensures mailbox data availability and redundancy in the event of server failures.
- Search and Indexing: The Mailbox Server role is responsible for indexing mailbox data to enable efficient and fast searching within user mailboxes. It manages the search indexes and ensures that search queries retrieve accurate and up-to-date results.
Overall, the Mailbox Server role in Exchange Server 2019 is responsible for managing mailbox databases, handling mailbox-related operations, providing mailbox access to clients, and ensuring the availability and reliability of user mailboxes and associated data.
56. How does the Edge Transport Server role enhance security in Exchange Server 2019?
The Edge Transport Server role in Exchange Server 2019 enhances security by providing an additional layer of protection at the perimeter of the network. Here’s how the Edge Transport Server role enhances security:
- Secure Mail Flow: The Edge Transport Server acts as a gateway for external mail flow, serving as the first point of contact for incoming emails from the internet. It performs message filtering, including anti-spam and anti-malware checks, to block malicious or unwanted emails before they enter the internal Exchange infrastructure.
- Anti-Spam and Anti-Malware Protection: The Edge Transport Server role includes built-in anti-spam and anti-malware agents that help identify and block spam emails, phishing attempts, viruses, and other malicious content. These agents utilize various techniques, such as content filtering, IP reputation checks, and real-time blacklists, to detect and mitigate threats.
- Transport Rule Enforcement: The Edge Transport Server enforces transport rules to apply specific actions or restrictions on incoming and outgoing emails. This allows organizations to enforce compliance policies, apply data loss prevention (DLP) measures, and prevent the unauthorized transmission of sensitive information.
- Secure Communication: The Edge Transport Server role supports Transport Layer Security (TLS) encryption for secure communication with external email servers. It can be configured to establish secure connections when sending or receiving emails, ensuring the confidentiality and integrity of message transmission.
- Protection against DoS Attacks: The Edge Transport Server helps protect the Exchange infrastructure from Denial-of-Service (DoS) attacks by implementing connection throttling, recipient filtering, and message rate limiting. These measures prevent excessive resource consumption and help maintain service availability.
- Sender Reputation Checks: The Edge Transport Server performs sender reputation checks by verifying the reputation of external senders based on various factors such as IP reputation, SPF (Sender Policy Framework) records, and DMARC (Domain-based Message Authentication, Reporting, and Conformance) policies. This helps in identifying and blocking emails from known spammers or sources with a poor reputation.
By deploying the Edge Transport Server role, organizations can strengthen the security posture of their Exchange Server 2019 environment, protect against email-based threats, and reduce the load on internal servers by filtering out potentially harmful or unwanted messages at the network perimeter.
57. How does Exchange Server 2019 handle message routing and delivery through the Transport Server?
Exchange Server 2019 handles message routing and delivery through the Transport Server role, which is responsible for the flow of emails within the Exchange organization. Here’s an overview of how Exchange Server 2019 handles message routing and delivery:
- Message Submission: When a user sends an email, the client (such as Outlook) submits the message to the Transport service running on the Mailbox Server. The Transport service processes the message and determines the appropriate next hop for delivery.
- Routing Decisions: The Transport service evaluates the recipient’s address and performs routing calculations to determine the best route for message delivery. It considers factors such as the recipient’s mailbox location, the presence of routing connectors, and the organization’s routing topology.
- Transport Pipeline: Once the routing decision is made, the message enters the Transport pipeline, which consists of a series of stages that process the message. These stages include categorization, content conversion, content filtering (anti-spam and anti-malware), journaling, and transport rules processing.
- Transport Agents: Exchange Server 2019 allows the use of transport agents to extend or modify the behavior of the Transport service. Transport agents can perform additional message processing, apply custom policies, or interact with external systems. Examples of transport agents include anti-spam agents, journaling agents, and DLP agents.
- Message Delivery: After passing through the transport pipeline, the message is delivered to the recipient’s mailbox or to the next hop in the message’s route. Delivery may involve communication with other Mailbox Servers or the Edge Transport Server, depending on the organization’s topology and routing configuration.
- Redundancy and High Availability: Exchange Server 2019 supports database availability groups (DAGs) for mailbox database redundancy and high availability. DAGs replicate mailbox databases across multiple Mailbox Servers, ensuring that message delivery can continue even in the event of server failures.
- External Message Delivery: For messages sent to external recipients, Exchange Server 2019 uses Send Connectors to establish connections with external email servers. The Transport service handles the delivery of outbound messages to these external recipients, following SMTP (Simple Mail Transfer Protocol) standards.
Microsoft Exchange Server 2019 deployment interview questions and answers
58. What are the prerequisites for deploying Exchange Server 2019?
The prerequisites for deploying Exchange Server 2019 include:
- Operating System: Exchange Server 2019 can be installed on Windows Server 2019 Standard or Datacenter editions.
- Active Directory: The Active Directory forest functional level must be at least Windows Server 2008 or higher. Additionally, the schema must be extended to support Exchange Server 2019 by running the Exchange setup’s /PrepareSchema command.
- Hardware Requirements: The server hardware should meet the minimum requirements specified by Microsoft, including CPU, RAM, and storage capacity. It’s recommended to review the official documentation for the specific hardware requirements based on the expected workload.
- Software Requirements: Ensure that the required software components are installed on the server, such as the correct version of the .NET Framework and Visual C++ Redistributable.
- Networking and DNS: Plan and configure the network settings, including IP addresses, subnet masks, and network interfaces. Ensure that DNS is properly configured, and the Exchange Server can resolve domain names.
- Certificates: Obtain a valid SSL certificate for secure communication with Exchange services. The certificate should include the appropriate subject names (e.g., autodiscover, mail) and be trusted by the clients and devices accessing Exchange services.
- Firewall and Security: Configure the server’s firewall to allow incoming and outgoing traffic for the necessary Exchange services. Ensure that the server is properly secured by following security best practices, such as applying security updates and implementing proper access controls.
- Permissions and Service Accounts: Prepare the necessary permissions and service accounts required for the installation and operation of Exchange Server 2019. This includes assigning appropriate Active Directory permissions and configuring service account credentials.
59. How do you configure a hybrid deployment with Exchange Server 2019 and Office 365?
To configure a hybrid deployment with Exchange Server 2019 and Office 365, you need to follow these general steps:
- Verify Prerequisites: Ensure that both the on-premises Exchange Server 2019 and Office 365 environments meet the necessary prerequisites, such as supported versions and properly configured DNS.
- Configure Office 365 Tenant: Set up an Office 365 tenant and verify the domain ownership. This involves adding the domain to Office 365 and configuring the required DNS records.
- Prepare On-Premises Exchange Server: Update your on-premises Exchange Server 2019 to the latest cumulative update and ensure it is properly configured. This includes configuring the virtual directories, SSL certificates, and autodiscover settings.
- Establish Hybrid Connectivity: Configure hybrid connectivity between the on-premises Exchange Server and Office 365. This typically involves setting up and configuring the Hybrid Configuration Wizard (HCW) to establish trust and communication between the environments.
- Configure Mail Flow: Set up mail flow between the on-premises Exchange Server and Office 365. This includes configuring connectors and mail routing options, such as inbound and outbound mail flow and the use of centralized mail transport.
- Configure Hybrid Features: Enable and configure hybrid features, such as shared free/busy calendar availability, cross-premises mailbox permissions, and the ability to move mailboxes between on-premises and Office 365.
- Test and Validate: Perform thorough testing to ensure that mail flow, calendar sharing, and other hybrid features are functioning as expected. Validate that mailboxes can be moved between the on-premises and Office 365 environments without issues.
- Manage and Monitor: Implement monitoring and management tools to monitor the hybrid deployment, track mail flow, and troubleshoot any issues that may arise. This includes utilizing tools like Exchange Admin Center (EAC) and Exchange Online PowerShell.
Learn Hybrid deployment with Exchange Server 2019 step by step.60. What are the high availability options available in Exchange Server 2019?
Exchange Server 2019 provides several high availability options to ensure continuous availability of mailbox data and services. The key high availability feature in Exchange Server 2019 is Database Availability Groups (DAGs). Here are the high availability options available in Exchange Server 2019:
- Database Availability Groups (DAGs): DAGs are a native high availability feature in Exchange Server 2019. A DAG is a group of up to 16 Exchange servers that host mailbox databases and replicate them across the DAG members. DAGs provide automatic database replication, continuous database and log file replay, and automatic failover in case of server or database failures. This ensures mailbox database redundancy and availability.
- Database Copies: Within a DAG, multiple copies of a mailbox database are created and distributed across the DAG members. These database copies provide redundancy and allow for automatic failover in case of database or server failures. Database copies are continuously synchronized to maintain data consistency and can be activated on another DAG member in case of a failure.
- Database Resilience: Exchange Server 2019 offers database resilience by allowing database copies to be hosted on separate servers or datacenters. This provides protection against hardware or network failures, ensuring that mailbox data remains accessible even if a server or datacenter goes down.
- Lagged Database Copies: In addition to regular database copies, Exchange Server 2019 also supports lagged database copies. Lagged copies introduce an intentional delay in replicating database changes to provide a point-in-time recovery option. This can be useful in scenarios where data corruption or deletion needs to be recovered from a previous point in time.
- Site Resilience: Exchange Server 2019 supports site resilience by allowing the distribution of DAG members across multiple sites or datacenters. This enables geographically dispersed deployments and provides protection against site-level failures. It allows for automatic failover and failback between sites, ensuring mailbox database availability even in the event of a site outage.
These high availability options in Exchange Server 2019 help to minimize downtime, provide data redundancy, and ensure continuous access to mailbox data and services.
61. How do you perform mailbox migrations from older Exchange versions to Exchange Server 2019?
To perform mailbox migrations from older Exchange versions to Exchange Server 2019, you can use different migration methods depending on your specific environment and requirements. Here are a few commonly used migration methods:
- Cutover Migration: This method is suitable when you have a small number of mailboxes to migrate. In a cutover migration, all mailboxes are moved from the source Exchange server to Exchange Server 2019 in a single migration batch. It involves exporting mailbox data from the source server and importing it to the target server. Cutover migration is typically used when migrating from Exchange Server 2010 or Exchange Server 2013.
- Staged Migration: Staged migration is suitable for larger migrations where you want to migrate mailboxes in batches over a period of time. It involves a two-step process: first, you configure mail flow coexistence between the source Exchange server and Exchange Server 2019, allowing mail to flow seamlessly between both environments. Then, you migrate mailboxes in batches using a migration batch process. Staged migration is commonly used when migrating from Exchange Server 2010 or Exchange Server 2013.
- Hybrid Migration: If you are planning to integrate your on-premises Exchange organization with Office 365, you can use a hybrid migration. This method allows for a seamless coexistence between Exchange Server 2019 and Exchange Online. With a hybrid deployment, you can move mailboxes between on-premises Exchange Server 2019 and Exchange Online using the Exchange Admin Center or PowerShell commands. Hybrid migration provides a more flexible and phased approach to migrating mailboxes while maintaining coexistence and preserving features such as shared free/busy calendar availability.
- Third-Party Migration Tools: There are also third-party migration tools available in the market that provide additional features and capabilities for mailbox migrations. These tools offer more advanced migration options, mailbox mapping, scheduling, and reporting features, making it easier to migrate mailboxes from older Exchange versions to Exchange Server 2019.
When planning a mailbox migration, it is crucial to thoroughly assess your environment, consider any dependencies or custom configurations, and ensure that you have a proper backup and recovery plan in place. Additionally, it is recommended to refer to Microsoft’s official documentation and migration guides for detailed step-by-step instructions based on your specific migration scenario.
62. What considerations should be taken into account when planning a multi-site deployment of Exchange Server 2019?
When planning a multi-site deployment of Exchange Server 2019, several considerations should be taken into account to ensure optimal performance, high availability, and efficient management. Here are some key considerations:
- Site Topology: Evaluate the physical locations of your sites and determine the logical layout of your Exchange infrastructure. Consider factors such as network connectivity, bandwidth, latency, and datacenter locations. Determine which sites will host Exchange servers and mailbox databases, and plan for appropriate network segmentation and routing.
- High Availability and Disaster Recovery: Implement Database Availability Groups (DAGs) to provide high availability and database replication across multiple sites. Configure DAG members and database copies to ensure redundancy and failover capabilities. Consider the placement of witness servers to maintain quorum and determine your disaster recovery strategy, including backup and restore procedures.
- Network Connectivity and Bandwidth: Ensure sufficient network connectivity and bandwidth between sites to support Exchange Server communication and data replication. Evaluate network latency and implement measures like QoS (Quality of Service) to prioritize Exchange traffic and prevent performance degradation.
- Active Directory Infrastructure: Evaluate your Active Directory infrastructure to support multi-site Exchange deployments. Consider factors such as the placement of domain controllers, site topology in Active Directory Sites and Services, and ensure proper replication and connectivity between sites.
- Client Access and Load Balancing: Plan the placement of Client Access Servers (CAS) to provide optimal access for users in different sites. Implement load balancing solutions to distribute client traffic and ensure high availability of CAS services.
- Mail Routing and Transport: Configure mail routing between sites to ensure efficient message flow. Evaluate the use of Hub Transport servers or Edge Transport servers to handle mail flow between sites and external entities. Configure appropriate send and receive connectors to facilitate communication.
- Management and Administration: Consider the administrative overhead of managing a multi-site deployment. Determine the delegation of administrative tasks and permissions across sites. Evaluate the use of centralized management tools, such as the Exchange Admin Center (EAC) or PowerShell remoting, to streamline administration.
- Compliance and Data Governance: Consider compliance and data governance requirements in a multi-site deployment. Implement policies for message archiving, retention, eDiscovery, and data protection across sites. Ensure compliance with data privacy regulations and industry standards.
63. What are the best practices for securing the deployment of Exchange Server 2019?
Securing the deployment of Exchange Server 2019 is essential to protect sensitive data, ensure the integrity of communication, and prevent unauthorized access. Here are some best practices for securing Exchange Server 2019:
- Keep Exchange Server Up-to-Date: Regularly apply the latest security updates and patches provided by Microsoft to address vulnerabilities and protect against known threats. Stay informed about security bulletins and follow recommended update practices.
- Secure Network Communication: Use Transport Layer Security (TLS) to encrypt communication between Exchange servers, clients, and external systems. Configure Exchange to use SSL/TLS certificates from trusted certificate authorities. Disable insecure protocols such as SSLv2 and SSLv3 and ensure the use of strong cipher suites.
- Implement Role-Based Access Control (RBAC): Use RBAC to assign appropriate permissions to Exchange administrators and users. Restrict administrative privileges to only those who require them and enforce the principle of least privilege. Regularly review and audit access rights to maintain a secure environment.
- Enable Anti-Malware and Anti-Spam Protection: Configure Exchange Server to use built-in anti-malware and anti-spam features. Enable real-time scanning of incoming and outgoing emails to detect and block malicious content. Keep the anti-malware definitions up-to-date.
- Implement Strong Password Policies: Enforce strong password policies for user accounts in Exchange Server. Require complex passwords with a combination of uppercase and lowercase letters, numbers, and special characters. Enforce password expiration and account lockout policies.
- Enable Multi-Factor Authentication (MFA): Implement MFA to add an extra layer of security for user authentication. Require users to provide additional verification, such as a one-time password or biometric authentication, in addition to their username and password.
- Secure Remote Access: If remote access to Exchange is required, use a secure method such as a VPN (Virtual Private Network) to establish an encrypted connection. Consider implementing Remote Desktop Gateway (RD Gateway) for secure remote access to Exchange management tools.
- Protect Physical Server and Datacenter: Implement physical security measures to protect Exchange servers and the datacenter. Restrict physical access to authorized personnel only. Implement surveillance, alarms, and environmental controls to protect against physical threats.
- Regularly Monitor and Audit: Implement a robust monitoring and auditing system to track and detect any suspicious activities or security breaches. Monitor event logs, security logs, and Exchange-specific logs for signs of unauthorized access or unusual behavior.
- Backup and Disaster Recovery: Implement regular backups of Exchange databases and configuration settings. Maintain a comprehensive disaster recovery plan to restore services in case of data loss or system failure.
Microsoft Exchange Server 2019 administration questions and answers
64. How do you configure mailbox quotas in Exchange Server 2019, and what is the significance of these quotas?
In Exchange Server 2019, you can configure mailbox quotas to control the size and usage of user mailboxes. These quotas help in managing the storage space allocated to each mailbox and maintaining the overall performance and stability of the Exchange environment. Here’s how you can configure mailbox quotas in Exchange Server 2019:
- Open the Exchange Admin Center (EAC) or Exchange Management Shell (PowerShell).
- In the EAC, navigate to Recipients -> Mailboxes. In the list of mailboxes, select the mailbox for which you want to configure quotas. In the details pane, click on the “…” (ellipsis) button and choose “Properties.” In the mailbox properties window, click on the “Mailbox Features” tab.
- In the Mailbox Features tab, click on “Storage Quotas” or “View details” (depending on the version of Exchange) to access the quota settings.
- Here, you can configure three types of quotas: a. Issue Warning Quota: This specifies the mailbox size at which a warning message is sent to the user, indicating that their mailbox is nearing its limit. b. Prohibit Send Quota: This sets the maximum mailbox size at which users are prevented from sending new emails. Existing emails can still be accessed and received. c. Prohibit Send and Receive Quota: This sets the maximum mailbox size at which users are completely blocked from sending and receiving emails.
- Specify the desired values for each quota type, either in megabytes (MB) or gigabytes (GB).
- Save the changes and apply the quotas to the mailbox.
The significance of mailbox quotas is to prevent mailboxes from growing indefinitely and consuming excessive storage resources. By implementing quotas, administrators can enforce storage limits, proactively notify users about approaching limits, and control the overall storage usage. This helps in maintaining the performance of Exchange Server, preventing database and storage issues, and promoting responsible mailbox management. Additionally, mailbox quotas also assist in adhering to compliance regulations and managing storage costs effectively.
65. Explain the process of creating and managing distribution groups in Exchange Server 2019. How can you control who can send emails to these groups?
In Exchange Server 2019, you can create and manage distribution groups to facilitate email communication with specific groups of users. Distribution groups can be used to send emails to multiple recipients simultaneously. Here’s an overview of the process of creating and managing distribution groups, including how to control who can send emails to these groups:
Creating a Distribution Group:
- Open the Exchange Admin Center (EAC) or Exchange Management Shell (PowerShell).
- In the EAC, navigate to Recipients -> Groups. Click on the “New (+)” button to create a new distribution group. Alternatively, in the Exchange Management Shell, use the New-DistributionGroup cmdlet to create a distribution group.
- Provide a name and email address for the distribution group. Choose the desired organizational unit (OU) or leave it in the default location.
- Configure other settings as needed, such as the group type (e.g., distribution group, security group), whether it’s open or closed, and whether it’s visible in the address book.
- Add members to the distribution group by selecting them from the available recipient list. You can add individual users, contacts, or other groups as members.
Managing Distribution Group Membership:
- To manage the membership of a distribution group, navigate to the group in the EAC or use PowerShell cmdlets like Add-DistributionGroupMember or Remove-DistributionGroupMember to add or remove members.
- You can also manage group membership using dynamic distribution groups, where the membership is determined based on specific criteria like attributes, organizational units, or custom filters.
Controlling Who Can Send Emails to the Distribution Group:
- By default, anyone in the organization can send emails to a distribution group. However, you can control who can send emails to the group by modifying the group’s “Message Approval” settings.
- In the EAC, navigate to the distribution group’s properties and go to the “Mail Flow Settings” tab. Click on “Message Approval” or “Message Delivery Restrictions” (depending on the Exchange version) to access the settings.
- Enable the “Senders inside and outside of my organization” option to allow emails from both internal and external senders. Alternatively, choose the “Senders inside my organization” option to restrict emails to only internal senders.
- To further control who can send emails, you can specify additional restrictions such as allowing only certain individuals or groups to send to the distribution group.
- Save the changes to apply the message approval or delivery restriction settings.
By configuring the message approval and delivery restriction settings, you can control who can send emails to the distribution group. This allows you to limit access to specific individuals or groups and ensure that only authorized users can communicate with the distribution group.
66. Describe the steps involved in configuring and troubleshooting mailbox database backups and restores in Exchange Server 2019.
Configuring and troubleshooting mailbox database backups and restores in Exchange Server 2019 involves several steps. Here’s an overview of the process:
Configuring Mailbox Database Backups:
- Identify a suitable backup solution that is compatible with Exchange Server 2019. Ensure it supports Exchange-aware backups.
- Install and configure the backup software on a dedicated backup server or a server separate from the Exchange Server environment.
- Create a backup schedule that aligns with your organization’s data retention and recovery objectives. Consider factors such as backup frequency, retention period, and backup window.
- Configure the backup software to include the Exchange Server 2019 mailbox databases in the backup scope. Ensure all necessary databases are selected for backup.
- Specify the backup destination, such as a network share, tape drive, or cloud storage, where the backup files will be stored.
- Test the backup configuration by performing a test backup and restore to validate the backup process.
Troubleshooting Mailbox Database Backups and Restores:
- Monitor the backup jobs regularly to ensure they are running successfully without errors or warnings. Investigate any failed or incomplete backups and address the underlying issues.
- Verify that the backup files are being created and stored in the designated location. Check for sufficient disk space on the backup destination.
- Perform test restores periodically to ensure that the backup files are valid and can be restored successfully. Validate the integrity and consistency of the restored mailbox databases.
- If backups fail or encounter issues, review the backup logs and error messages for specific details. Investigate and resolve any issues related to connectivity, permissions, or storage availability.
- Keep track of any changes made to the Exchange Server environment, such as mailbox database moves, database dismounts, or changes to storage configurations. These changes may impact the backup and restore processes.
- Regularly review and update the backup strategy based on changes in the Exchange Server environment, data growth, and business requirements.
- Stay up to date with the latest Exchange Server 2019 updates, patches, and best practices for backup and restore operations.
Remember that mailbox database backups and restores are critical for data protection and disaster recovery. It is recommended to follow best practices, test backups and restores regularly, and address any issues promptly to ensure the availability and integrity of Exchange Server 2019 mailbox databases.
67. How do you manage and track email messages using transport rules in Exchange Server 2019? Provide an example of a common scenario where transport rules are useful.
In Exchange Server 2019, you can manage and track email messages using transport rules. Transport rules allow you to apply specific actions or conditions to messages as they pass through the transport pipeline. Here’s how you can use transport rules to manage and track email messages:
- Open the Exchange Admin Center (EAC) or Exchange Management Shell (PowerShell).
- In the EAC, navigate to Mail Flow -> Rules. In the Exchange Management Shell, use the New-TransportRule cmdlet to create a new transport rule.
- Define the conditions that will trigger the transport rule. For example, you can specify conditions based on message properties (sender, recipient, subject, etc.), message content (keywords, attachments, etc.), or message characteristics (message size, SCL rating, etc.).
- Specify the actions to be taken when the conditions are met. Actions can include modifying the message, adding disclaimers or signatures, forwarding the message, redirecting the message, or rejecting the message.
- Optionally, you can enable tracking for the transport rule. This allows you to monitor and track messages affected by the rule. You can choose to log the rule’s activity, generate reports, or send notifications to specific recipients.
- Test the transport rule to ensure it functions as intended. You can use test email messages that meet the specified conditions to verify the rule’s behavior.
- Save and enable the transport rule to make it active in the Exchange Server environment.
Example Scenario: A common scenario where transport rules are useful is enforcing email content policies. For instance, let’s consider a scenario where a company wants to prevent the transmission of sensitive information through email. They want to ensure that any email containing credit card numbers is automatically blocked or flagged for review.
To achieve this, you can create a transport rule with the following configuration:
Condition:
- Message properties: If the message contains any of these patterns in the subject or body: [0-9]{4}-[0-9]{4}-[0-9]{4}-[0-9]{4}
Actions:
- Block the message and generate a non-delivery report (NDR) informing the sender of the policy violation.
- Optionally, send a notification to the IT department or a designated recipient for further review.
By implementing this transport rule, any email that includes a credit card number in the specified pattern will be blocked or flagged for review, helping to enforce the company’s security and compliance policies.
Transport rules provide a flexible and powerful mechanism for managing and tracking email messages in Exchange Server 2019. They can be utilized to enforce various policies, such as data loss prevention, email encryption, compliance regulations, or custom requirements specific to your organization’s needs.
68. What are the different types of recipient objects in Exchange Server 2019, and how do you create and manage them using PowerShell commands?
In Exchange Server 2019, there are several types of recipient objects that you can create and manage. Here are the commonly used recipient objects and their PowerShell commands for creation and management:
- User Mailboxes:
- Creation: New-Mailbox cmdlet
- Management: Set-Mailbox cmdlet for modifying mailbox properties, Get-Mailbox cmdlet for retrieving mailbox information, Disable-Mailbox cmdlet for disabling a mailbox, and Remove-Mailbox cmdlet for removing a mailbox.
- Distribution Groups:
- Creation: New-DistributionGroup cmdlet
- Management: Set-DistributionGroup cmdlet for modifying group properties, Get-DistributionGroup cmdlet for retrieving group information, Add-DistributionGroupMember cmdlet for adding members to a group, and Remove-DistributionGroupMember cmdlet for removing members from a group.
- Mail Contacts:
- Creation: New-MailContact cmdlet
- Management: Set-MailContact cmdlet for modifying contact properties, Get-MailContact cmdlet for retrieving contact information, and Remove-MailContact cmdlet for removing a contact.
- Mail-Enabled Public Folders:
- Creation: New-MailPublicFolder cmdlet
- Management: Set-MailPublicFolder cmdlet for modifying public folder properties, Get-MailPublicFolder cmdlet for retrieving public folder information, and Remove-MailPublicFolder cmdlet for removing a public folder.
- Room Mailboxes:
- Creation: New-Mailbox -Room cmdlet
- Management: Set-Mailbox cmdlet for modifying room mailbox properties, Get-Mailbox cmdlet for retrieving room mailbox information, and Remove-Mailbox cmdlet for removing a room mailbox.
- Shared Mailboxes:
- Creation: New-Mailbox -Shared cmdlet
- Management: Set-Mailbox cmdlet for modifying shared mailbox properties, Get-Mailbox cmdlet for retrieving shared mailbox information, and Remove-Mailbox cmdlet for removing a shared mailbox.
- Contacts:
- Creation: New-Contact cmdlet
- Management: Set-Contact cmdlet for modifying contact properties, Get-Contact cmdlet for retrieving contact information, and Remove-Contact cmdlet for removing a contact.
These are just a few examples of recipient objects in Exchange Server 2019. PowerShell commands provide a convenient and efficient way to create and manage these objects. By utilizing the appropriate cmdlets, you can create, modify, retrieve information, and remove recipient objects based on your organization’s requirements and policies.
Microsoft Exchange Server 2019 security interview questions and answers
69. How do you secure the Exchange Server 2019 infrastructure against external threats?
To secure Microsoft Exchange Server 2019 infrastructure against external threats, you can follow these best practices:
- Keep Exchange Server Up-to-Date:
- Regularly apply the latest security updates and patches provided by Microsoft to address known vulnerabilities.
- Use Secure Network Configurations:
- Implement firewalls and network segmentation to isolate Exchange Server from untrusted networks.
- Restrict access to Exchange services using network security groups or other access control mechanisms.
- Implement Secure Remote Access:
- Use a virtual private network (VPN) or secure HTTPS connections (e.g., Outlook Anywhere or Exchange ActiveSync) for remote access to Exchange services.
- Consider using two-factor authentication to add an extra layer of security.
- Enable Anti-Malware and Anti-Spam Protection:
- Deploy and configure anti-malware and anti-spam software to scan inbound and outbound email traffic for malicious content.
- Keep the anti-malware and anti-spam software up-to-date with the latest virus definitions.
- Utilize Transport Layer Security (TLS) Encryption:
- Configure Exchange Server to use TLS encryption for inbound and outbound email communication to protect the confidentiality and integrity of email data.
- Enable opportunistic TLS for automatic encryption whenever possible.
- Implement Sender and Recipient Filtering:
- Use Sender and Recipient Filtering features in Exchange Server to block or allow email messages based on specific criteria (e.g., IP addresses, domains, or specific senders).
- Implement Role-Based Access Control (RBAC):
- Utilize RBAC to assign appropriate permissions to administrators and users, limiting access to Exchange Server resources based on their roles and responsibilities.
- Enable Auditing and Logging:
- Enable auditing and logging features in Exchange Server to track and monitor activities, including authentication attempts, mailbox access, and administrative actions.
- Regularly review audit logs for any suspicious activities or unauthorized access.
- Regularly Monitor and Review Security Logs:
- Monitor security logs and event logs on Exchange Server for any signs of intrusion attempts, abnormal activities, or system vulnerabilities.
- Set up alerts or notifications for critical events to promptly respond to potential security incidents.
- Educate Users on Security Best Practices:
- Conduct security awareness training for users to educate them about common security threats, phishing attacks, and safe email practices.
- Encourage the use of strong passwords, caution when opening attachments or clicking on suspicious links, and reporting any security incidents or suspicious emails.
By implementing these security measures, you can help protect your Exchange Server 2019 infrastructure from external threats and minimize the risk of unauthorized access, data breaches, and other security incidents.
70. What are the best practices for securing mailbox access in Exchange Server 2019?
Securing mailbox access in Exchange Server 2019 is crucial to protect sensitive data and prevent unauthorized access. Here are some best practices to follow:
- Implement Strong Password Policies:
- Enforce strong password requirements for user mailboxes, including complexity, length, and regular password changes.
- Discourage the use of common or easily guessable passwords.
- Enable Multi-Factor Authentication (MFA):
- Implement MFA to add an extra layer of security for mailbox access.
- Require users to provide additional verification, such as a one-time password (OTP) or biometric authentication, in addition to their password.
- Use Role-Based Access Control (RBAC):
- Implement RBAC to grant appropriate permissions to administrators and users based on their roles and responsibilities.
- Limit access to mailbox resources and administrative functions to authorized individuals.
- Restrict External Access:
- Configure Exchange Server to limit external access to mailboxes.
- Disable POP3 and IMAP protocols if they are not required.
- Use secure protocols such as Exchange ActiveSync and Outlook Anywhere with HTTPS.
- Implement Account Lockout Policies:
- Configure account lockout policies to prevent brute-force attacks on user accounts.
- Set limits on the number of failed login attempts and define lockout durations.
- Regularly Monitor and Review Mailbox Access Logs:
- Enable mailbox auditing to track and log mailbox access activities.
- Monitor mailbox access logs and review them regularly for any suspicious activities or unauthorized access attempts.
- Educate Users on Security Awareness:
- Provide training and awareness programs to users about mailbox security best practices.
- Educate them on identifying phishing emails, avoiding suspicious attachments or links, and reporting any security incidents.
- Regularly Update and Patch Exchange Server:
- Keep Exchange Server up-to-date with the latest security updates and patches provided by Microsoft.
- Regularly apply security updates to address any known vulnerabilities.
- Implement Data Loss Prevention (DLP) Policies:
- Configure DLP policies in Exchange Server to prevent the accidental or intentional leakage of sensitive data.
- Define rules to monitor and block sensitive information from being sent via email.
- Regularly Backup and Monitor Mailbox Data:
- Implement regular backup and recovery procedures to protect mailbox data from accidental deletion, corruption, or system failures.
- Monitor mailbox data for any suspicious activities or unauthorized changes.
By following these best practices, you can enhance the security of mailbox access in Exchange Server 2019 and safeguard the confidentiality and integrity of your organization’s email communication.
71. What security measures can be implemented to protect against email-based attacks in Exchange Server 2019?
To protect against email-based attacks in Exchange Server 2019, you can implement the following security measures:
- Enable Anti-Spam and Anti-Malware Protection:
- Deploy and configure anti-spam and anti-malware software or services to scan incoming and outgoing email messages for spam, viruses, and other malicious content.
- Keep the anti-spam and anti-malware software up-to-date with the latest definitions and signatures.
- Implement Sender and Recipient Filtering:
- Utilize the Sender and Recipient Filtering features in Exchange Server to block or allow email messages based on specific criteria such as sender IP addresses, domains, or specific recipients.
- Create filters to block known malicious senders or suspicious domains.
- Use Connection Filtering and IP Reputation Services:
- Configure connection filtering in Exchange Server to block connections from known malicious IP addresses or ranges.
- Utilize IP reputation services to assess the reputation of incoming IP addresses and block connections from sources with poor reputation scores.
- Enable DMARC, SPF, and DKIM:
- Implement Domain-based Message Authentication, Reporting, and Conformance (DMARC), Sender Policy Framework (SPF), and DomainKeys Identified Mail (DKIM) to authenticate email senders and prevent email spoofing.
- Configure DMARC policies to specify how to handle emails that fail SPF or DKIM authentication.
- Educate Users on Phishing Awareness:
- Conduct regular security awareness training for users to educate them about phishing attacks and how to identify and report suspicious emails.
- Teach them to be cautious when clicking on links or downloading attachments from unknown or suspicious sources.
- Implement Transport Rules for Email Filtering:
- Create and enforce transport rules in Exchange Server to filter and block email messages based on specific criteria, such as keywords, attachment types, or specific sender domains.
- Use transport rules to block common phishing techniques or sensitive information leakage.
- Enable Mailbox Auditing and Monitoring:
- Enable mailbox auditing in Exchange Server to track and log mailbox access activities, including suspicious login attempts or unauthorized access.
- Regularly review mailbox audit logs for any signs of abnormal activities or potential security breaches.
- Regularly Update and Patch Exchange Server:
- Keep Exchange Server up-to-date with the latest security updates and patches provided by Microsoft.
- Regularly apply security updates to address any known vulnerabilities.
- Implement Data Loss Prevention (DLP) Policies:
- Configure DLP policies in Exchange Server to prevent the accidental or intentional leakage of sensitive information through email.
- Define rules to identify and block the transmission of sensitive data, such as social security numbers or credit card information.
- Monitor and Analyze Email Traffic:
- Use email traffic monitoring and analysis tools to detect and analyze patterns or anomalies in email traffic.
- Look for signs of phishing campaigns, unusual email volume, or suspicious attachments.
By implementing these security measures, you can significantly reduce the risk of email-based attacks and enhance the overall security of Exchange Server 2019. However, it’s important to regularly assess and update your security measures to stay protected against evolving threats.
72. How do you ensure data protection and privacy in Exchange Server 2019, especially in compliance with regulations like GDPR?
To ensure data protection and privacy in Exchange Server 2019, particularly in compliance with regulations like GDPR (General Data Protection Regulation), you can implement the following measures:
- Data Classification and Retention Policies:
- Classify sensitive data within mailboxes and apply appropriate retention policies.
- Identify and tag personal data elements within emails and attachments to facilitate compliance with data protection regulations.
- Encryption of Data in Transit and at Rest:
- Enable Transport Layer Security (TLS) encryption to protect data during transmission between Exchange Server and other mail servers.
- Implement BitLocker encryption on server hard drives to protect data at rest.
- Role-Based Access Control (RBAC):
- Configure RBAC to grant access to mailbox data based on the principle of least privilege.
- Assign permissions to administrators and users based on their roles and responsibilities.
- Data Loss Prevention (DLP) Policies:
- Implement DLP policies to detect and prevent the unauthorized disclosure of sensitive information.
- Define rules to identify and block the transmission of personal data, such as social security numbers or credit card information.
- Auditing and Logging:
- Enable mailbox auditing to track and log access to mailbox data.
- Maintain detailed logs of user activities, including email access, modifications, and deletions, to ensure accountability and facilitate compliance.
- Consent Management:
- Implement mechanisms to obtain and manage user consent for data processing and storage.
- Ensure that users have the ability to control and revoke consent as required by regulations.
- Data Breach Detection and Incident Response:
- Implement monitoring tools and processes to detect potential data breaches or unauthorized access.
- Establish an incident response plan to handle and report data breaches promptly, as required by regulations.
- Vendor and Third-Party Management:
- Conduct due diligence when selecting vendors or third-party services that handle or process personal data.
- Ensure that appropriate data protection agreements and compliance measures are in place.
- Employee Training and Awareness:
- Provide regular training and awareness programs to employees regarding data protection policies and practices.
- Educate employees about their responsibilities in handling and protecting personal data.
- Regular Assessments and Audits:
- Conduct regular assessments and audits of Exchange Server configurations and data protection measures.
- Perform periodic reviews to ensure compliance with regulations and identify areas for improvement.
It’s important to consult with legal and compliance experts to ensure that your Exchange Server 2019 deployment aligns with the specific requirements of GDPR or any other applicable data protection regulations in your region.
73. How do you configure Transport Layer Security (TLS) encryption in Exchange Server 2019 to secure email communication?
To configure Transport Layer Security (TLS) encryption in Exchange Server 2019 to secure email communication, you can follow these steps:
- Obtain and Install SSL/TLS Certificates:
- Obtain a valid SSL/TLS certificate from a trusted certificate authority (CA) for your Exchange Server.
- Install the certificate on the Exchange Server to enable secure communications.
- Enable TLS on Receive and Send Connectors:
- Open the Exchange Management Shell.
- To enable TLS encryption for incoming email, use the following PowerShell command:
Set-ReceiveConnector -Identity "<ReceiveConnectorIdentity>" -RequireTLS $true - To enable TLS encryption for outgoing email, use the following PowerShell command:
Set-SendConnector -Identity "<SendConnectorIdentity>" -RequireTLS $true
- Configure TLS Cipher Suite:
- Determine the desired TLS cipher suite to be used for secure communication.
- Use the following PowerShell command to set the TLS cipher suite on the Exchange Server:
Set-ExchangeServer -Identity "<ServerIdentity>" -TLSCipherSuite "<CipherSuiteName>"
- Configure Opportunistic TLS:
- Opportunistic TLS allows the Exchange Server to attempt a secure TLS connection when communicating with other email servers that support it.
- Use the following PowerShell command to enable Opportunistic TLS:
Set-TransportConfig -TLSSendDomainSecureList "contoso.com, fabrikam.com"
- Validate TLS Configuration:
- Test the TLS configuration by sending a test email to an external email address.
- Monitor the Exchange Server logs and examine the email headers to ensure that TLS encryption is being used.
It’s important to note that TLS encryption also relies on the configuration of the recipient’s email server. Both the sending and receiving email servers must have TLS encryption enabled to establish a secure communication channel.
74. How do you implement and manage Data Loss Prevention (DLP) policies in Exchange Server 2019 to prevent the accidental or intentional leakage of sensitive data?
To implement and manage Data Loss Prevention (DLP) policies in Exchange Server 2019 to prevent the accidental or intentional leakage of sensitive data, you can follow these steps:
- Define Data Loss Prevention Policies:
- Identify the sensitive data that needs to be protected, such as credit card numbers, social security numbers, or confidential documents.
- Determine the conditions and rules for detecting and preventing the transmission of sensitive data, including keywords, patterns, or specific data formats.
- Configure DLP Rules in Exchange Admin Center (EAC):
- Open the Exchange Admin Center.
- Navigate to the “Compliance Management” section and select “Data Loss Prevention.”
- Create new DLP rules based on your defined policies, specifying the conditions, actions, and exceptions.
- Customize the rule parameters, such as severity levels, notifications, or blocking actions.
- Test and Validate DLP Policies:
- Use test mailboxes or accounts to send sample emails that contain sensitive data.
- Monitor the DLP policies’ actions and verify that they are correctly identifying and handling sensitive information.
- Refine the policies based on the testing results to ensure accurate detection and prevention.
- Train and Educate Users:
- Conduct user awareness and training programs to educate employees about data protection policies and the importance of preventing data leakage.
- Communicate the consequences of violating DLP policies and provide guidelines for handling sensitive data securely.
- Monitor and Review DLP Policy Effectiveness:
- Regularly monitor the DLP policy logs and reports to identify any policy violations or false positives.
- Review and refine the DLP policies based on the monitoring results and feedback from users or compliance teams.
- Regularly Update DLP Policies:
- Stay informed about the latest data protection regulations and industry best practices.
- Update and modify the DLP policies to align with the changing requirements and to address emerging threats.
- Integrate with Data Classification and Encryption Solutions:
- Leverage data classification tools to automatically identify and classify sensitive data within emails and attachments.
- Integrate with encryption solutions to ensure that sensitive data is protected during transmission and storage.
- Maintain Compliance and Audit Trails:
- Regularly audit and review the DLP policy configurations and actions to ensure compliance with regulatory requirements.
- Keep detailed logs and records of DLP policy enforcement and incidents for future reference and compliance audits.
75. What measures can be taken to protect Exchange Server 2019 against common security threats such as phishing, malware, and spam?
To protect Exchange Server 2019 against common security threats such as phishing, malware, and spam, you can implement the following measures:
- Implement Secure Email Gateways:
- Deploy and configure a secure email gateway solution that provides advanced threat protection, spam filtering, and malware detection.
- Ensure that the email gateway solution is regularly updated with the latest threat intelligence and security definitions.
- Enable Sender Authentication:
- Implement Sender Policy Framework (SPF), DomainKeys Identified Mail (DKIM), and Domain-based Message Authentication, Reporting, and Conformance (DMARC) to verify the authenticity of incoming email messages.
- Configure these authentication mechanisms to reject or mark suspicious emails from unauthorized senders.
- Use Advanced Threat Protection (ATP) Services:
- Enable Exchange Online Protection (EOP) or other ATP services to provide additional layers of protection against advanced threats such as phishing and malware.
- Utilize features like Safe Links, Safe Attachments, and anti-phishing policies to detect and block malicious URLs and attachments.
- Educate Users and Conduct Awareness Training:
- Train users to recognize and report phishing attempts, suspicious emails, and social engineering techniques.
- Conduct regular security awareness programs to educate employees about email security best practices, password hygiene, and safe email usage.
- Implement Anti-Malware Solutions:
- Deploy and configure anti-malware software on Exchange Server to scan incoming and outgoing email messages for malware and viruses.
- Ensure that the anti-malware solution is regularly updated with the latest virus definitions and security patches.
- Enable Spam Filtering:
- Configure Exchange Server’s built-in anti-spam features or integrate with third-party spam filtering solutions to detect and block spam emails.
- Fine-tune spam filtering rules and policies based on organizational requirements and adjust the sensitivity levels as needed.
- Regularly Patch and Update Exchange Server:
- Stay up to date with the latest security patches and updates provided by Microsoft for Exchange Server.
- Implement a regular patch management process to ensure that all servers are running the latest software versions and security fixes.
- Use Email Encryption and Digital Signatures:
- Implement Transport Layer Security (TLS) encryption to secure email communication between servers.
- Encourage the use of encrypted email communication and digital signatures for sensitive or confidential information.
- Monitor and Analyze Email Traffic:
- Implement email traffic monitoring and analysis solutions to detect anomalies, suspicious activities, or patterns indicative of security threats.
- Set up alerts and notifications for unusual email behavior or potential security breaches.
- Conduct Regular Security Audits and Assessments:
- Perform periodic security audits and assessments to identify vulnerabilities, review security configurations, and ensure compliance with security standards.
- Conduct penetration testing and vulnerability scanning to proactively identify and address potential security weaknesses.
In conclusion, this blog post aimed to provide you with valuable insights into some of the most commonly asked interview questions related to Microsoft Exchange Server 2019. We covered a wide range of topics, including deployment considerations, migration strategies, architecture components, troubleshooting techniques, security measures, and more.
By understanding these interview questions and their corresponding answers, you can enhance your knowledge and preparation for Exchange Server 2019 interviews. Remember to leverage PowerShell commands where applicable, as they are powerful tools for managing and troubleshooting Exchange Server environments.
It’s important to note that while these questions offer a good foundation, it’s always beneficial to further explore the topics and keep yourself updated with the latest advancements in Exchange Server technology. Additionally, gaining hands-on experience and practicing in a lab environment will significantly strengthen your skills and boost your confidence during interviews.
We hope that this blog post has been helpful in your journey towards a successful Exchange Server 2019 interview. Good luck with your preparations and may you excel in your future endeavors as an Exchange Server administrator!
Further resources
Expand your knowledge and boost your interview performance with our series of insightful blogs on interview questions and answers. Discover expert tips and strategies for success in various industries.
50+ Exchange Online Mail Flow Interview questions and answers
Exchange Server 2010 Interview Questions and Answers
50+ Microsoft Exchange Server Interview Questions and Answers
40+ Azure AD Connect Interview Questions and Answers
Top 40+ Azure Active Directory interview questions and answers
Top 50+ Office 365 Interview questions and answers
40+ Exchange Hybrid Interview questions and answers
50+ Microsoft Exchange Online interview questions and answers