
Office 365 outgoing emails going to Spam
In this blog you will learn how to isolate and troubleshoot Office 365 outgoing emails going to Spam. You will also learn what changes you can do or suggest to the recipient side (if only one) when your emails are marked as spam by them.
It becomes very frustrating when all the emails sent from a Microsoft 365 / Office 365 Tenant are being marked as Spam by all the external recipients. This article is for Exchange Online Administrators that want to isolate and troubleshoot Office 365 Outgoing emails going to Spam.
Table of Contents
Troubleshoot Office 365 outgoing emails going to Spam
If all the emails sent from your Office 365 Tenant are being marked as spam by all the external recipients, follow the below steps to isolate and troubleshoot such scenario.
Missing Email Authentication Records SPF, DKIM, and DMARC.
When emails sent from your Office 365 account end up in recipients’ spam folders, missing or misconfigured email authentication records such as SPF, DKIM, and DMARC could be a contributing factor. These records help verify the authenticity of your emails and improve their deliverability.
What is SPF record
SPF (Sender Policy Framework) record helps an organization from receiving Spoof or Phishing emails. SPF record determines whether or not a sender is permitted to send emails on behalf of a domain. If the sender isn’t permitted to do so, SPF check will fail for that email on the receiving server and the spam policy configured on the receiving server determines what to do with the message.
When an email server receives an email, it checks the Return-Path within the email header and extracts the domain name from Return-Path address. Then recipient’s email server reaches public DNS and validates if the Connecting IP address is added within the SPF record for that domain (sender’s domain). If the connecting IP is not mentioned within SPF record of the sender’s domain, then the recipient server will treat this email as spam email.
How to create SPF record
A typical SPF record for Office 365 domain has the following values:
v=spf1 include:spf.protection.outlook.com –allIf you are sending emails from an application (SMTP relay) or from a website, make sure you include the IP address of the application or website within the SPF record as shown below:
v=spf1 ip4:192.168.0.1 include:spf.protection.outlook.com -allHow to verify SPF record
Make sure the SPF record for your domain has the correct values and it is validated using SPF Record Testing Tools like Kitterman. Go to Check SPF record section and type your domain name and the SPF record value (without quotes) as shown below and click Check SPF Record.
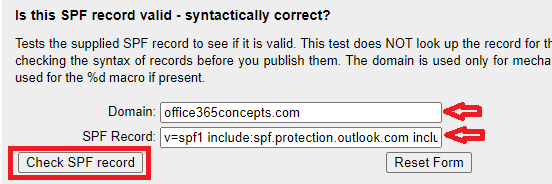
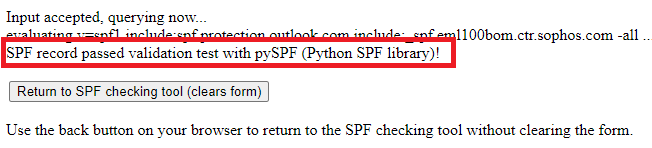
This tool will analyze the SPF record against your domain, it will check the syntax of the SPF record and will show the results.
Create a TXT record on your domain’s provider portal (public DNS) for SPF record. To learn how to create TXT record for SPF record, please watch this video.
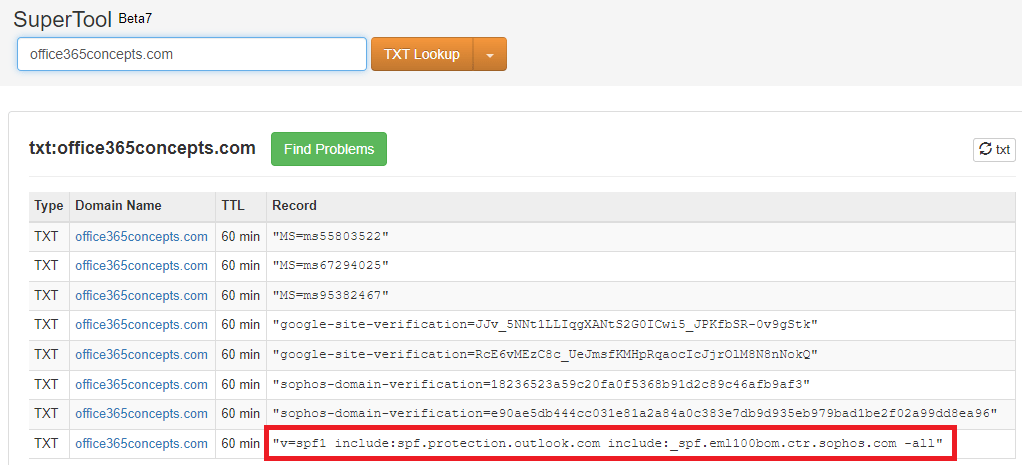
After you have created TXT record for SPF, go to MXToolbox and type txt:domain.com and press Enter. This will show if you have added SPF record for your domain and whether this record is published on the Internet. In the below image you can see the SPF record for office365concepts.com domain.
What is DKIM record
KIM email authentication for a specific domain. It contains information necessary to verify the authenticity and integrity of emails sent from that domain. The DKIM record is a CNAME record that resides in the DNS settings of the domain. DKIM record is an email security standard which is designed to make sure that emails are not altered during transmission between source to destination. As soon as an email is sent from the sending email server, DKIM signs that email using a private key. DKIM record adds digital signatures within the email header and even if email is forwarded to a different organization, the signatures will be preserved with in the email header.
How to create DKIM record
Before we create a DKIM (DomainKeys Identified Mail) record, we should be aware of the MX value for the domain you want to enable DKIM. And the second value that we need is Office 365 initial domain name. For this demo, I will be enabling DKIM for office365concepts.com domain, that has MX value office365concepts-com.mail.protection.outlook.com, and the initial domain for my tenant is o365.onmicrosoft.com.
Host name: selector1._domainkey Points to address or value: selector1-<domainGUID>._domainkey.<initialDomain>

Host name: selector2._domainkey Points to address or value: selector2-<domainGUID>._domainkey.<initialDomain>
To create DKIM record, we will replace domain_guid with the domain name as it is showing in MX record. For example, office365concepts-com, and Initial_Domain will be replaced with your initial domain name.
What is DMARC record
DMARC (Domain-based Message Authentication, Reporting, and Conformance) record helps the recipient email servers to determine what action they should take on the emails if SPF or DKIM checks fail. DMARC record works with SPF and DKIM. Before you enable DMARC record for your domain, you must need SPF and DKIM records published for that domain. DMARC record ensures the destination email systems trust messages sent from your domain. Using DMARC with SPF and DKIM gives organizations more protection against spoofing and phishing email. DMARC helps receiving mail systems decide what to do with the messages from your domain that fail SPF or DKIM checks.
Create DMARC record for your domain
Below is a standard DMARC record.
"v=DMARC1; p=Reject; pct=100; rua=mailto:analyse@domain.com"Analyze Email Header
After you have validated SPF, DKIM, and DMARC records for your domain, and if emails sent from Office 365 tenant are still being considered as spam/phish by the recipients, collect email header from the recipient’s side and analyze it. If you want to learn how to analyze an email header in detail, please refer to this link.
Within the email header look for below sections:
X-Forefront-Antispam-Report: Shows Connecting IP Address, Spam Filtering Verdict (SFV), Spam Confidence Level (SCL).
X-MS-Exchange-Organization-PCL: Shows Phishing Confidence Level (PCL)
X-Microsoft-Antispam: Shows Bulk Confidence Level (BCL) verdict.
ARC-Authentication-Results: Shows SPF, DKIM, and DMARC validation results.
Authentication-Results: Shows detailed validation results of SPF record.
ARC-Message-Signature: Shows DKIM signatures.
Emails going through High Risk Delivery Pool IPs
High Risk Delivery Pool or HRDP is a separate pool of outbound IP addresses that Exchange Online Protection (EOP) uses for routing the outbound messages which are identified as spam emails. When a customer’s email system has been compromised by malware or a malicious spam attack, and it is sending outbound spam through EOP, this can result in the IP addresses of the Office 365 data center servers being listed on third-party block lists. To prevent this, all outbound messages that exceed the spam threshold are sent through a High-Risk Delivery Pool IP addresses. This secondary outbound email pool is only used to send messages that may be of low quality. This helps to protect the rest of the network from sending messages that are more likely to result in the sending IP address being blocked.
To identify if an email was sent through HRDP low reputation IP addresses, look for X-Forefront-Antispam-Report-Untrusted section within the email header. If this section contain values SFV:SPM, SCL = 5 or higher, and SFP: 1501, that means this particular email was routed though High Risk Delivery Pool IP addresses.
In Extended Message Trace (EMT) report if you see SFV:SPM, SCL:5 or higher, and DI=SO, that means the email was routed through High Risk Delivery pool.
Troubleshoot emails routed through low reputation IP addresses
Within the email header look for Connecting IP address under X-Forefront-Antispam-Report section. Copy the connecting IP address (CIP) and perform IP Lookup.
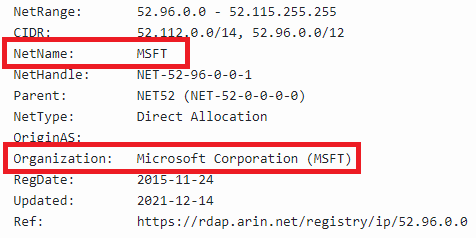
In the above screenshot you can see the IP address belongs to MSFT. To validate the IP address reputation, go to Mxtoolbox and perform blacklist check.
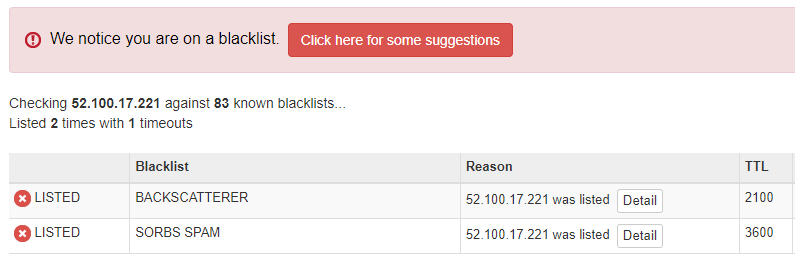
In the above screenshot you can see the IP address is listed on Backscatterer and Sorbs SPAM. But in case the IP address doesn’t show listed on this tool, try delisting the IP address using Office 365 Anti-Spam IP Delist Portal.
Isolation required when emails are sent using low reputation IP addresses (HRDP)
- Ask the sender to send a blank email with just a signature to see if it is still marked as spam. If the email is still marked as spam, the signature may be the problem.
- Ask the sender to send a blank email with no signature or disclaimer. If the email is still marked as spam, there may be a reputation problem with the sending domain.
- Ask the sender to send the same email but with no signature. If the email is still marked as spam, the problem is likely in the email contents.
- Check the public reputation of the sending domain using mxtoolbox.
Reviewing Email Content
Reviewing email content is a crucial aspect of ensuring that your outgoing emails from Office 365 are not flagged as spam. Email content plays a significant role in determining whether an email is perceived as legitimate or suspicious by spam filters. Here are some key considerations when reviewing email content:
- Relevance and Clarity: Ensure that the content of your emails is relevant to the recipient and clearly conveys the intended message. Avoid including irrelevant information or using language that may confuse or mislead the recipient.
- Avoid Spam-Like Characteristics: Certain characteristics commonly associated with spam emails can trigger spam filters. Avoid using excessive punctuation, excessive capitalization, or misleading subject lines that could be interpreted as spam.
- Personalization: Personalizing your emails by addressing recipients by their name and tailoring the content to their interests or preferences can help improve engagement and reduce the likelihood of your emails being marked as spam.
- Avoid Trigger Words: Certain words and phrases are commonly associated with spam and can trigger spam filters. Avoid using words like “free,” “urgent,” “act now,” or “limited time offer” unless absolutely necessary and relevant to the content of your email.
- Compliance with Policies and Regulations: Ensure that your email content complies with relevant policies, regulations, and industry standards. Avoid sending unsolicited emails or engaging in deceptive practices that violate anti-spam laws.
Conclusion
While Office 365 offers a robust suite of email services, the challenge of outgoing emails being routed to spam folders can impede effective communication. By understanding the underlying causes and implementing proactive measures outlined in this guide, you can enhance the deliverability of your outgoing emails and maintain a positive sender reputation.
You might like our other articles on Exchange Online Protection (EOP) Architecture, Bypass Exchange Online Protection (EOP), Bypass Advanced Threat Protection (ATP) scanning, and How to stop Spoof emails in Office 365.
If you found this article helpful and informative, please share it within your community and do not forget to share your feedback in the comments below. Please join our YouTube channel for the latest videos on the Cloud technology and join our Newsletter for the early access of the blogs and updates.
Happy Learning!!