
Manage shared mailbox using PowerShell
In this article you will learn how to manage shared mailbox using PowerShell commands. You will learn how to create a shared mailbox, how to convert a shared mailbox, how to manage shared mailbox permissions, how to bulk import and export shared mailbox members, how to transfer a shared mailbox data to another mailbox, and how to remove a shared mailbox.
Table of Contents
What is a shared mailbox
A shared mailbox is an email account that multiple users can access and use collaboratively. A shared mailbox is designed for shared access among a group of users, such as members of a team or department within an organization.
In a shared mailbox setup, multiple users can send, receive, and manage emails from the same email address. This allows for efficient communication and collaboration within a team, as all members have access to the same pool of emails and can work together to manage and respond to them.
A shared mailbox doesn’t require a license. By default a shared mailbox size is 50GB, but you can increase it up to 100GB by assigning Exchange Online Plan 2 license.
Manage shared mailbox using PowerShell commands
Managing shared mailboxes using PowerShell commands can be particularly useful for administrators who want to automate various tasks or perform bulk operations. In this article we have covered most of he tasks related to managing shared mailboxes in Microsoft Exchange Online (Office 365) using PowerShell commands:
Connect to Exchange Online PowerShell
Before you run below PowerShell commands, you need to connect to Exchange Online PowerShell. Open Windows PowerShell and run below commands:
Install-Module ExchangeOnlineManagement
Import-Module ExchangeOnlineManagement
Connect-ExchangeOnline
If you come across an error “running scripts is disabled on this system“, run below PowerShell command and click Yes to All.
Create shared mailbox using PowerShell
Set-ExecutionPolicy -ExecutionPolicy UnrestrictedCreate a Shared Mailbox
To create a shared using PowerShell, use below command:
New-Mailbox -Shared -Name "Test-Shared1" -DisplayName "Test-Shared1" -Alias "Test-Shared1" -PrimarySmtpAddress Test-Shared1@office365concepts.onmicrosoft.comThe above PowerShell command will create a shared mailbox with name, alias and display name as Test-Shared1, and email address as Test-Shared1@office365concepts.onmicrosoft.com.
You can verify the new shared mailbox using below PowerShell command:
Get-Mailbox -Identity "Test-Shared1"Bulk create Shared Mailboxes using CSV file
You can create shared mailboxes in bulk using a PowerShell script and a CSV file.
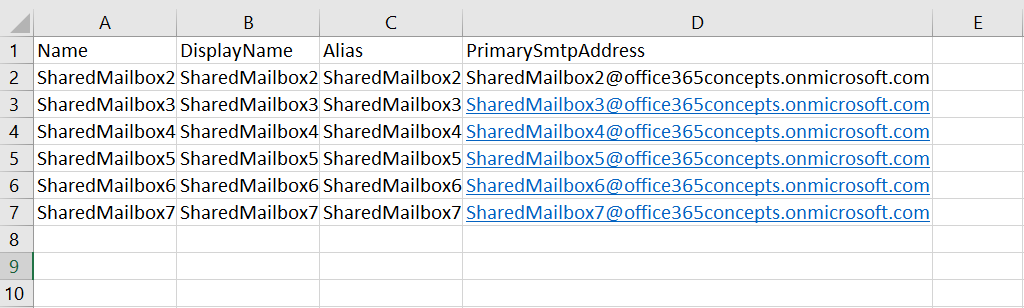
Create a CSV file with below details:
Name: This column contains name of the shared mailbox.
DisplayName: Display name of the shared mailbox.
Alias: Alias for the shared mailbox.
PrimarySmtpAddress: Email address of the shared mailbox
Run below PowerShell script:
# Define the path to the CSV file
$csvFilePath = "C:\csv files\BulkSharedMailbox.csv"
# Import data from the CSV file
$mailboxes = Import-Csv -Path $csvFilePath
# Loop through each row in the CSV file and create shared mailboxes
foreach ($mailbox in $mailboxes) {
$name = $mailbox.Name
$displayName = $mailbox.DisplayName
$alias = $mailbox.Alias
$primarySMTPAddress = $mailbox.PrimarySMTPAddress
# Create the shared mailbox
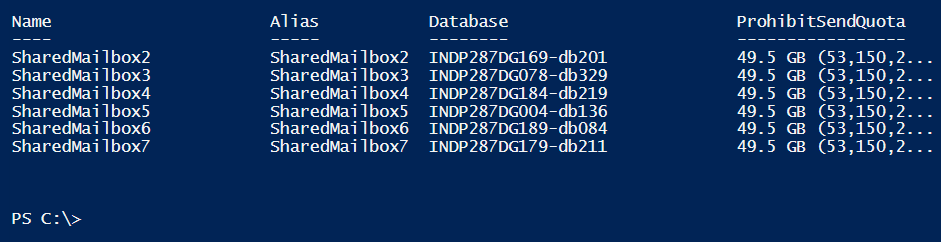
New-Mailbox -Shared -Name $name -DisplayName $displayName -Alias $alias -PrimarySmtpAddress $primarySMTPAddress
}The above script will read the CSV file, it will create shared mailboxes as per the CSV file, and will show the output as shown below:
Manage Shared Mailbox permissions using PowerShell
Now let’s learn how to efficiently manage shared mailbox permissions using PowerShell. Discover step-by-step instructions for granting, revoking, or modifying access rights for users and groups, ensuring streamlined collaboration and secure data management within your organization’s shared mailboxes.
Assign Full Access Permission on Shared Mailbox
In this example a user “Bob Ross” needs Full Access permission on a shared mailbox “SharedMailbox2” so that he can add the shared mailbox in Outlook application or Outlook Web Access (OWA).
Full Access permission offers a feature Auto Mapping that automatically adds a shared mailbox to a user’s Outlook profile when Full Access permissions are granted to that user. This means that when a user is given Full Access permission to a shared mailbox along with Auto Mapping, Outlook will automatically display the shared mailbox in their mailbox list without needing to manually add it.
Assign Full Access permission on Shared Mailbox with Auto Mapping enabled
To assign Full Access permission on a shared mailbox along with Auto Mapping feature enabled, use below PowerShell command:
Add-MailboxPermission -Identity "SharedMailbox2" -User "Bob Ross" -AccessRights FullAccess -InheritanceType All -AutoMapping $trueThe above command will assign Full Access permission to “Bob Ross” on “SharedMailbox2” and will enable Auto Mapping.
Assign Full Access permission on Shared Mailbox with Auto Mapping disabled
To assign Full Access permission on a shared mailbox with Auto Mapping feature disabled, use below PowerShell command:
Add-MailboxPermission -Identity "SharedMailbox2" -User "Bob Ross" -AccessRights FullAccess -InheritanceType AllThe above command will assign Full Access permission to “Bob Ross” on “SharedMailbox2”, and will prevent Outlook from automatically opening SharedMailbox2 mailbox.
Disable Shared Mailbox AutoMapping
If you want to disable AutoMapping for a shared mailbox, follow below steps:
Run below PowerShell command to remove Full Access permission:
Remove-MailboxPermission -Identity "SharedMailbox3" -User "User1HR" -AccessRights FullAccess -InheritanceType AllRun below PowerShell command to assign Full Access permission with Auto Mapping disabled:
Add-MailboxPermission "sharedmailbox3" -User "user1hr" -AccessRights FUllAccess -InheritanceType All -AutoMapping $falseThe above command will assign Full Access permission to “User1HR” on shared mailbox “SharedMailbox3” with Auto Mapping disabled.
Bulk assign Full Access permission using CSV file
In this scenario we will use a CSV file to assign Full Access permission to multiple users.
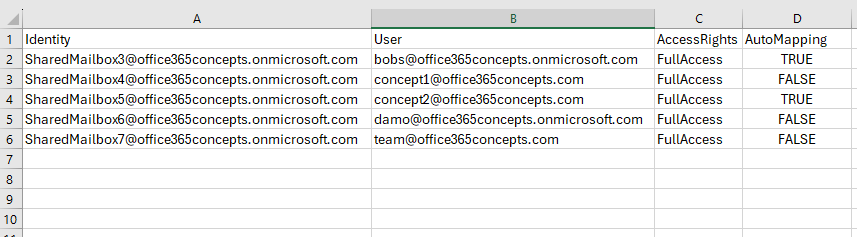
Create a CSV file with below details:
Identity: Shared Mailbox email address.
User: Email address of users who need Full Access permission on shared mailbox.
AccessRights: This column will specify FullAccess permission.
AutoMapping: This column will specify if you need to enable Auto Mapping or not.
Run below PowerShell script:
# Import the CSV file
$mailboxPermissions = Import-Csv -Path "C:\CSV Files\FullAccessPermissions.csv"

# Loop through each row in the CSV
foreach ($row in $mailboxPermissions) {
    $sharedMailbox = $row.Identity
    $user = $row.User
    $accessRights = $row.AccessRights
    $autoMapping = $row.AutoMapping

    # Assign Full Access permission with auto-mapping
    Add-MailboxPermission -Identity $sharedMailbox -User $user -AccessRights $accessRights -Automapping:$autoMapping

    # Display the output
    Write-Output "Full Access permission assigned on shared mailbox '$sharedMailbox' to user '$user'. AutoMapping: $autoMapping"
}
Assign Full Access permission on Shared Mailbox using Custom Attribute
In this example we will assign Full Access permission on a shared mailbox for the users whose CustomAttribute1 is set to “Test”.
# Define the shared mailbox name
$sharedMailbox = "SharedMailbox5"

# Get all users whose CustomAttribute1 is set to "Test"
$users = Get-Mailbox -ResultSize Unlimited | Where-Object { $_.CustomAttribute1 -eq "Test" }

# Initialize an array to store the output
$output = @()

# Loop through each user and assign Full Access permission to the shared mailbox
foreach ($user in $users) {
    Add-MailboxPermission -Identity $sharedMailbox -User $user.PrimarySmtpAddress -AccessRights FullAccess -AutoMapping $true
    $output += [PSCustomObject]@{
        SharedMailbox = $sharedMailbox
        User = $user.PrimarySmtpAddress
        Permission = "Full Access"
        AutoMapping = $true
    }
}

# Display the output in tabular form
$output | Format-Table -AutoSize
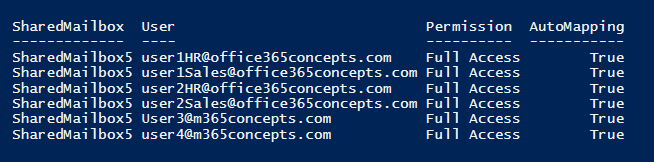
Replace “SharedMailboxName” with the actual name of your shared mailbox. The above script will assign Full Access permission to all the users whose CustomAttribute1 is set to “Test” and will enable Auto Mapping feature, and will display the output as shown below:
Assign Send As permission on Shared Mailbox
In this scenario we will assign Send As permission to “Bob Ross” on a shared mailbox “SharedMailbox4” so that he can send emails using shared mailbox email address.
Add-RecipientPermission -Identity "SharedMailbox4" -Trustee "Bob Ross" -AccessRights SendAsThe above command will assign Send As permission to “Bob Ross” on “SharedMailbox4” shared mailbox.
Bulk assign Send As permission using CSV file
In this scenario we will use a CSV file to assign SendAs permission on multiple users.
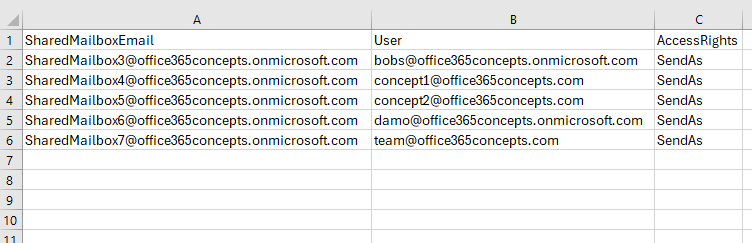
Create a CSV file with below columns:
SharedMailboxEmail: This column will include the email address of shared mailboxes.
User: This column will include email address of the users who need SendAs permission on shared mailbox.
AccessRights: This column will include level of permission (SendAs).
Run below PowerShell script:
# Specify the path to your CSV file
$CsvFilePath = "C:\csv files\SendAsPermission.csv"

# Function to bulk assign Send As permission
function BulkAssignSendAsPermission {
    param (
        [string]$CsvFilePath
    )

    # Read CSV file
    $csvData = Import-Csv $CsvFilePath

    foreach ($row in $csvData) {
        $SharedMailboxEmail = $row.SharedMailboxEmail
        $User = $row.User
        $AccessRights = $row.AccessRights

        # Get shared mailbox and user objects
        $SharedMailbox = Get-Mailbox -Identity $SharedMailboxEmail
        $User = Get-Mailbox -Identity $User

        if ($SharedMailbox -and $User) {
            # Assign Send As permission
            Add-RecipientPermission -Identity $SharedMailbox -Trustee $User -AccessRights $AccessRights -Confirm:$false
            Write-Output "Send As permission assigned to $($User.DisplayName) on $($SharedMailbox.DisplayName)"
        }
        else {
            Write-Output "Shared mailbox or user not found: SharedMailboxEmail: $SharedMailboxEmail, User: $User"
        }
    }
}

# Call the function with the specified CSV file path
BulkAssignSendAsPermission -CsvFilePath $CsvFilePath
Make sure to replace “C:\csv files\SendAsPermission.csv” with the path to your CSV file. Your CSV file should contain columns SharedMailboxEmail, User, and AccessRights, representing the shared mailbox email address, the user who needs SendAs permission on the shared mailbox, and the access rights respectively.
Bulk assign Send As permission to members of group
In this scenario we will assign SendAs permission to each member of a security group.
In the below script add security group email address and shared mailbox email address, and run it.
# Specify the security group name and shared mailbox email address
$SecurityGroupName = "securitygroup@office365concepts.onmicrosoft.com"
$SharedMailboxEmail = "SharedMailbox3@office365concepts.onmicrosoft.com"

# Function to assign Send As permission to members of a security group on a shared mailbox
function AssignSendAsPermissionToGroupMembers {
    param (
        [string]$GroupName,
        [string]$MailboxEmail
    )

    # Get members of the security group
    $GroupMembers = Get-DistributionGroupMember -Identity $GroupName | Where-Object { $_.RecipientType -ne "Group" }

    foreach ($Member in $GroupMembers) {
        # Assign Send As permission to each group member on the shared mailbox
        try {
            Add-RecipientPermission -Identity $MailboxEmail -Trustee $Member.PrimarySmtpAddress -AccessRights SendAs -Confirm:$false -ErrorAction Stop
            Write-Output "Send As permission assigned to $($Member.PrimarySmtpAddress) on shared mailbox $($MailboxEmail)"
        }
        catch {
            Write-Error "Error assigning SendAs permission to $($Member.PrimarySmtpAddress) on shared mailbox $($MailboxEmail): $_"
        }
    }
}

# Call the function with the specified security group name and shared mailbox email address
AssignSendAsPermissionToGroupMembers -GroupName $SecurityGroupName -MailboxEmail $SharedMailboxEmail
Assign Send on Behalf permission to a user
In this example we will assign Send on Behalf permission to a user “Bob Ross” on shared mailbox “SharedMailbox3”.
Set-Mailbox -Identity "SharedMailbox3" -GrantSendOnBehalfTo User1HRAssign Send on Behalf permission to multiple users
To assign Send on Behalf permission to multiple users on a shared mailbox, run below PowerShell command:
Set-Mailbox -Identity "SharedMailbox3" -GrantSendOnBehalfTo User1HR,User2HR,User1Sales,User2SalesRemove Full Access permission for a Shared Mailbox
To remove Full Access for a user on Shared Mailbox, run below PowerShell command:
Remove-MailboxPermission -Identity "SharedMailbox3" -User "Bob Ross" -AccessRights FullAccess -InheritanceType AllRemove SendAs permission for a Shared Mailbox
In this example we will remove SendAs permission for a shared mailbox.
Remove-RecipientPermission -Identity "SharedMailbox3" -Trustee "User1HR" -AccessRights SendAsRemove Send on Behalf permission for shared mailbox
To remove Send on Behalf permission for a shared mailbox, run below PowerShell command:
Set-Mailbox -Identity "SharedMailbox3" -GrantSendOnBehalfTo $nullRemove Send on Behalf permission for a particular user on shared mailbox
In this example we will remove Send on Behalf permission for a particular user where you have assigned Send on Behalf permission to multiple users on a Shared Mailbox.
Set-Mailbox -Identity "SharedMailbox3" -GrantSendOnBehalfTo @{Remove="user1hr"}Convert Shared Mailbox
Convert Shared mailbox to User mailbox
To convert shared mailbox to user mailbox, run below PowerShell command:
Set-Mailbox -Identity "SharedMailbox2" -Type RegularTo verify if the shared mailbox is converted to user mailbox (regular mailbox), run below PowerShell command:
Get-Mailbox -Identity "SharedMailbox2" | Select-Object RecipientTypeDetailsConvert User mailbox to Shared mailbox
To convert a regular mailbox or user mailbox to shared mailbox, run below PowerShell command:
Set-Mailbox -Identity "User3" -Type SharedTo verify if user mailbox is converted to shared mailbox, run below PowerShell command:
Get-Mailbox -Identity "user3" | Select-Object recipienttypedetailsDisable shared mailbox
To disable shared mailbox account, run below PowerShell command:
Set-Mailbox -Identity "SharedMailbox4" -AccountDisabled $trueConclusion
In this article you learnt how to manage Shared Mailbox using PowerShell commands, how to manage permissions of a Shared Mailbox, how to disable shared mailbox automapping, how to convert shared mailbox to user mailbox, how to convert user mailbox to shared mailbox, and how to disable shared mailbox using PowerShell commands.
You might like our other articles on Manage Office 365 email forwarding using PowerShell, Manage Office 365 licenses using PowerShell, Manage Dynamic Distribution Groups using PowerShell and Manage Distribution Groups using PowerShell commands.
If you found this article helpful and informative, please share it within your community and do not forget to share your feedback in the comments below. Please join us on YouTube for the latest videos on the Cloud technology and join our Newsletter for the early access of the articles and updates.
Happy Scripting!!