
Manage Distribution Groups with PowerShell
In this article you will learn how to manage Distribution Groups with PowerShell commands.
Table of Contents
Manage Distribution Groups with PowerShell Commands
Unlock the power of PowerShell to streamline your distribution group management tasks! In this comprehensive guide, discover how to effortlessly create, modify, and delete distribution groups in your Microsoft Exchange or Office 365 environment. This “Manage Distribution Groups with PowerShell” guide equips you with the knowledge and tools to effectively manage distribution groups and enhance productivity like never before.
Connect to Exchange Online PowerShell
Before you run below PowerShell commands, you need to connect to Exchange Online PowerShell. Run below command in Windows PowerShell to connect to Exchange Online.
Connect-ExchangeOnlineCreate a distribution group
If you want to create a new distribution group in Exchange Online, run below command:
New-DistributionGroup -Name "Test DL1" -DisplayName "Test DL1" -PrimarySmtpAddress testdl1@office365concepts.onmicrosoft.comThe above command will create a distribution group with name and display name “Test DL1”, and will set email address as testdl1@office365concepts.onmicrosoft.com.

Add members to distribution group
To add a member in distribution group, run below PowerShell command:
Add-DistributionGroupMember -Identity "Test DL1" -Member user4@m365concepts.comTo add multiple members in a distribution group, run below PowerShell command:
Update-DistributionGroupMember -Identity "Test DL1" -Members user1hr,user2hrAdd owners to distribution group
To add an owner in distribution group, run below PowerShell command:
Set-DistributionGroup -Identity "Test DL1" -ManagedBy User1HRTo add multiple owners in distribution group, run below command:
Set-DistributionGroup -Identity "Test DL1" -ManagedBy User1HR,User2HRGet members of distribution group
To list members of distribution group, run below PowerShell command:
Get-DistributionGroupMember -Identity "Test DL1" | Select-Object Displayname,PrimarySmtpAddress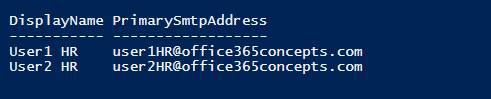
Export distribution group members to CSV
To list all the members of a distribution group and export them to a CSV file, run below PowerShell command:
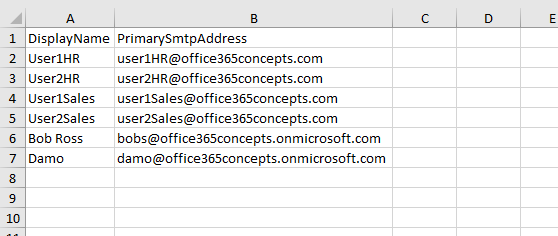
Get-DistributionGroupMember -Identity "Test DL1" | Select-Object DisplayName,PrimarySMTPAddress | Export-CSV c:\DLmembers.CSV –NoTypeInformation -Encoding UTF8In the below image you can see the members of the distribution group “Test DL1” are exported to a CSV file along with their Display Name and Primary SMTP Address.

Add Send As permission on distribution group
To add Send As permission on distribution group, run below PowerShell command:
Add-RecipientPermission -Identity "Test DL1" -Trustee User1HR -AccessRights SendAsThe above command will assign Send As permission to User1HR on the distribution group “Test DL1”.

Add Send on Behalf permission on distribution group
If you want to add Send on Behalf permission on a distribution group, run below PowerShell command:
Set-DistributionGroup -Identity "Test DL1" -GrantSendOnBehalfTo @{Add="User1HR"}The above command will assign Send on Behalf permission to User1HR on the distribution group “Test DL1”.
To assign Send on Behalf permission to multiple users, run below PowerShell command:
Set-DistributionGroup -Identity "Test DL1" -GrantSendOnBehalfTo @{Add="User1HR","User2HR","User1Sales"}Set distribution group to accept emails from outside organization
If you want to allow a distribution group to accept emails from outside the organization (external emails), run below PowerShell command:
Set-DistributionGroup -Identity "Test DL1" -RequireSenderAuthenticationEnabled $falseThe RequireSenderAuthenticationEnabled parameter specifies whether a distribution group should receive emails only from authenticated (internal) senders or external users as well. If this value is set to True, then distribution group will accept emails only from internal users. If RequireSenderAuthenticationEnabled is set to False, then distribution group will accept emails from both internal and external users.
Add allowed sender in distribution group
If you want to allow few users or groups of users to send emails to a distribution group, run below PowerShell commands:
Set-DistributionGroup -Identity "Test DL1" -AcceptMessagesOnlyFrom "User1HR"After running the above command, the distribution group “Test DL1” will only accept messages from User1HR user, and other emails will be rejected.
Set-DistributionGroup -Identity "Test DL1" -AcceptMessagesOnlyFromDLMembers "DL10"The above command will set DL10 as allowed sender in distribution group “Test DL1”. This means only the members of DL10 will be allowed to send emails to distribution group “Test DL1” and other emails will be rejected.
Add multiple members to distribution group using CSV file
If you want to add multiple members in a distribution group using a CSV file, create a CSV file as shown below and then run below PowerShell command:
$Users = Import-Csv "C:\CSV File\GroupMembers.csv"
ForEach ($User in $Users)
{
    Add-DistributionGroupMember -Identity "Test DL1" -Member $User.PrimarySmtpAddress
}
List all distribution groups a user is member of
If you want to find a user’s membership, run below script:
$User = “Type UserName Here"
$UserName = (Get-Mailbox $User).name
ForEach ($DistributionGroup in Get-Distributiongroup -resultsize unlimited)
{
    if ((Get-Distributiongroupmember $DistributionGroup.identity | select -expand name) -contains $UserName)
    {
    $DistributionGroup.name
}
}
The above script will list all the distribution groups a user is member of.
Copy members of distribution group to security group
If you want to copy all the members of a distribution group to a security group, run below script. This script will collect all the members of a distribution group, and will add them to the security group.
# Specify the name of the distribution group and security group
$DistributionGroupName = "Test DL1"
$SecurityGroupName = "TestSecurityGroup"
# Get members of the distribution group
$DistributionGroupMembers = Get-DistributionGroupMember -Identity $DistributionGroupName
# Add members to the security group
foreach ($member in $DistributionGroupMembers) {
Add-DistributionGroupMember -Identity $SecurityGroupName -Member $member
# Retrieve the DisplayName and PrimarySmtpAddress of the user
$user = Get-Recipient -Identity $member
Write-Host "Added $($user.DisplayName) ($($user.PrimarySmtpAddress)) to $SecurityGroupName"
}
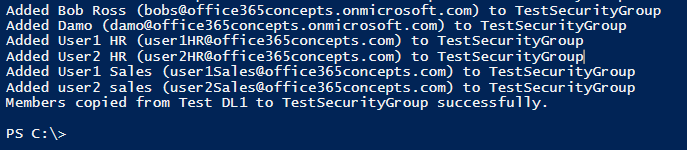
Write-Host "Members copied from $DistributionGroupName to $SecurityGroupName successfully."This script will also display the progress of members being copied as shown below:
Add a user as owner in all distribution groups
If you want to add a user as owner in all the distribution groups in Office 365, run below PowerShell script:
# Specify the user to set as the owner
$ownerUser = "Bob Ross"
# Get all distribution groups
$distributionGroups = Get-DistributionGroup -ResultSize Unlimited
foreach ($group in $distributionGroups) {
# Set the owner for each distribution group
Set-DistributionGroup -Identity $group.Identity -ManagedBy $ownerUser -BypassSecurityGroupManagerCheck
Write-Host "Set $ownerUser as the owner of $($group.DisplayName)"
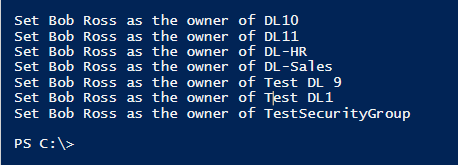
}The above PowerShell script will add Bob Ross as owner in all the distribution groups and this will display the output as shown below:
Create bulk distribution groups and add members using CSV file
If you want to create multiple distribution groups and add members in them using a CSV file, follow the below steps:
You need to create a CSV file with below format:
Name: The name of the distribution group.
Alias: The alias of the distribution group.
DisplayName: The display name of the distribution group.
PrimarySmtpAddress: The primary SMTP address of the distribution group.
Members: Comma-separated list of members’ email addresses to be added to the distribution group.

Run below script:
# Read the CSV file
$groups = Import-Csv -Path "C:\CSV Files\BulkDGs.csv"
foreach ($group in $groups) {
# Create distribution group
New-DistributionGroup -Name $group.Name -Alias $group.Alias -DisplayName $group.DisplayName -PrimarySmtpAddress $group.PrimarySmtpAddress -Type "Distribution"
# Add members to the distribution group
$members = $group.Members -split ','
foreach ($member in $members) {
Add-DistributionGroupMember -Identity $group.PrimarySmtpAddress -Member $member.Trim()
Write-Host "Added $($member.Trim()) to $($group.DisplayName)"
}
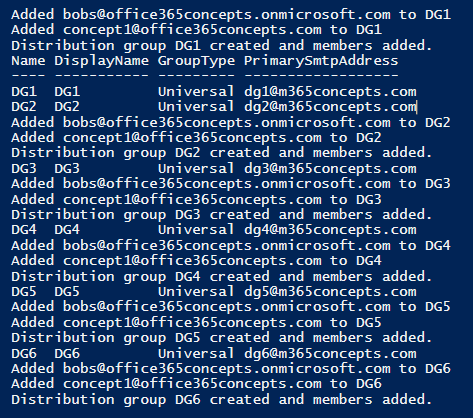
Write-Host "Distribution group $($group.DisplayName) created and members added."
}The above script will create distribution groups and will add members as per the CSV file and will display the member’s email addresses being added to each group along with the group names during the execution as shown below:
Remove a user from all the distribution groups who is added as member
If your requirement is to remove a particular member from all the distribution groups, run below PowerShell script:
# Specify the member you want to remove from distribution groups
$memberToRemove = "bobs@office365concepts.onmicrosoft.com"
# Get all distribution groups
$distributionGroups = Get-DistributionGroup -ResultSize Unlimited
foreach ($group in $distributionGroups) {
# Check if the member is a member of the group
if (Get-DistributionGroupMember -Identity $group.Identity | Where-Object {$_.PrimarySmtpAddress -eq $memberToRemove}) {
# Remove the member from the distribution group
Remove-DistributionGroupMember -Identity $group.Identity -Member $memberToRemove -Confirm:$false
Write-Host "Removed $memberToRemove from $($group.DisplayName)"
}
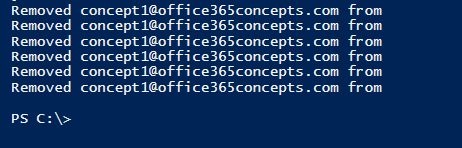
}The above script will remove bobs@office365concepts.onmicrosoft.com from all the distribution groups membership and will display the outcome as shown below:

Remove all the members from distribution groups using CSV file
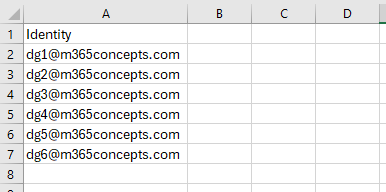
In this scenario, we have a CSV file as shown below that includes the Identity of distribution groups from where we want to remove all the members.
We will create a CSV file with column Identity and in rows we will mention the PrimarySmtpAddress of the distribution groups.
Run below PowerShell script to remove all the members from distribution groups as per the above CSV file:
# Read the CSV file
$groups = Import-Csv -Path "C:\CSV Files\RemoveMembers.csv"

foreach ($group in $groups) {
    # Get members of the distribution group
    $members = Get-DistributionGroupMember -Identity $group.Identity

    # Remove each member from the distribution group
    foreach ($member in $members) {
        Remove-DistributionGroupMember -Identity $group.Identity -Member $member.PrimarySmtpAddress -Confirm:$false
        Write-Host "Removed $($member.PrimarySmtpAddress) from $($group.DisplayName)"
    }
}
The above command will remove all the members from the distribution groups as given in the CSV file and will display the progress of the script as well.
Replace the owner of the distribution group with new owner
The below script will replace the current owner of the distribution group with a new owner.
# Specify the current owner and the new owner
$currentOwner = "currentowner@example.com"
$newOwner = "newowner@example.com"

# Get all distribution groups owned by the current owner
$groupsOwnedByCurrentOwner = Get-DistributionGroup -ResultSize Unlimited | Where-Object {$_.ManagedBy -eq $currentOwner}

foreach ($group in $groupsOwnedByCurrentOwner) {
    # Set the new owner for the distribution group
    Set-DistributionGroup -Identity $group.Identity -ManagedBy $newOwner -BypassSecurityGroupManagerCheck
    Write-Host "Changed owner of $($group.DisplayName) from $currentOwner to $newOwner"
}
Replace $currentOwner to the email address of the current owner you want to replace, and set $newOwner to the email address of the new owner. The script will look like below:
# Specify the current owner and the new owner
$currentOwner = "Bob Ross"
$newOwner = "User1HR"

# Get all distribution groups owned by the current owner
$groupsOwnedByCurrentOwner = Get-DistributionGroup -ResultSize Unlimited | Where-Object {$_.ManagedBy -eq $currentOwner}

foreach ($group in $groupsOwnedByCurrentOwner) {
    # Set the new owner for the distribution group
    Set-DistributionGroup -Identity $group.Identity -ManagedBy $newOwner -BypassSecurityGroupManagerCheck
    Write-Host "Changed owner of $($group.DisplayName) from $currentOwner to $newOwner"
}
Find the distribution groups created in last 3 days
To find the distribution groups created in Exchange Online in last 3 days, run below PowerShell script:
# Calculate the date 3 days ago
$startDate = (Get-Date).AddDays(-3)
# Get distribution groups created in the last 3 days
$groups = Get-DistributionGroup -ResultSize Unlimited | Where-Object {$_.WhenCreated -ge $startDate}
# Output the distribution groups created in the last 3 days
if ($groups -ne $null) {
Write-Host "Distribution groups created in the last 3 days:"
$groups | Select-Object DisplayName, PrimarySmtpAddress, WhenCreated
} else {
Write-Host "No distribution groups created in the last 3 days."
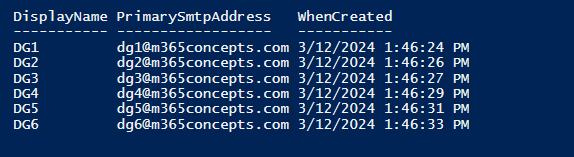
}The above script will display the information about the distribution groups created in the last 3 days, including their display name, primary SMTP address, and creation date as shown below:
Find the distribution groups created in last 100 hours
If you want to find the distribution groups those were created in last 100 hours in Exchange Online organization, run below PowerShell script:
# Calculate the date 100 hours ago
$startDate = (Get-Date).AddHours(-100)

# Get distribution groups created in the last 100 hours
$groups = Get-DistributionGroup -ResultSize Unlimited | Where-Object {$_.WhenCreated -ge $startDate}

# Output the distribution groups created in the last 100 hours
if ($groups -ne $null) {
    Write-Host "Distribution groups created in the last 100 hours:"
    $groups | Select-Object DisplayName, PrimarySmtpAddress, WhenCreated
} else {
    Write-Host "No distribution groups created in the last 100 hours."
}
Find the distribution groups created in last 4 weeks
If you want to find the distribution groups those were created in last 4 weeks, run below PowerShell script:
# Calculate the date 4 weeks ago
$startDate = (Get-Date).AddDays(-28)

# Get distribution groups created in the last 4 weeks
$groups = Get-DistributionGroup -ResultSize Unlimited | Where-Object {$_.WhenCreated -ge $startDate}

# Output the distribution groups created in the last 4 weeks
if ($groups -ne $null) {
    Write-Host "Distribution groups created in the last 4 weeks:"
    $groups | Select-Object DisplayName, PrimarySmtpAddress, WhenCreated
} else {
    Write-Host "No distribution groups created in the last 4 weeks."
}
The above PowerShell script will display the information about the distribution groups created in the last 4 weeks, including their display name, primary SMTP address, and creation date.
Conclusion
In this article you learnt how to manage distribution groups with PowerShell commands in Exchange Online.
You might like our other articles on Fix 550 5.7.520 Access Denied and Disable auto-forwarding in Office 365.
If you found this article helpful and informative, please share it within your community and do not forget to share your feedback in the comments below. Please join us on our YouTube channel for the latest videos on the Cloud technology and join our Newsletter for the early access of the articles and updates.
Happy Learning!!