Disable auto-forwarding in Office 365
In this article you will learn how users or administrators can enable email forwarding, and how an administrator can disable auto-forwarding Office 365.
Table of Contents
Types of email forwarding in Office 365
Before we learn how to disable auto-forwarding in Office 365, let’s understand what are the various types of email forwarding in Office 365.
- User can create an Inbox rule in Outlook application and Outlook Web Access (OWA).
- User can enabled email forwarding in OWA.
- User can configure email forwarding, while creating Out of Office (OOF) rule in Outlook client.
- Administrator can enable mailbox forwarding from Exchange Admin Centre or using PowerShell commands.
How to disable auto-forwarding Office 365
Let’s talk about different methods available in Office 365 to control or disable auto-forwarding in Office 365 or Exchange Online.
Mail Flow Rule Block External Forwarding
One of the methods to disable auto-forwarding is Mail Flow rule (Transport rule). Follow below instructions to create a mail flow rule to disable auto-forwarding in your Exchange Online organization.
Go to Exchange Admin Center, expand Mail flow, click Rules, click Add a rule, and click Create a new rule.
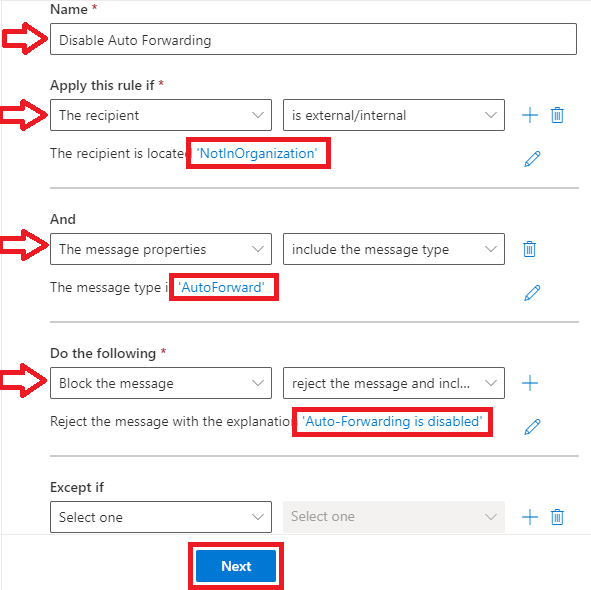
- Give a name to the rule, like, Disable Auto Forward.
- Under Apply this rule if, select The recipient, select is external/internal, and then select Outside the organization.
- Click + to add one more condition.
- Under And, select The message properties, select include the message type, and then select Auto-Forward.
- Under Do the following, select Block the message, select reject the message and include an explanation, and under specify rejection reason, type a reason of rejecting the email. For example, Auto-Forwarding is disabled and click Save.
- If you want to add an exception to this rule, you can add it under Except if.
- Click Next.
- Under Rule mode select Enforce.
- Under Severity select High.
- Check Stop processing more rules.
- Click Next.
- Click Finish.
You can use below PowerShell command to create mail flow rule Block External Forwarding
New-TransportRule -Name "Disable Auto-Forwarding" -SentToScope NotInOrganization -MessageTypeMatches AutoForward -RejectMessageReasonText "Auto-Forwarding is disabled" -StopRuleProcessing $True -SetAuditSeverity High -Mode EnforceAllow Automatic Forwarding Remote Domain
Allow Automatic Forwarding Remote Domain is a feature in Exchange Online that is used by the administrators to control whether users can automatically forward their emails to external email addresses or not.
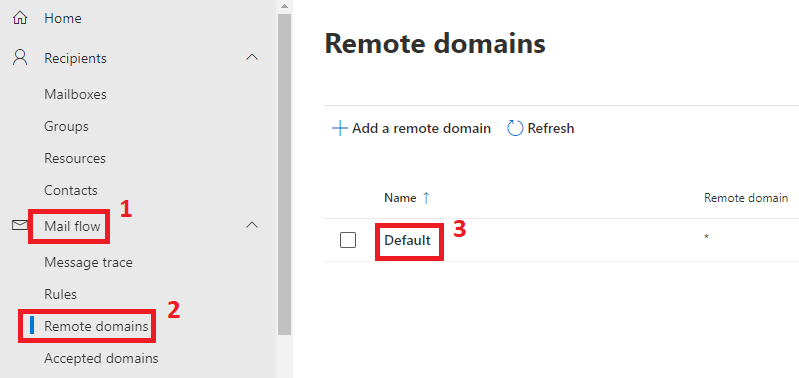
By default Allow Automatic Forwarding is enabled, that allows users to forward their emails to the external users. To disable this feature, go to Exchange Admin Center, expand Mail flow, click Remote domains, and click Default.
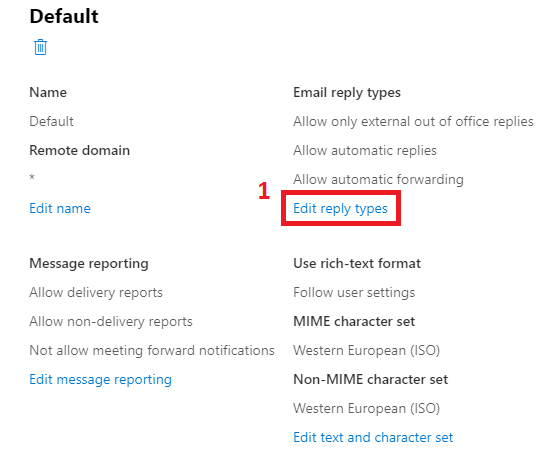
On the properties page, click Edit reply types.
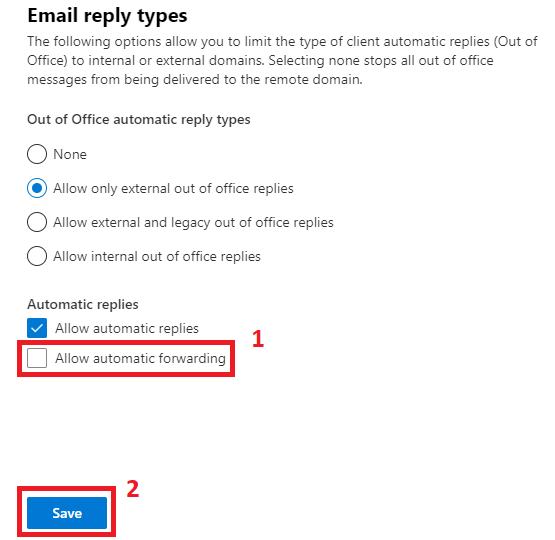
On the Edit reply types page, uncheck Allow automatic forwarding and click Save.
Automatic Forwarding Rules System Controlled
The 3rd option to disable automatic forwarding is Automatic Forwarding Rule in Anti-spam outbound policy in Microsoft Defender for Office 365.
To disable Automatic Forwarding, go to Microsoft Defender for Office 365, under Email & collaboration click Policies & rules and click Threat policies.
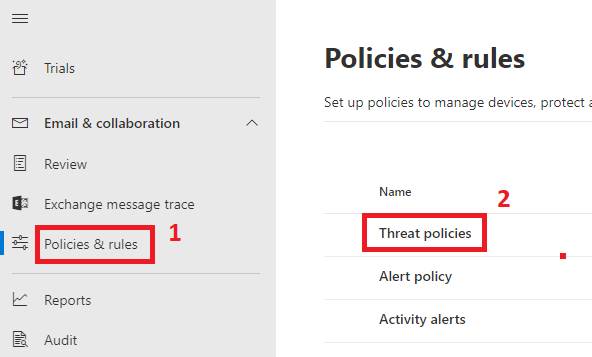
On the Threat policies page, click Anti-spam.
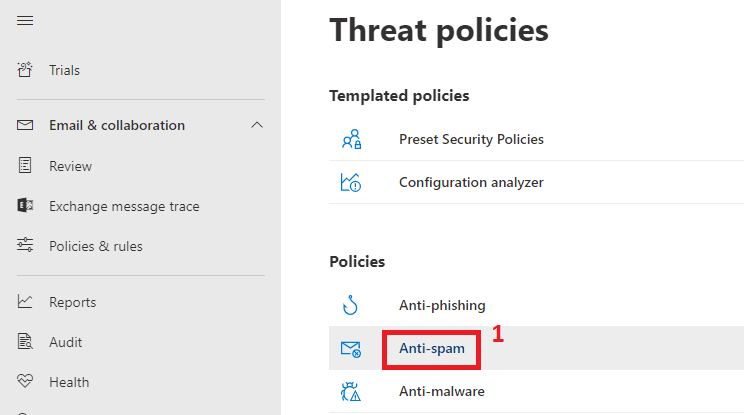
On the Anti-spam policies page, click Anti-spam outbound policy (Default).
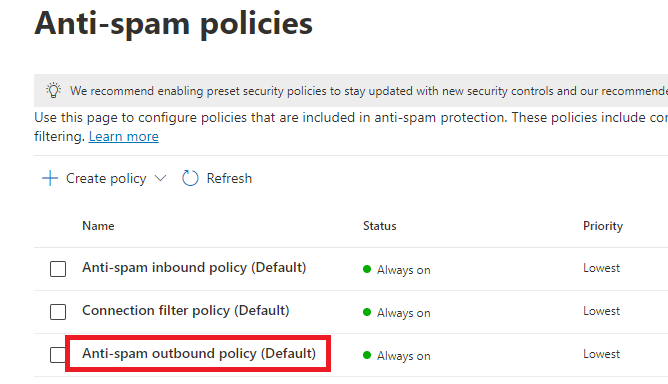
On the Anti-spam outbound policy (Default) settings page, click Edit protection settings.
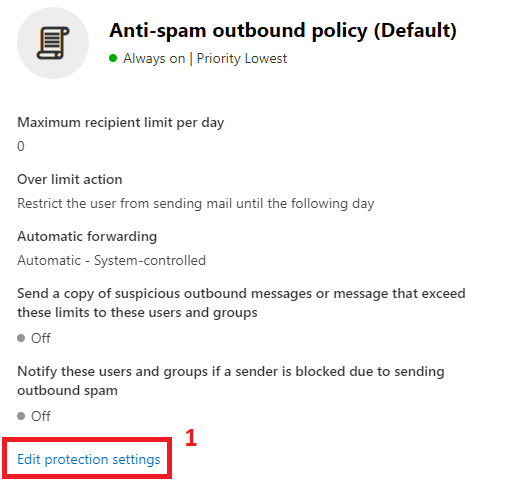
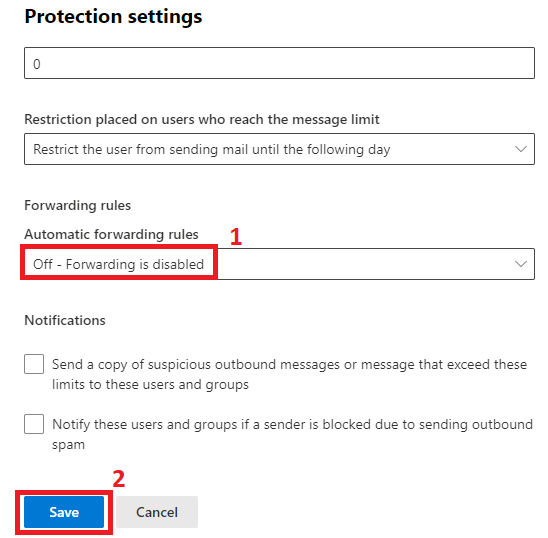
On the Protection settings page, under Automatic forwarding rules, select Off – Forwarding is disabled and click Save.
Remove Forwarding option in OWA – Role Based Access Control (RBAC)
The other option to disable auto-forwarding is to remove forwarding option in OWA using Role Based Access Control (RBAC).
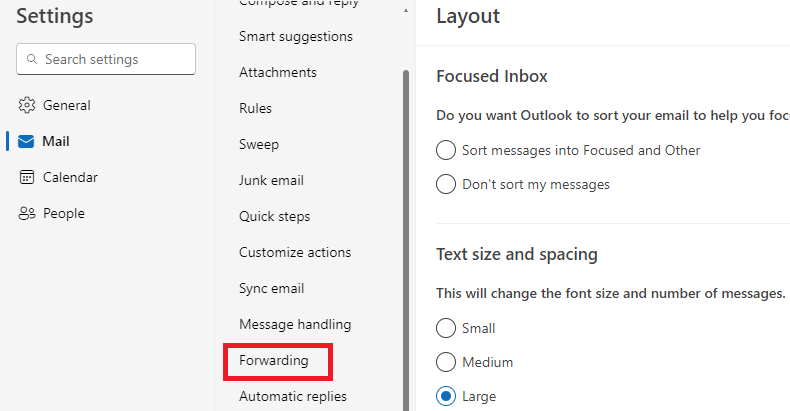
Exchange Online users have Forwarding option in OWA that can be used to forward their emails to other users as discussed in this article. But using RBAC, you can remove this Forwarding option from OWA.
Step 1. Create the new role with parent “MyBaseOptions”
New-ManagementRole -Parent MyBaseOptions -Name DenyForwarding
Step 2. Remove Forwarding option in OWA
Set-ManagementRoleEntry DenyForwarding\Set-Mailbox -RemoveParameter -Parameters DeliverToMailboxAndForward,ForwardingAddress,ForwardingSmtpAddressStep 3. Create a new policy and add all the management roles
New-RoleAssignmentPolicy -Name DenyForwardingRoleAssignmentPolicy -Roles DenyForwarding, MyContactInformation, MyRetentionPolicies,MyMailSubscriptions,MyTextMessaging, MyVoiceMail,MyDistributionGroupMembership, MyDistributionGroups, MyProfileInformationStep 4. Assign the policy to the mailbox
Set-Mailbox –Identity user1hr@office365concepts.com -RoleAssignmentPolicy DenyForwardingRoleAssignmentPolicyResult
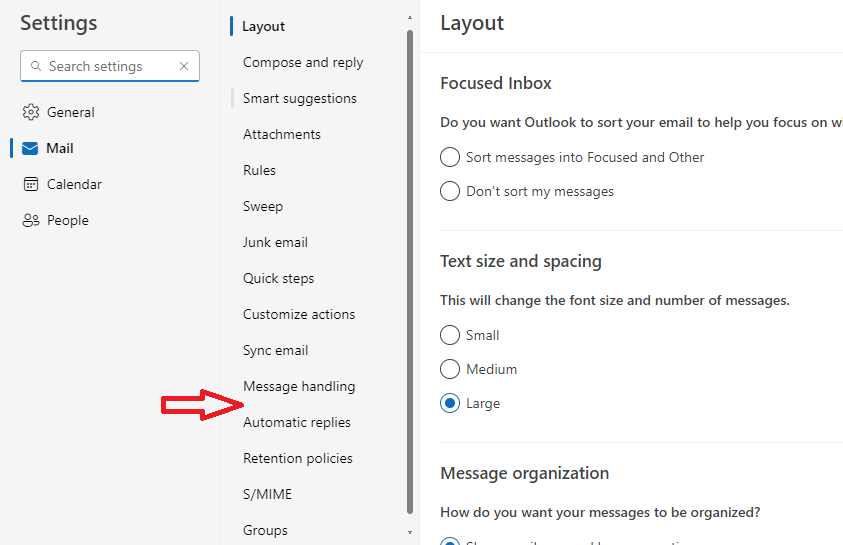
In the below image you can see Forwarding option has been removed from OWA.
Which option should you use to control Auto Forwarding in Office 365
As an administrator, you have a few different options to control auto forwarding of emails outside of your environment. However all the options have few pros and cons as explained below:
Allow Automatic Forwarding Remote Domain
Pros: This feature disables all type of email forwarding to the external users, and it is very easy to implement and manage.
Cons: The users are not notified that their forwarded emails are rejected/dropped.
Mail Flow Rule Block External Forwarding
Pros: You can specify the actions and conditions as per your business requirement, and users can be notified about the rejected emails.
Cons: Does not block the emails those are forwarded using Forwarding option in OWA.
Remove Forwarding option in OWA – Role Based Access Control (RBAC)
Pros: Removed the Forwarding option from OWA.
Cons: Does not remove the options in Outlook and does nothing for forwarding that was already set up.
Automatic Forwarding Rules System Controlled
Pros: Controls all type of email forwarding to the external users. Also users get NDR (Non Delivery Report) when forwarded emails are rejected with error code 5.7.520 Access denied, Your organization does not allow external forwarding. Please contact your administrator for further assistance.
Conclusion
In this article you learnt about the various types if options to disable auto forwarding in Office 365.
You might like our other article on Ways to Auto Forward emails in Exchange Online, Separate users in GAL and Separate Domains in GAL.
If you found this article helpful and informative, please share it within your community and do not forget to share your feedback in the comments below. Please join us on our YouTube channel for the latest videos on the Cloud technology and join our Newsletter for the early access of the articles and updates.
Happy Learning!!

Hi,
Is there any option to allow auto forwarding for few users and disable for whole organisation?
Hi Vinod,
Yes, you can achieve this using Transport Rule or by removing Forwarding option in OWA.
Regards
Office365Concepts