How to create Distribution List in Outlook for 365
In this article you will learn how to create Distribution List in Outlook for 365. You will learn how to create distribution list (DL), how to add members in distribution list, and how to send email using distribution list.
Table of Contents
Outlook Distribution Group
Outlook Distribution Group (DG) is similar to the Distribution Group created in Exchange Admin Center. Both distribution groups are used to distribute the emails to their members, but they operate at different levels of the email infrastructure. Let’s talk about the difference between distribution groups created from Outlook and the distribution groups created from Exchange Admin Center (EAC).
Outlook Distribution Group
- Outlook distribution groups are created and managed within the Outlook email client. They are primarily used for sending emails to a group of people simultaneously without having to add individual recipients every time.
- These groups are usually managed by end-users within Outlook.
- Outlook distribution groups are limited to email communication within the Outlook client environment.
Exchange Online Distribution Group
- Exchange Online distribution groups are created and managed at the server level in Microsoft Exchange Online.
- They are similar to Outlook distribution groups in function, allowing you to send emails to a group of recipients with a single email address.
- Exchange Online distribution groups offer additional features and administrative controls compared to Outlook distribution groups. For example, administrators can assign permissions on the groups so that users can send emails using these distribution groups.
- Exchange Online distribution groups can be managed through the Exchange Admin Center (EAC) or PowerShell commands, offering more robust management capabilities than those available within Outlook alone.
Why you need to create a distribution list in Outlook
The purpose of creating a distribution list in Outlook is to easily send emails to multiple users (internal or external).
Imagine you want to send an email to multiple users. If you do not have a distribution list in Outlook, you need to type their email addresses manually as shown below:

Instead of typing multiple email addresses in TO or CC field, you can create a distribution group in Outlook, add members within the group, type the email address of distribution group in TO or CC field, and the email will be delivered to all the members of the group.
Create distribution list in Outlook for 365
To create a distribution list in Outlook, click Contacts, make sure you are on Home page, and click New Contact Group as shown in below image.

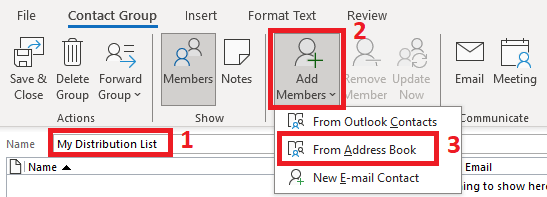
Give a name to the distribution list, click Add Members and click From Address Book.
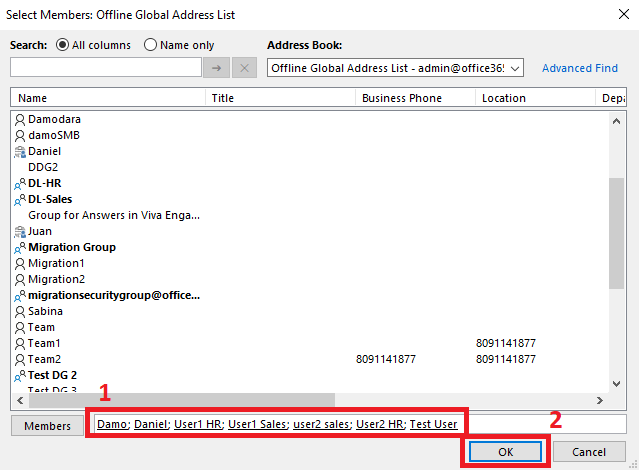
Add users in the group by double clicking on their accounts in Address List, and click OK.
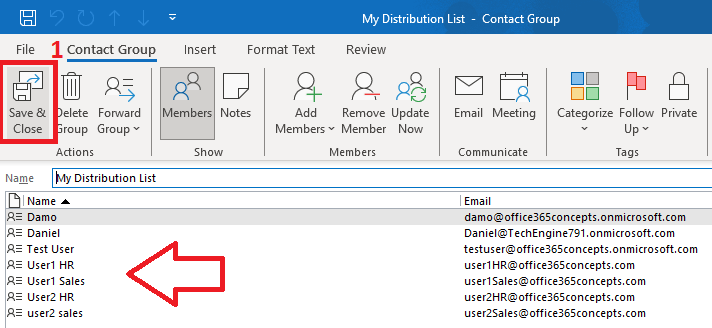
As you can see in the below image, the users are added in distribution list. Click Save & Close to close the wizard.
Create a distribution group in Outlook from email
If you’re always emailing the same group of people, you can create a distribution group in Outlook that includes all of the recipients by using a previous email that you sent to them.
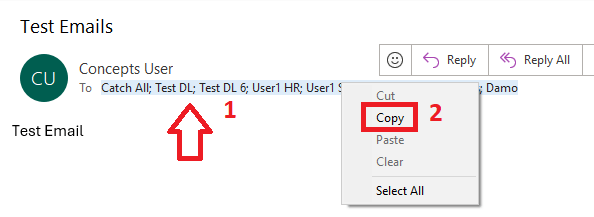
Find the email in your mailbox Sent Items folder, select all the email addresses and click Copy.
Click Contacts, make sure you are on the Home tab, and click New Contact Group.

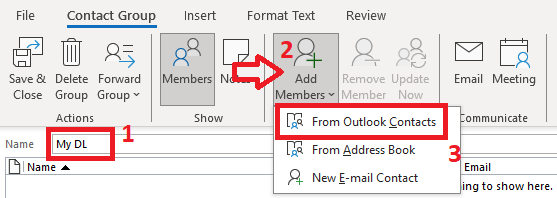
Give a name to the distribution list, click Add Members and click From Outlook Contacts.
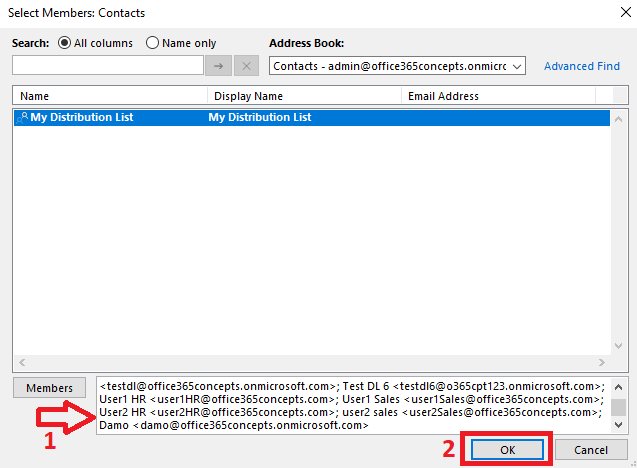
Paste the email addresses next to Members as shown below and click OK.
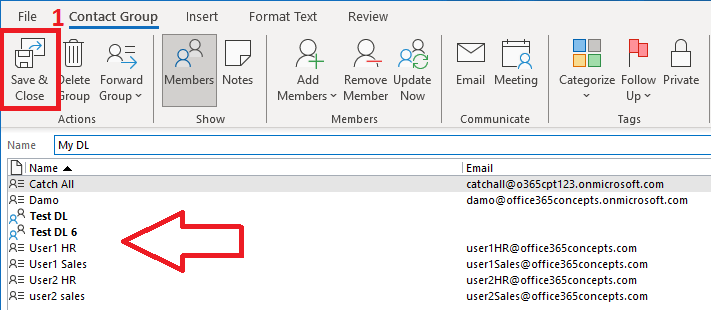
You can see in the below image, the email addresses are added within My DL distribution list. Click Save & Close to close the wizard.
Send email from Distribution Group in Outlook
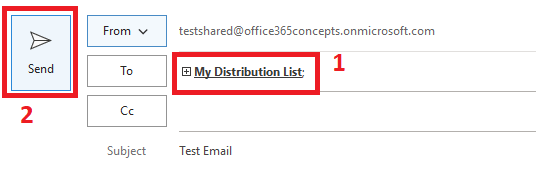
To send an email from distribution group in Outlook, click New Email, type the email address of the distribution list that you just created in TO or CC field and click Send.
You can also see the members of the distribution list by clicking the + icon before the distribution list name as shown below.
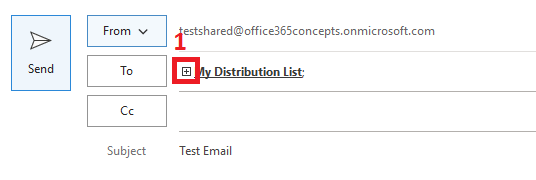
On the Expand List prompt, click OK.

In the below image you can see all the members of this distribution list.

Conclusion
In this article you learnt how to create a distribution group in Outlook for 365, how to add members in the group, and how to send email using distribution group in Outlook application.
You might like our other article on Convert Distribution Group to Microsoft 365 Group.
If you found this article helpful and informative, please share it within your community and do not forget to share your feedback in the comments below. Please join our YouTube channel for the latest videos on the Cloud technology and join our Newsletter for the early access of the articles and updates.
Happy Learning!!
