
Microsoft Entra Cloud Sync Explained and Setup Guide
In this blog we will discuss what is Microsoft Entra Cloud Sync (Azure AD Connect Cloud Sync), what is the difference between Azure AD Connect and Azure AD Connect Cloud Sync, and how to setup Azure AD Connect Cloud Sync.
Table of Contents
Watch the video
Watch this deep dive video on Azure AD Connect Cloud Sync (Microsoft Entra Cloud Sync) to learn how to works and how to setup Azure AD Connect Cloud Sync.
What is Azure AD Connect Cloud Sync
Azure AD Connect Cloud Sync (Microsoft Entra Cloud Sync) is a lightweight version of Azure AD Connect that is designed to meet and accomplish hybrid identity goals. If you are familiar with Azure AD Connect tool, this tool is used to synchronize the on-premises identities to Azure AD. Azure AD Connect Cloud Sync is also designed to synchronize on-premises identities to Azure Active Directory.
Azure AD Connect Cloud Sync vs Azure AD Connect / Azure AD Connect Cloud Sync limitations
There are lots of differences between Azure AD Connect and Azure AD Connect Cloud Sync.
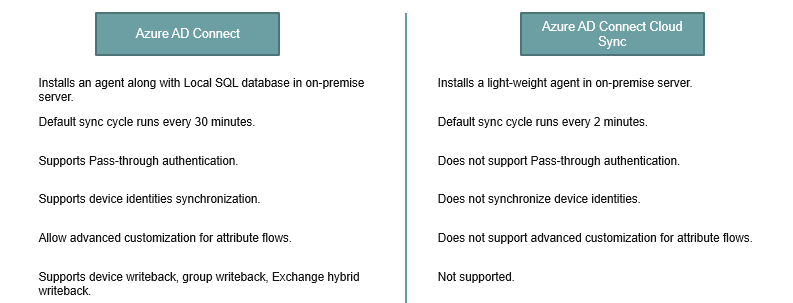
- When we install Azure AD Connect, it installs an agent in on-premises server and in Azure along with a local SQL database. But in case of Azure AD Connect Cloud Sync, a lightweight agent is installed in on-premises server.
- In Azure AD Connect by default, sync runs every 30 minutes. But in case of Azure AD Connect Cloud Sync, sync runs every 2 minutes.
- Azure AD Connect supports pass-through authentication. But Azure AD Connect cloud sync doesn’t support pass-through authentication.
- With Azure AD Connect you can synchronize device identities to Azure AD. But in Azure AD Connect cloud sync this feature is missing.
- In Azure AD Connect you can create more complex rules to customize the attributes flow. But in Azure AD Connect Cloud Sync you cannot create such rules.
- Device writeback, Groups writeback, and Hybrid attributes writeback is still missing in Azure AD Connect Cloud Sync.
Azure AD Connect Cloud Sync requirements
Now let’s talk about the prerequisites for Azure AD Connect Cloud Sync.
- For the installation of agent, you need a domain-joined server machine running on Windows Server 2016 or later along with, .Net 4.7.1 runtime or later.
- You need credentials of Azure AD tenant Global Administrator, and Enterprise Administrator of on-premises Active Directory.
- You need to allow port 443, port 80, and port 8080 in firewall and network.
- Verify on-premises domain in Azure Active Directory tenant.
- You need to allow below URLs. These URLs will be used by the agent to communicate with Azure AD, and to verify the certificates.
| *.msappproxy.net *.servicebus.windows.net *.microsoftonline.com *.microsoft.com *.msappproxy.com *.windowsazure.com mscrl.microsoft.com:80 crl.microsoft.com:80 ocsp.msocsp.com:80 www.microsoft.com:80 login.windows.net |
Setup Azure AD Connect Cloud Sync
Before you proceed with the below steps, make sure the above mentioned ports and the URLs are allowed in your network.
Install provisioning agent
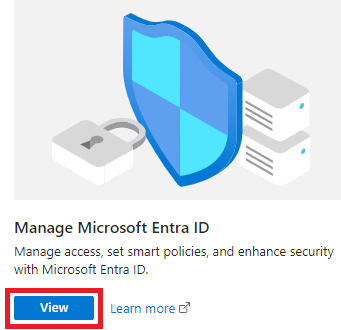
Login to a domain-joined machine running on Windows Server 2016 or later and login to portal.azure.com and click View under Manage Microsoft Entra ID.
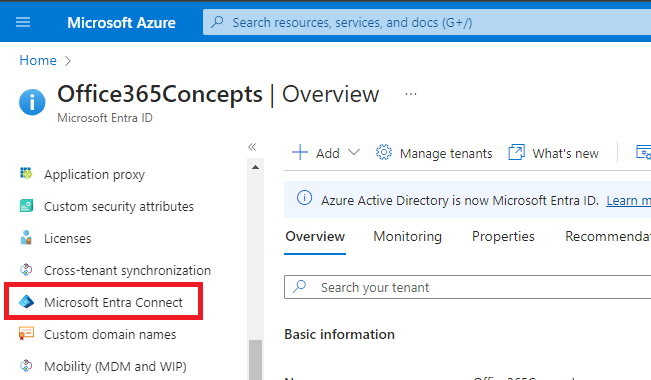
On the Microsoft Entra ID portal, under Manage, click Microsoft Entra Connect.
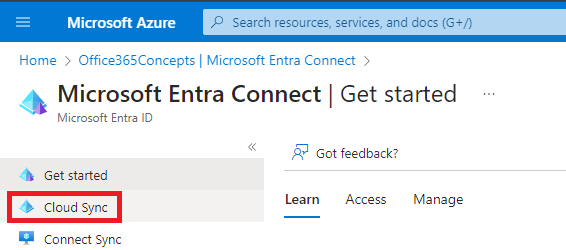
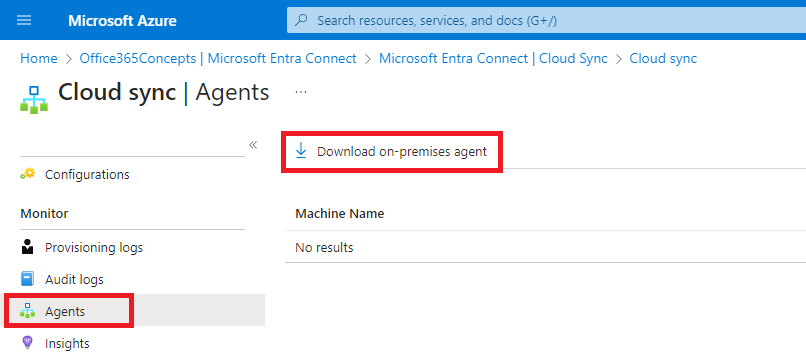
Click Cloud Sync.
On the next page, under Monitor click Agents, and click Download on-premises agent.
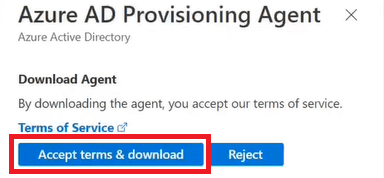
Click Accept terms & download, and run the set up file.
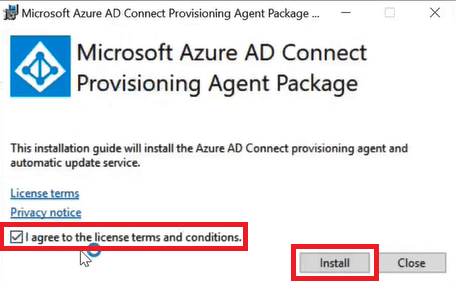
On the Microsoft Azure AD Connect Provisioning Agent Package installation wizard, check I agree to the license terms and conditions and click Install.
On the Welcome page of the wizard, click Next.
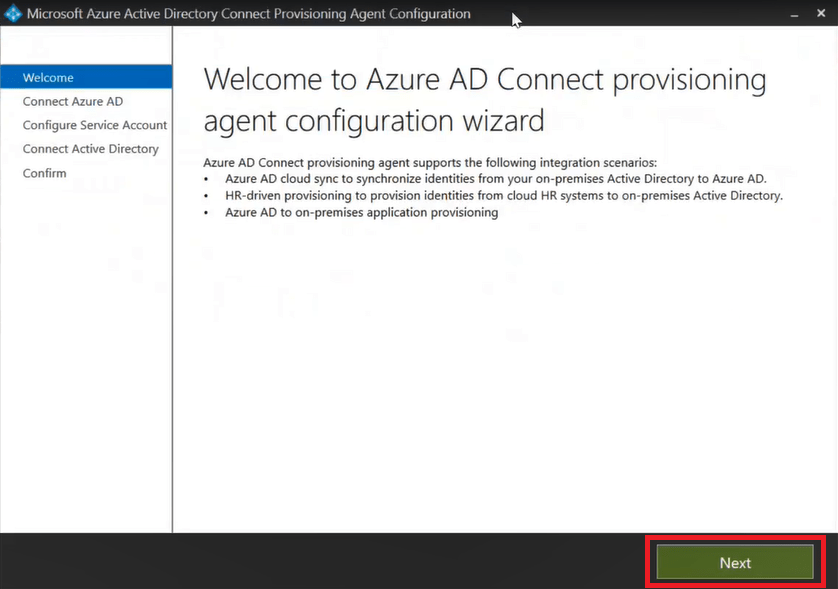
On the Select Extension page, select HR-driven provisioning (Workday and SuccessFactors) / Microsoft Entra Connect cloud sync and click Next.
On the Connect Azure AD page, enter Microsoft 365 Global Admin credentials and click Next.
On the Configure Service Account page, select Create gMSA and enter on-premises Active Directory Enterprise Admin credentials, and click Next.
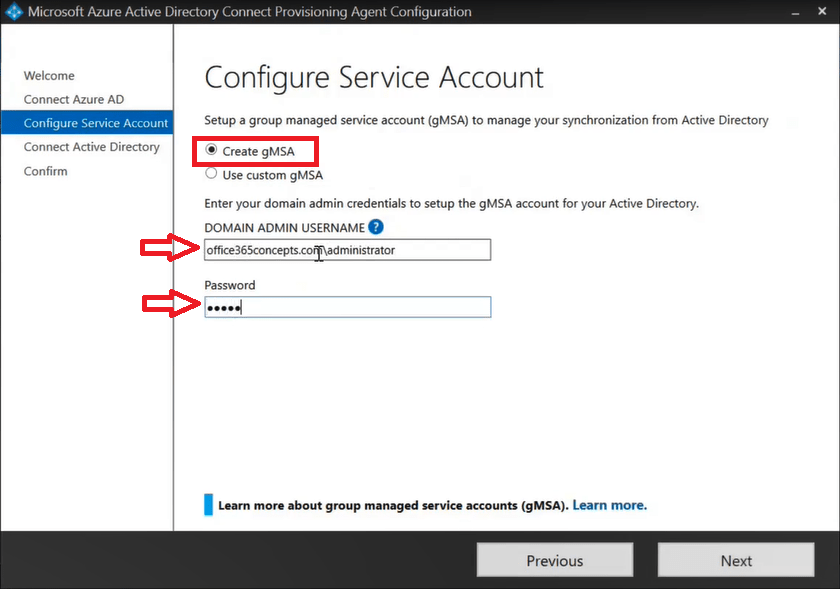
Important: Create gMSA which lets the agent create the provAgentgMSA$ managed service account for you. The group managed service account (for example, DOMAIN\provAgentgMSA$) will be created in the same Active Directory domain where the host server has joined. To use this option, enter the Active Directory domain administrator credentials (recommended). If you want to provide the name of the managed service account (if you have already created account), select Use custom gMSA.
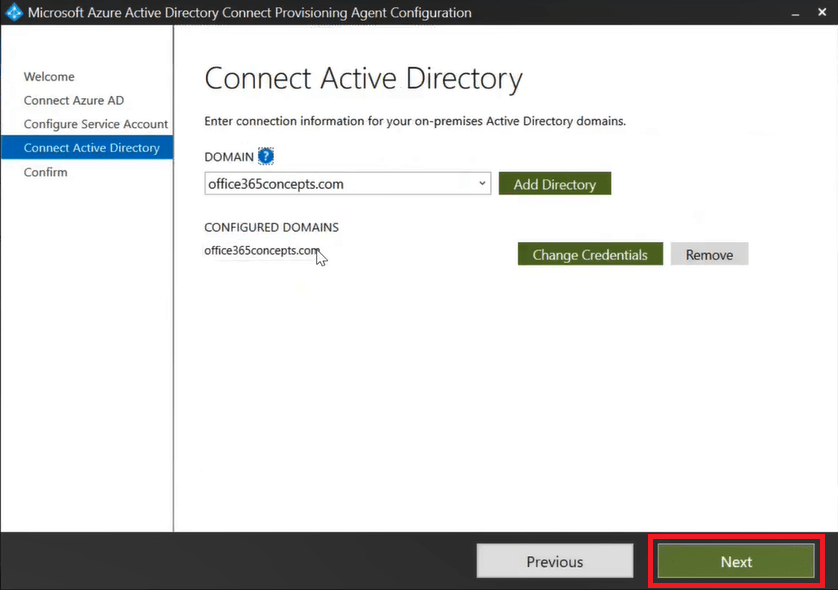
On the Connect Active Directory page, your on-premises Active Directory domain will appear automatically. If not, click Add Directory and enter on-premises Enterprise Admin credentials. Click Next.
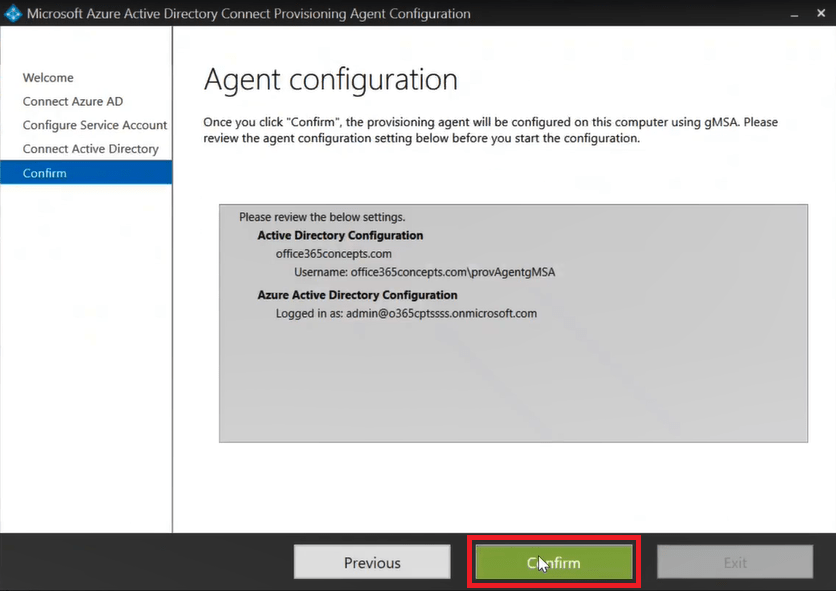
On the Agent configuration page click Confirm.
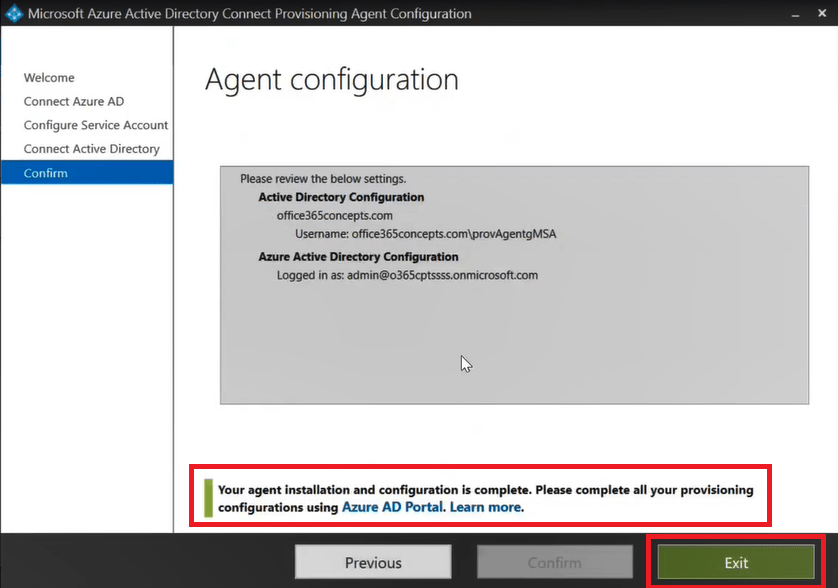
On the next page of the wizard, click Exit to close the wizard.
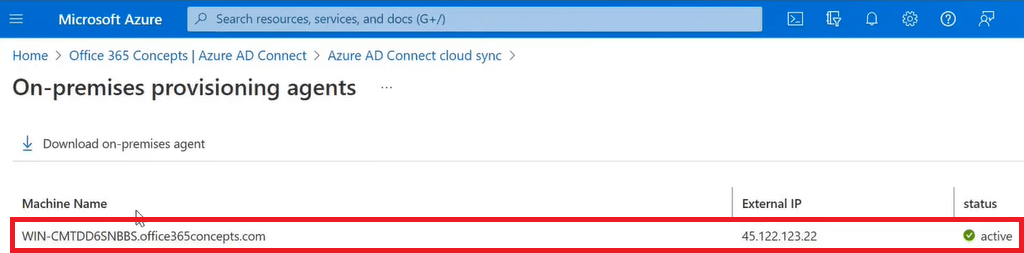
Go to Microsoft Entra ID (Azure AD), click Cloud sync. You will see the provisioning agents that are recently installed.
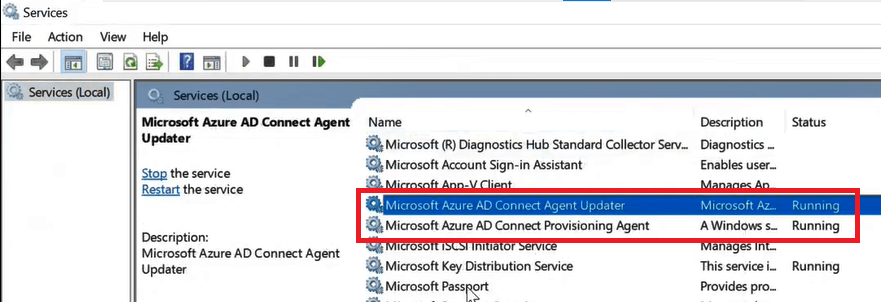
In on-premises, go to the server on which provisioning agent is installed and open Services. Make sure Microsoft Azure AD Connect Agent Updater and Microsoft Azure AD Connect Provisioning Agent is in Running state.
Configure Azure AD Connect Cloud Sync
Now the next step is to configure cloud sync in Azure Active Directory. By configuring cloud sync in Azure AD, we instruct the on-premises agent, that how and which on-premises identities should be synchronized to Azure AD.
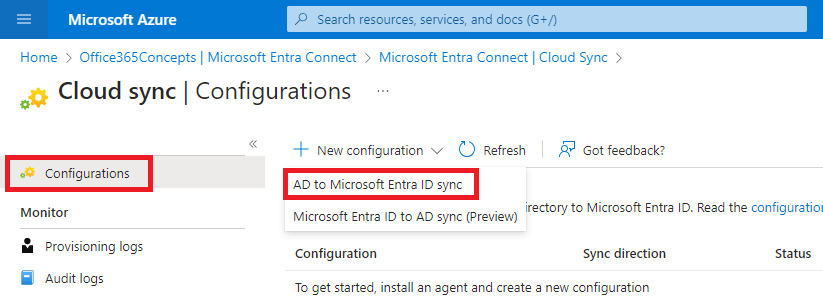
Go to Microsoft Entra ID, click Microsoft Entra Connect, click Cloud Sync, click New configuration and click AD to Microsoft Entra ID sync.
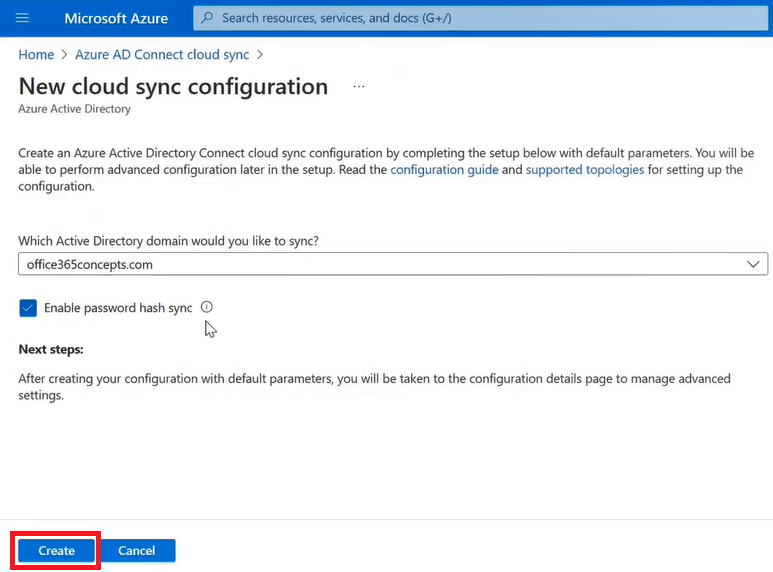
On the New cloud sync configuration page, your on-premises Active Directory domain will be automatically selected under Which Active Directory domain you would like to sync?. If you have multiple AD forests, in that case you can select your domain from the drop down arrow for which you want to do this configuration. Check Enable password hash sync and click Create.
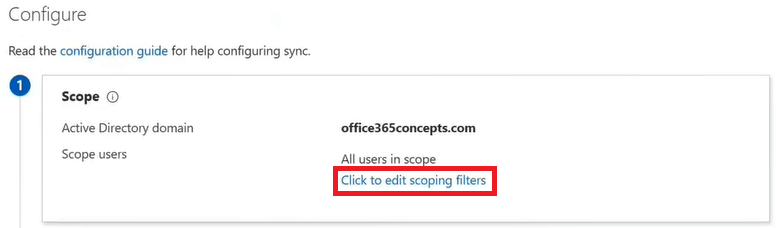
On the Configure page, under Scope you can specify which objects you want to synchronize from on-premises AD to Azure AD. By default, all the user accounts of on-premises Active Directory will be in syncing scope. But if you want to modify the syncing scope, click Click to edit scoping filters.
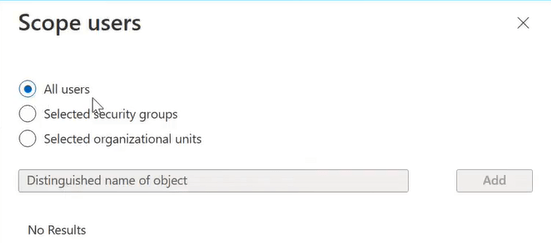
Under Scope users you can add all on-premises users in syncing scope, you can select a security group (group-based syncing), or you can select Organizational Units (OUs) to synchronize on-premises accounts to Azure AD. Once you make the changes as per your business requirements, click Done.
Under Manage attributes section, you can enable or disable Password Hash synchronization, and you can also modify the attributes flow.

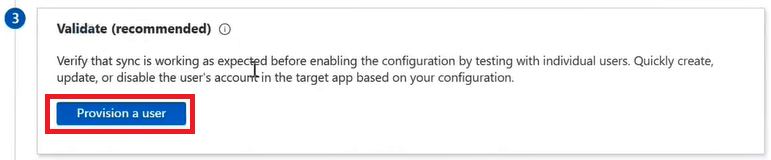
Azure AD Connect cloud sync runs every 2 minutes. But if you want to provision a user manually, click Provision a user.
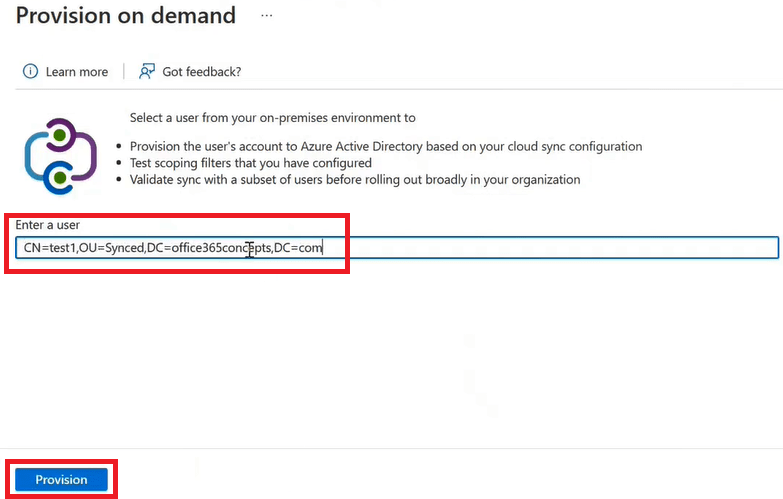
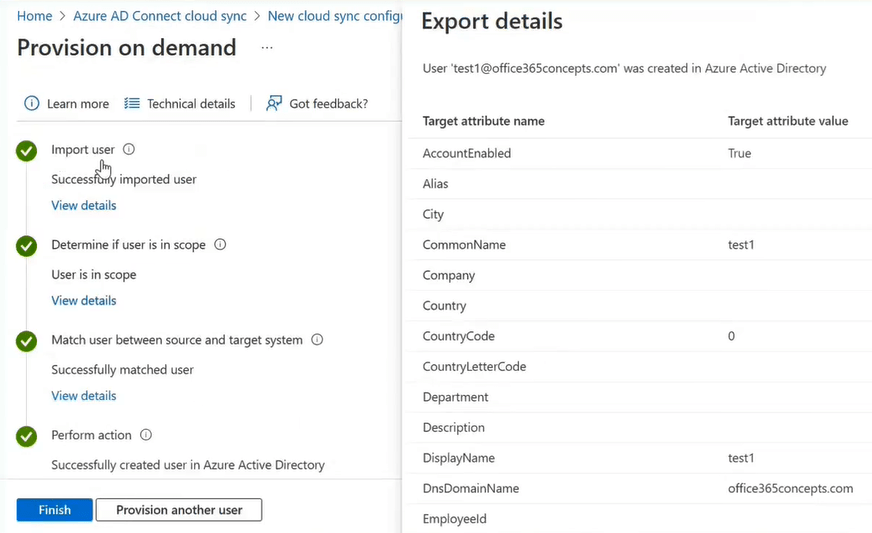
On the Provision on demand page, enter the Distinguished Name (DN) of the on-premises account, and click Provision.
Once the user account is successfully provisioned, you will see the results as shown below. Click Finish to close the window, or click Provision another user to synchronize another account from on-premises AD.
Under Settings section, you can specify an email address that should receive the email notifications related to the cloud sync health. Prevent Accidental Deletion prevents a mass deletion of the objects. By default this value is 500. That means, if you will delete 500 users in on-premise AD, cloud sync will not make those changes to Azure AD. This feature is also available in Azure AD Connect. You can modify this value as per your requirement.

Under Deploy select Enable and save the changes.

Conclusion
In this article you learn what is Azure AD Connect Cloud Sync, what is the difference between Azure AD Connect and Cloud Sync, and how to install and configure Azure AD Connect Cloud Sync.
You might like our other articles on Azure AD Connect introduction and Azure AD Connect Architecture.
If you found this article helpful and informative, please share it within your community and do not forget to share your feedback in the comments below. Join us on our YouTube channel for the latest videos on Cloud technology and join our Newsletter for the early access of blogs and updates.
Happy Learning!!