Bypass Exchange Online Protection in Office 365
In this blog you will learn how to bypass Exchange Online Protection in Office 365. You will learn how you can bypass each layer of email filters in Exchange Online Protection (EOP).
We recommend you to go through our article on Exchange Online Protection Architecture. In this article you will get a deeper understanding of Exchange Online Protection (EOP) and its email filters. How will also learn how each filter scans the emails and how they stamp email header values while scanning.
Table of Contents
What is Exchange Online Protection (EOP)
Exchange Online Protection (EOP) is a cloud-based email filtering service provided by Microsoft. It is designed to help protect your organization’s email environment against spam, malware, viruses, phishing attacks, and other threats. Exchange Online Protection is integrated with Microsoft Exchange Online, which is part of Microsoft 365 (formerly Office 365), but it can also be used with on-premises Exchange Server deployments. Exchange Online Protection (EOP) runs on a world wide network of datacenters to provide high availability. If one datacenter becomes unavailable, the emails are routed through another datacenter without interruption.
Exchange Online Protection (EOP) uses multiple email filters to scan the emails. These filters are Connection Filter, Anti-malware filter, Transport rules (mail flow rules), Advanced Threat Protection (ATP) / Microsoft Defender for Office 365, Anti-spam (Content Filtering), and Zero-hour auto purge (ZAP).
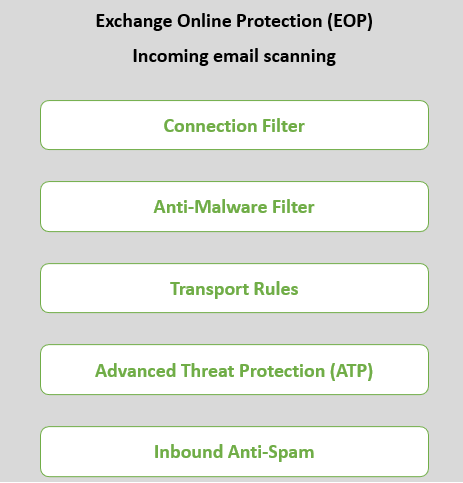
Disable Exchange Online Protection (EOP)
Exchange Online Protection (EOP) is a critical component of Microsoft’s Exchange Online service, providing protection against spam, malware, and other types of unwanted email. Disabling Exchange Online Protection (EOP) entirely isn’t recommended because it leaves your organization’s email system vulnerable to various threats. However, you may have scenarios where you need to adjust or customize the policies to bypass Exchange Online Protection (EOP). So let’s see we can bypass Exchange Online Protection in Office 365.
Bypass Exchange Online Protection in Office 365
Exchange Online Protection (EOP) serves as a critical layer of defense for your organization’s email infrastructure by filtering inbound and outbound email traffic using default policies. For example, Default Inbound and Outbound Anti-Spam policies, Default Connection Filter Policy, Default Anti-Phish policy, Default Anti-Malware policy, and Default Safe Attachments and Safe Links policies. However, there may be situations where you need to bypass email filter agents of EOP for specific reasons, such as allowing certain types of emails, domains, IP addresses, and attachments.
So let’s see how you can bypass Exchange Online Protection in Office 365.
Connection Filter Policy IP Allow List
As we have discussed in Exchange Online Protection Architecture blog, as soon as an email reaches EOP, it is scanned by Connection Filter. Connection Filter adds the Connecting IP address to the X-Forefront-Antispam-Report section within the email header. Apart from this Connection Filter runs various checks on the email, like, DBEB (Directory Based Edge Blocking), Safe List, Reputation Block, and Safe Sender List configured in junk email settings of the mailbox. And most important, if an email doesn’t pass any of these checks, the email is rejected.
Important: Connecting IP address if the IP address of the sender’s email server that was responsible to process the email.
You can come across scenarios where as an administrator you want to bypass an IP address, a domain, or an email address on the Connection Filter level.
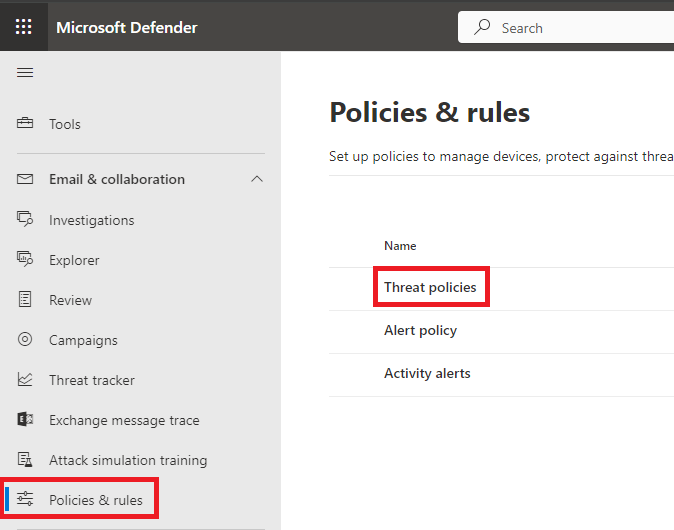
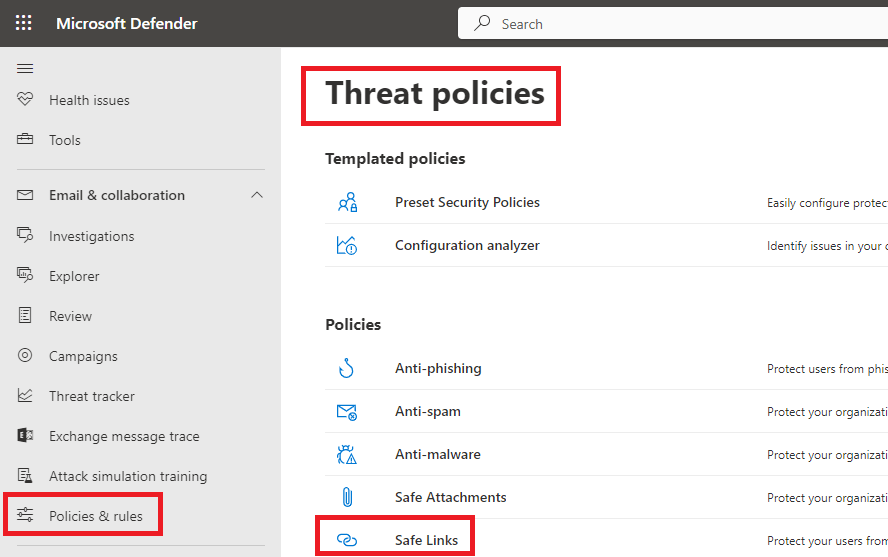
Go to Microsoft Defender portal, under Email & collaboration, click Policies & rules, and click Threat policies.
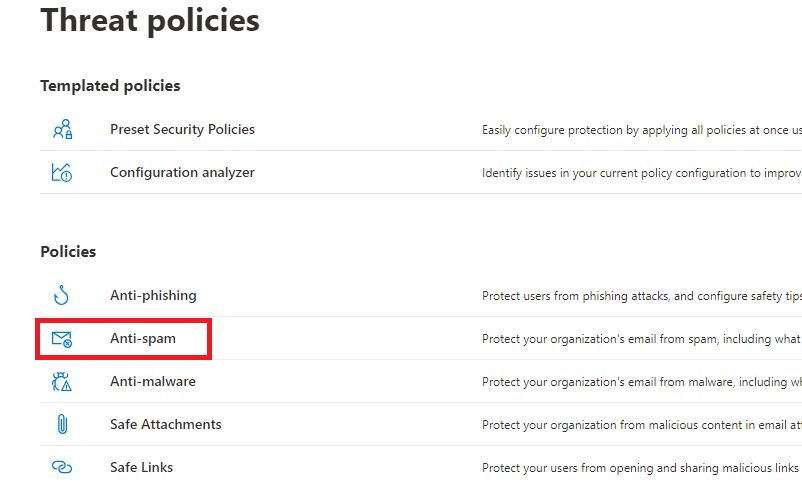
Under Threat policies click Anti-spam, and click Connection Filter policy (Default).
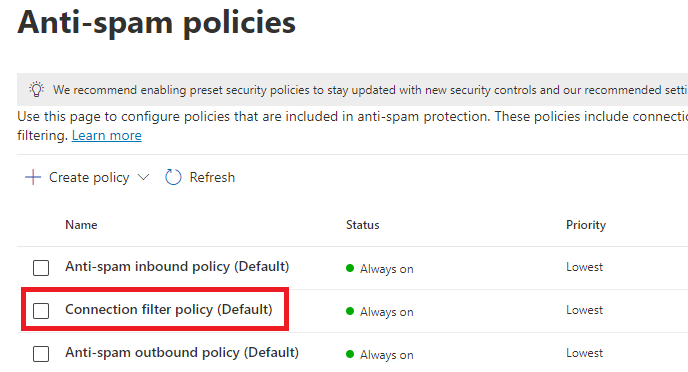
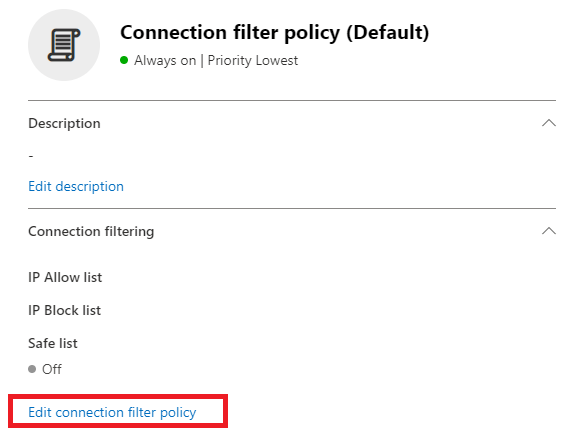
On the Connection filter policy (Default), click Edit connection filter policy.
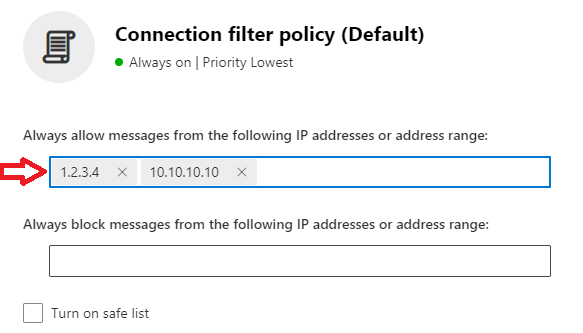
Under Always allow messages from the following IP addresses or address range, add the IP addresses for which you want to skip Connection Filter policy, and click Save.
Outlook Safe Sender List
Email addresses and domain names in the Safe Senders List are never treated as junk email, regardless of the content of the message. You can add your Contacts and other correspondents to the Safe Senders list to confirm you’ll always receive their messages in your inbox.
By default, email addresses in your Outlook contacts are considered safe senders by the Junk Email Filter, but you can change this setting. Email messages from safe senders are never moved to the Junk E-mail folder.
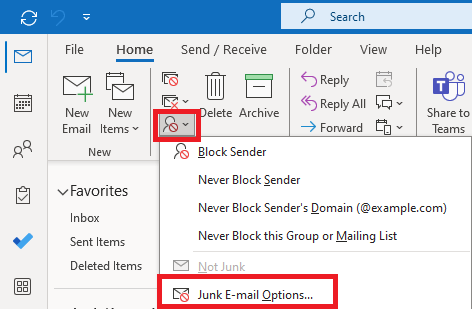
To create Safe Sender List in Outlook, click Junk icon in Outlook desktop application, and click Junk E-mail Options.
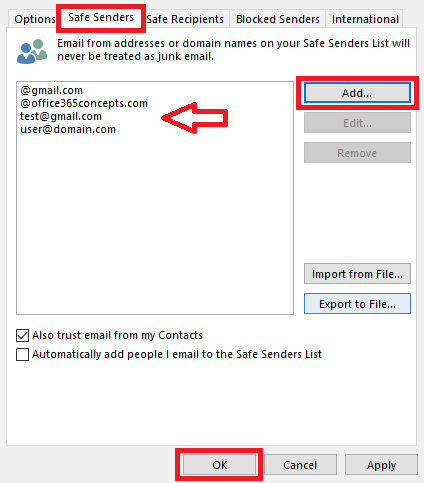
On the Junk Email Options window, select Safe Senders tab, and click Add to add the email addresses and domains in the safe sender list as shown below. Once done click OK.
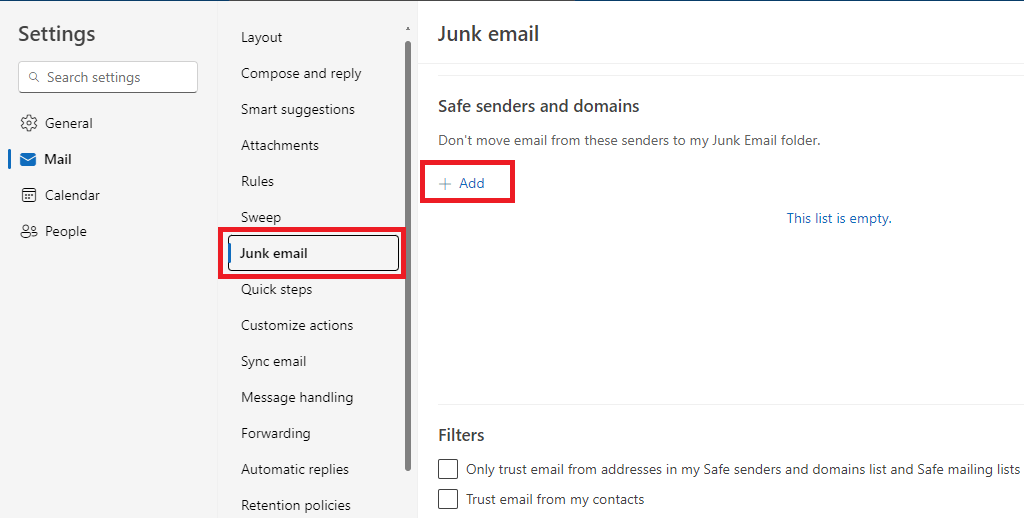
To add email addresses and domains in Safe Sender List from OWA, go to OWA, click the gear (Settings) icon, on the Settings page, select Junk email, click Add under Safe Sender and domains, and add the email addresses and domains you want to add in Safe Sender List. Once done, click Save.
To manage Mailbox Safe Sender List using PowerShell, you can use below PowerShell command:
Connect-ExchangeOnline

Set-MailboxJunkEmailConfiguration "Email Address of user" -TrustedSendersAndDomains @{Add="contoso.com","fabrikam.com"}
Tenant Allow/Block List
As an administrator you can use Tenant Allow/Block List to bypass Exchange Online Protection in Office 365. The Tenant Allow/Block List in the Microsoft Defender portal gives you a way to manually override the Defender for Office 365 or EOP filtering verdicts. You can’t create allow entries for domains and email addresses directly in the Tenant Allow/Block List. To add Domains, Email Addresses, Files or URLs in Tenant Allow/Block List, go to Microsoft Defender, expand Actions & submissions and click Submissions.
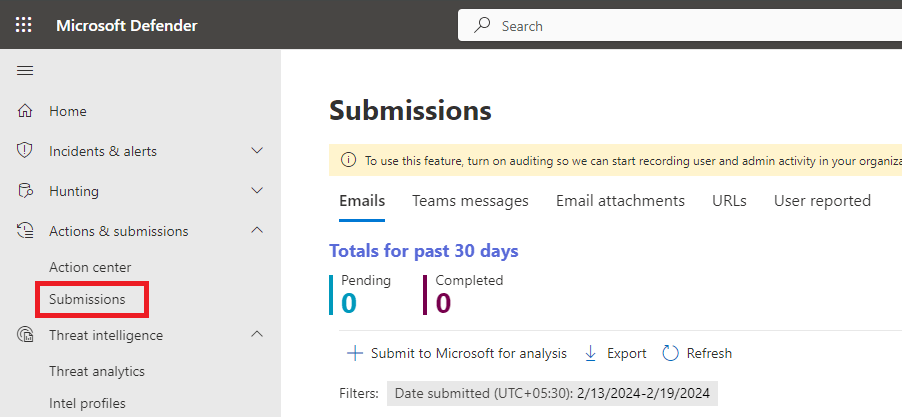
While submitting Emails in the Submission portal, select Should not have been blocked (False positive), and check Allow emails with similar attributes (URL, sender, etc.).
Bypass Anti-Malware policy file types in Office 365
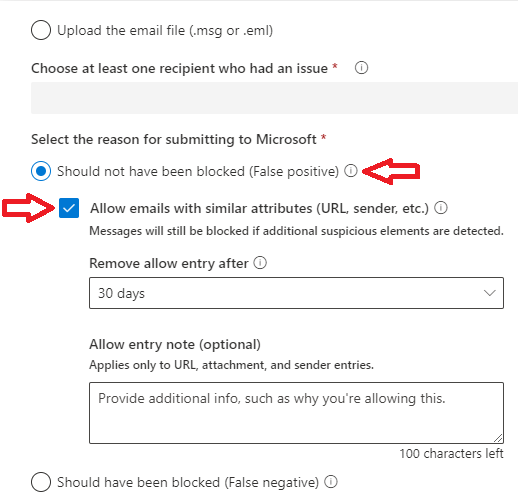
As an administrator you can come across a scenario where you want to allow a particular file type for a domain, email address or an IP address. In Anti-Malware policies, you cannot exclude external domains. You can create a mail flow rule to bypass Anti-Malware policy by using below steps:
Go to Exchange Admin Center > Mail Flow > Rules, click Add a rule and click Create a new rule.
- Give this rule a relevant name like “Bypass Anti-Malware File Types”.
- Under Apply this rule if select The sender and then select domain is and type the domain name for which you want to bypass certain file types those are added in Anti-Malware policies. You can also specify the IP address of the application/website from where you are relaying the emails. Under Apply this rule if select The sender and then select IP address is in any of these ranges or exactly matches and then add the IP address.
- Add another condition, select Any attachment and select file extension includes these words and type the file extensions.
- Under Do the following, select Modify the message properties and select set the spam confidence level (SCL) and select Bypass spam filtering.
- If you want to add exception on this rule, you can add it under Except if.
- Click Next.
- Under Rule mode select Enforce.
- Under Severity select High.
- Check Stop processing more rules option.
- Click Next and click Finish.
Mail Flow rule to bypass Spam Filtering
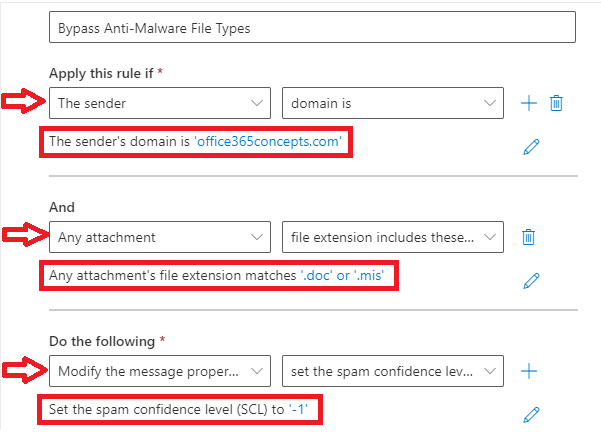
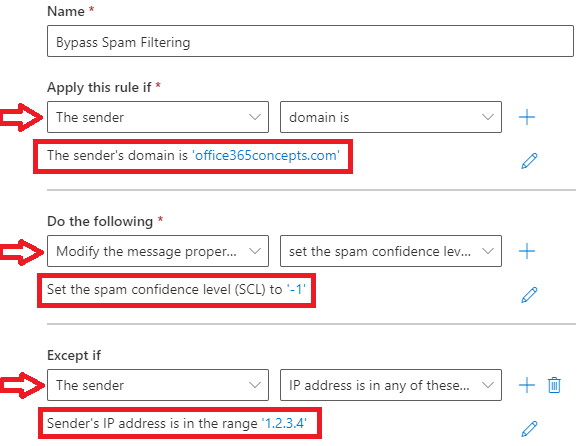
As a Global Administrator or Exchange Administrator you can come across a scenario where you want to allow emails or you do not want Anti-Spam Filter policies to take action on those emails. In such scenarios you can create a mail flow rule to bypass Spam Filtering in Exchange Online Protection organizations.
Go to Exchange Admin Center > Mail Flow > Rules, click Add a rule and click Create a new rule.
- Give this rule a relevant name like “Bypass Spam Filtering”.
- Under Apply this rule if select The sender and then select domain is and type the domain name for which you want to bypass Spam Filtering. You can also specify the IP address of the application/website from where you are relaying the emails. Under Apply this rule if select The sender and then select IP address is in any of these ranges or exactly matches and then add the IP address.
- Under Do the following, select Modify the message properties and select set the spam confidence level (SCL) and select Bypass spam filtering.
- If you want to add exception on this rule, you can add it under Except if.
- Click Next.
- Under Rule mode select Enforce.
- Under Severity select High.
- Check Stop processing more rules option.
- Click Next and click Finish.
Important: Creating transport rule to bypass spam filtering won’t bypass High Confidence Phish emails (HPHISH) and messages with Malware. You can use the Tenant Allow Block List (TABL) to temporarily override a HPHISH verdict in false positive scenarios when an email was classified as High Confidence Phish (HPHISH).
Bypass Advanced Threat Protection scanning
Bypassing Advanced Threat Protection (ATP) scanning is generally not recommended, however, in certain situations there might be specific needs or contexts where bypassing of ATP scanning is required for troubleshooting, or other legitimate purposes. If you want to bypass Advanced Threat Protection scanning please follow below steps:
Safe Attachments bypass rule
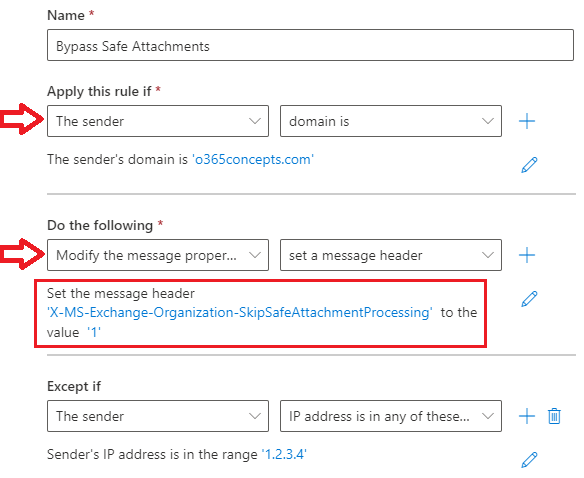
To bypass Safe Attachments, create below mail flow rule (transport rule):
Go to Exchange Admin Center > Mail Flow > Rules, click Add a rule and click Create a new rule.
- Give this rule a relevant name like “Safe Attachments bypass rule”.
- Under Apply this rule if select The sender and then select domain is and type the domain name for which you want to bypass ATP safe attachments. You can also specify the IP address of the application/website from where you are relaying the emails. Under Apply this rule if select The sender and then select IP address is in any of these ranges or exactly matches and then add the IP address.
- Under Do the following select Modify the message properties and then select set a message header. Click Enter text for Set the message header, add X-MS-Exchange-Organization-SkipSafeAttachmentProcessing and add 1 for the value.
- If you want to add exception on this rule, you can add it under Except if.
- Click Next.
- Under Rule mode select Enforce.
- Under Severity select High.
- Check Stop processing more rules option.
- Click Next and click Finish.
Bypass ATP Safe Links
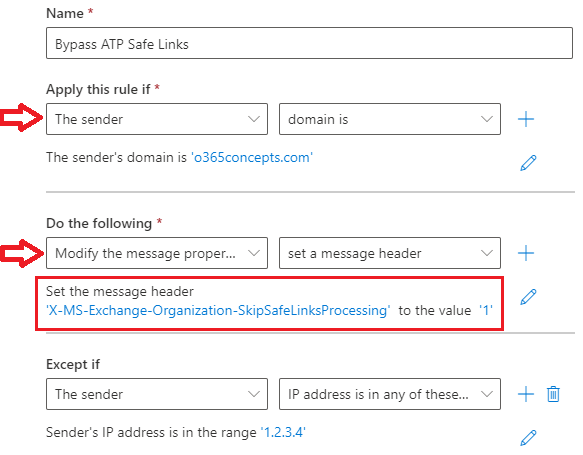
To bypass ATP safe links, please follow below steps to create a mail flow rule:
Go to Exchange Admin Center > Mail Flow > Rules, click Add a rule and click Create a new rule.
- Give this rule a relevant name like “Bypass ATP Safe Links”.
- Under Apply this rule if select The sender and then select domain is and type the domain name for which you want to bypass ATP safe attachments. You can also specify the IP address of the application/website from where you are relaying the emails. Under Apply this rule if select The sender and then select IP address is in any of these ranges or exactly matches and then add the IP address.
- Under Do the following select Modify the message properties and then select set a message header. Click Enter text for Set the message header, add X-MS-Exchange-Organization-SkipSafeLinksProcessing and add 1 for the value.
- If you want to add exception on this rule, you can add it under Except if.
- Click Next.
- Under Rule mode select Enforce.
- Under Severity select High.
- Check Stop processing more rules option.
- Click Next and click Finish.
Safe Links Do Not Rewrite URLs
Safe Links scans incoming email for known malicious hyperlinks. Scanned URLs are rewritten or wrapped using the Microsoft standard URL prefix: https://nam01.safelinks.protection..com. After the link is rewritten, it’s analyzed for potentially malicious content. Entries in the “Do not rewrite the following URLs” list aren’t scanned or wrapped by Safe Links during mail flow.
Each Safe Links policy contains a Do not rewrite the following URLs list that you can use to specify URLs that aren’t rewritten by Safe Links scanning. Go to Microsoft Defender, under Email & Collaboration click Policies & rules, click Threat policies, and click Safe links.
Give this policy a relevant name and click Next.
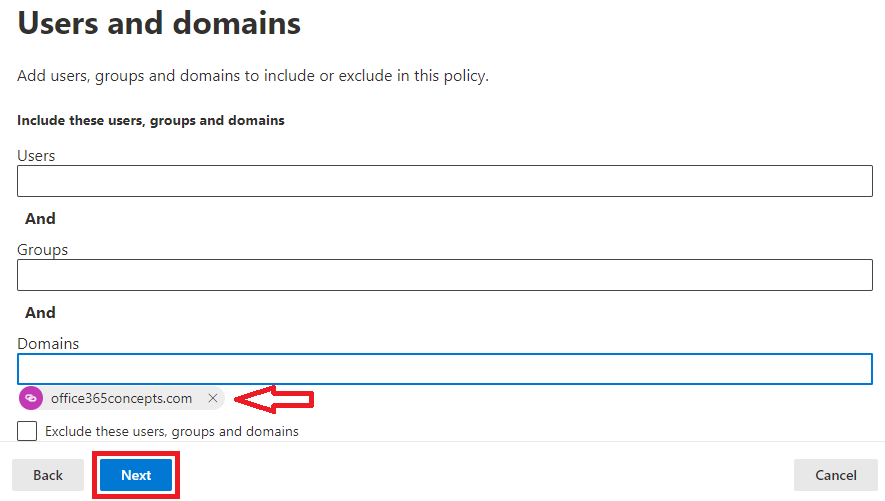
On the Users and domains page, add users, groups or domains on which you want this policy to be triggered. Once done, click Next.
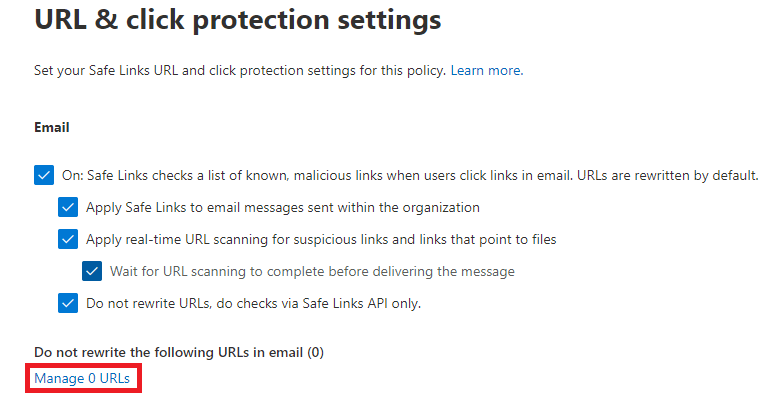
On the URL & click protection settings page, click Manage 0 URLs.
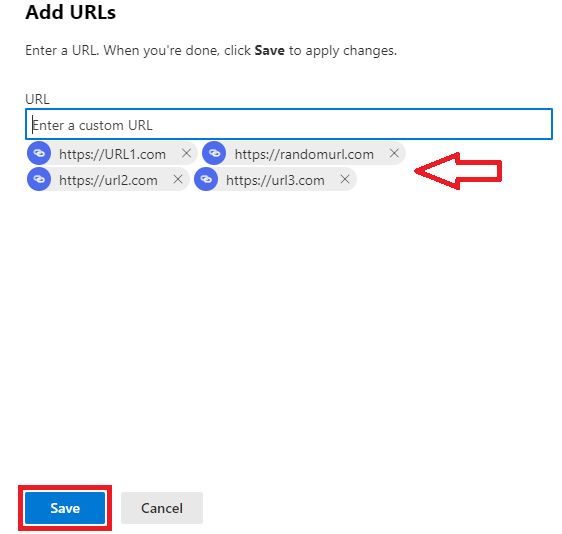
On the Manage URLs to not rewrite page, click Add URLs.

On the Add URLs page, add the URLs that should not be rewritten by the safe links policy and click Save.
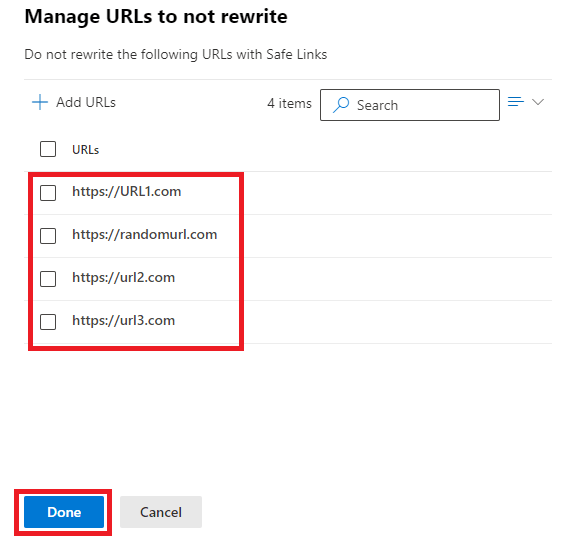
On the Manage URLs to not rewrite page you will see the URLs that you added in the previous screen. Click Done, click Next, and click Submit.
Conclusion
In this article you learnt how we can bypass Exchange Online Protection on different security levels. You learnt how to create Connection Filter policy IP Allow List to bypass IP Addresses on the Connection Filter level, how to create Outlook Safe Sender List, how to add domains and email addresses in Tenant Allow/Block List, you learnt how to create a mail flow rule to bypass Spam Filtering, and you learnt how to bypass Advanced Threat Protection scanning.
You might like our other article on Exchange Online Protection (EOP) Architecture and Stop Spoof emails in Office 365.
If you found this article helpful and informative, please share it within your community and do not forget to share your feedback in the comments below. Join us on YouTube for the latest videos on the Cloud technology and join our Newsletter for the early access of the articles and updates.
Happy Learning!!
