
Azure AD Seamless Single Sign-on
In this article you will learn what is Azure AD Seamless Single Sign-on (SSO), background working of seamless single sign-on, and how to set up SSO with Azure AD.
Table of Contents
Watch the video
Watch this video on our YouTube channel to learn how Seamless Single Sign-on works and how to set up SSO with Azure AD.
What is Single Sign-on
Azure AD Seamless Single Sign-on is a feature of Azure Active Directory that allows users to login to the applications without their usernames and passwords when they are using domain-joined machines. When this feature is enabled, users are automatically logged-in to the on-premises applications as well as the Cloud applications.
Azure AD Seamless Single Sign-on benefits
Azure AD Seamless SSO is enabled using Azure AD Connect (Microsoft Entra Connect). Below are few benefits provided by Azure AD Seamless SSO.
- This feature is very easy to deploy. If you want to enable Azure AD SSO, you do not need any additional components in on-premises.
- You can configure Azure AD Seamless Single Sign-on with Password Hash Synchronization or Pass-through Authentication. Both cloud-authentication methods are supported.
- You can roll out this feature to a set of users, or to all the users using Group Policy.
How Seamless Single Sign On works
Let’s understand how Azure AD Seamless Single Sign-on works.
Important: When you enable Seamless SSO using Azure AD Connect, it creates a computer account object in on-premises Active Directory with name AZUREADSSOACC (Azure AD SSO Account). This account represents Azure Active Directory tenant. In addition to this, a Kerberos Service Principal Name is also created. This SPN is used during Azure AD sign-in process.
So let’s understand how a user is authenticated using Azure AD Seamless Single Sign-on.
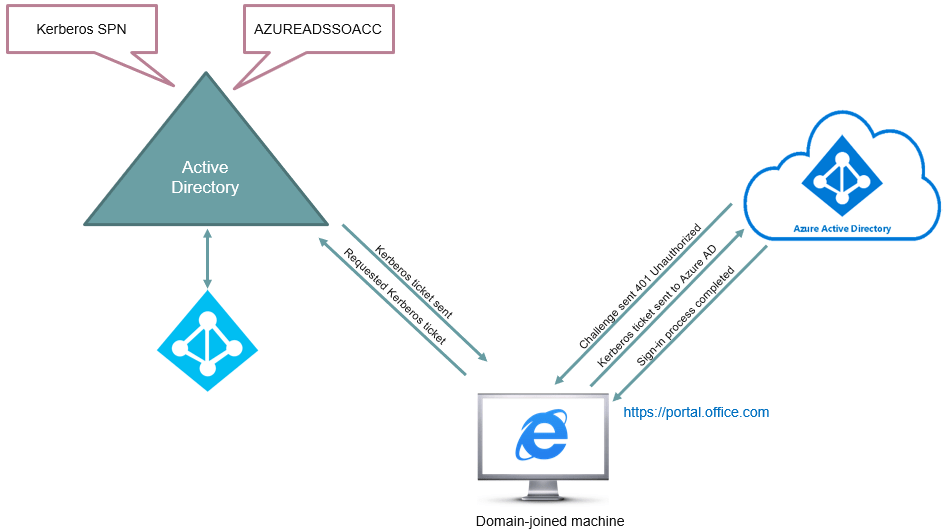
- Let’s assume a user is trying to access portal.office.com from a domain-joined machine.
- Using JavaScript in the background, Azure AD will send a challenge to the browser (using 401 Un-authorized response) and it will ask to provide a Kerberos ticket.
- Then browser will request a ticket from Active Directory for Azure AD SSO Account.
- Then Active Directory will locate the computer account object. It will create a Kerberos ticket, it will encrypt this ticket using the secret key of Azure AD SSO Account, and will send the Kerberos ticket to the browser.
- Browser will forward this Kerberos ticket to Azure Active Directory.
- Azure AD will decrypt the Kerberos ticket, and will evaluate the identity that is included within the Kerberos ticket.
- After successful evaluation, Azure AD will send a token to the application, and the user will login to the application.
In this entire process of Seamless SSO, the user did not enter his username or password. He simply typed portal.office.com in browser in domain-joined machine, and he was logged in.
Azure AD Seamless SSO prerequisites
Now let’s talk about the prerequisites for using Azure AD Seamless SSO.
- You need to set up Azure AD Connect in on-premises using either Password Hash Synchronization or Pass-through Authentication.
- You need to make sure that your are using the latest version of Azure AD Connect.
- You need Admin credentials for Office 365 Tenant and on-premises Active Directory.
- Before you enable Azure AD Seamless SSO, make sure Modern Authentication is enabled in your Microsoft 365 tenant.
- If you want to use SSO feature with Microsoft 365 clients (like, Outlook, Word or Excel), make sure you are using the latest version of these clients.
How to set up SSO with Azure AD
Let’s set up Azure AD Seamless SSO step by step.
Enable Seamless Single Sign-on using Microsoft Entra Connect
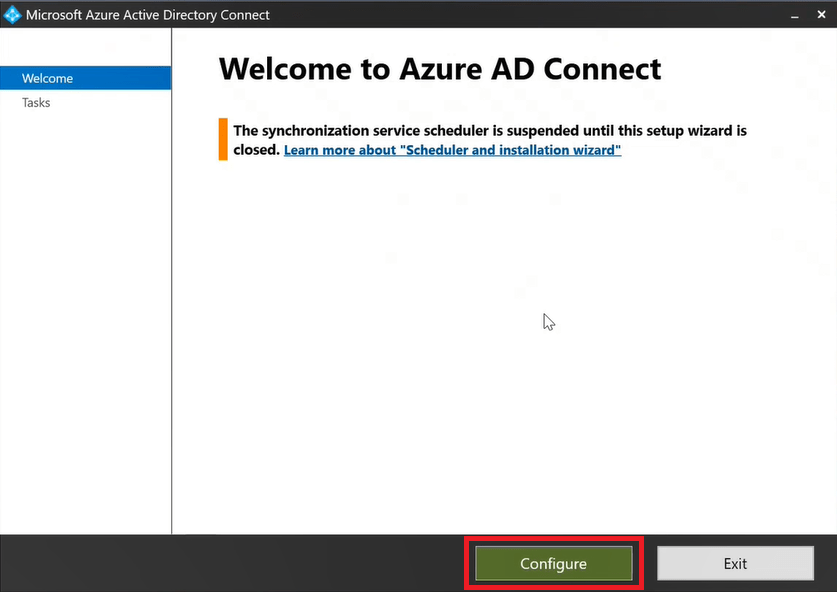
To enable Seamless SSO using Azure AD Connect (Microsoft Entra Connect), open Azure AD Connect wizard, and on the Welcome page, click Configure.
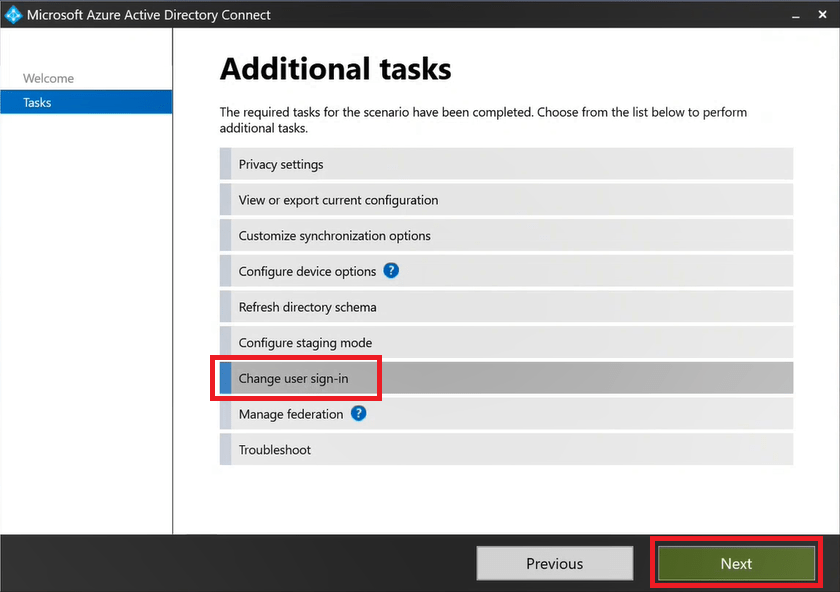
On the Additional tasks page of Azure AD Connect wizard, select Change user sign-in and click Next.
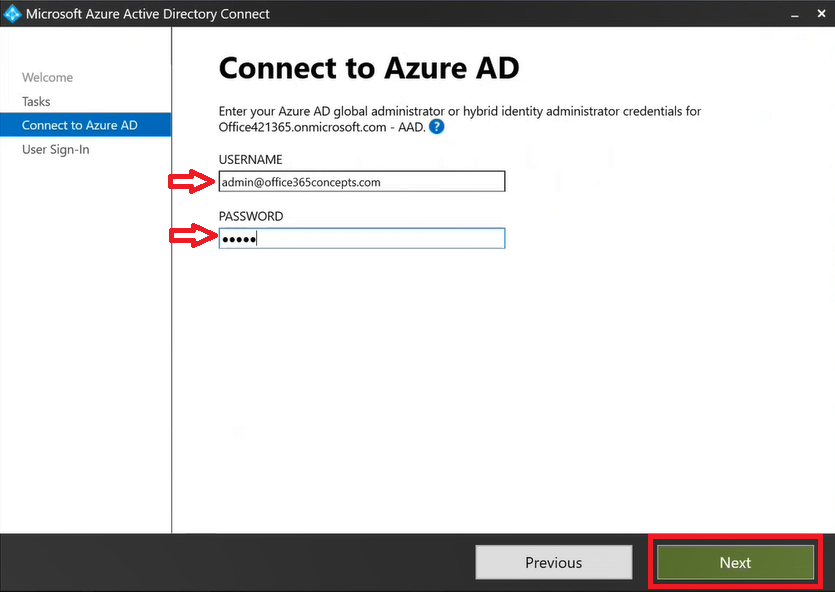
On the Connect to Azure AD page, type Azure AD Global Administrator credentials and click Next.
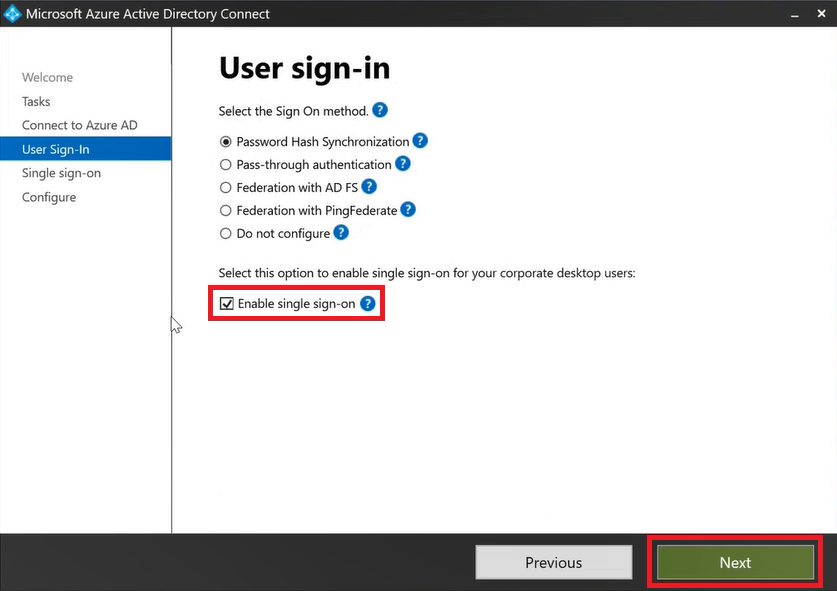
On the User sign-in page, check Enable single sign-on option and click Next.
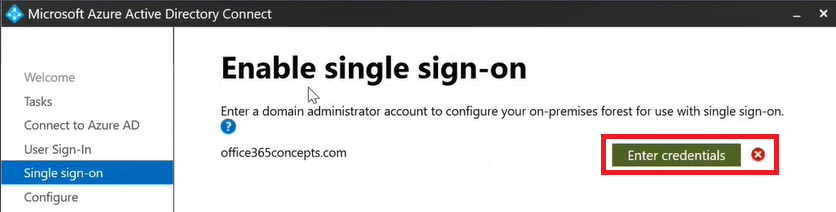
On the Enable single sign-on page click Enter credentials and type on-premises Active Directory Enterprise Admin credentials and click Next.
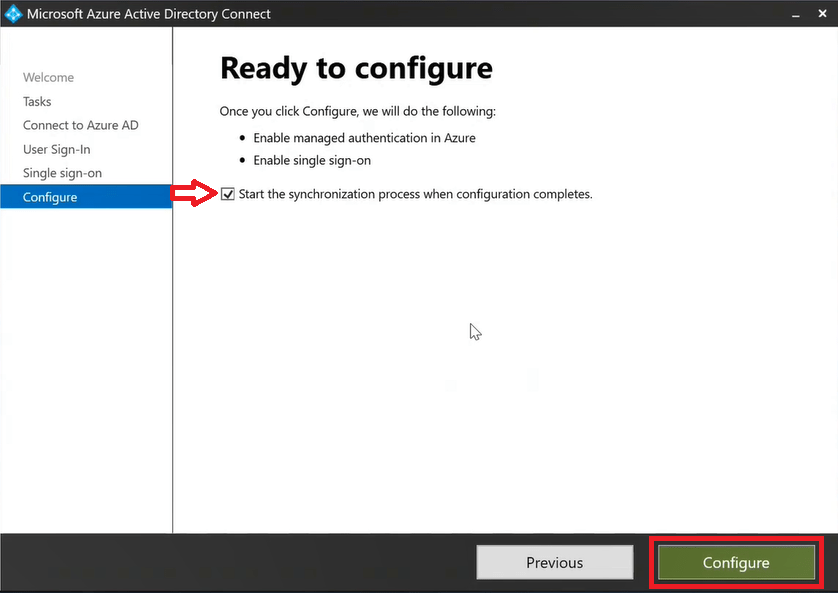
On the Ready to configure page, check Start the synchronization process when configuration completes, and click Configure.
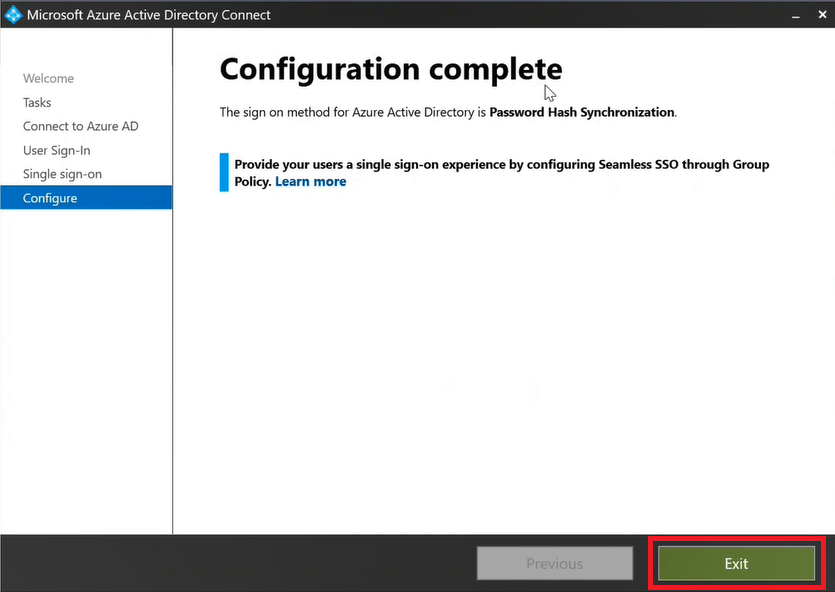
On the Configuration complete page click Exit to close the wizard.
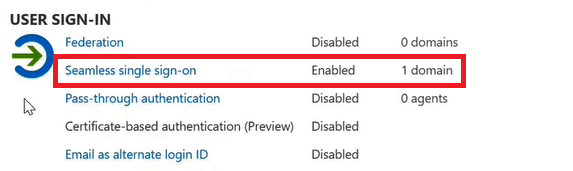
Verify Seamless SSO in Azure AD
Go to Microsoft Entra Admin Center, click Hybrid management, click Microsoft Entra Connect, click Connect Sync. Verify that Seamless single sign-on is set to Enabled.
Roll out Seamless Single Sign-on using Group Policy
In the next step we will create a group policy in on-premises Active Directory to roll out Seamless SSO to the users.
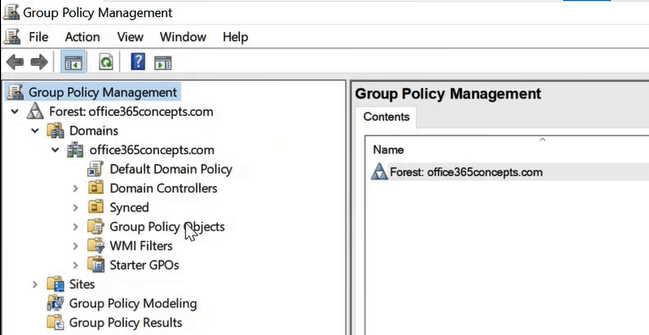
Open Group Policy Management, expand Forest: Domain.com, expand Domains, and expand your Active Directory domain as shown in below image:
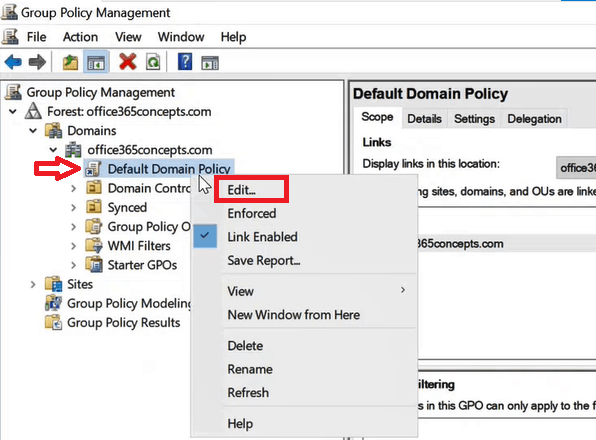
Right click Default Domain Policy and click Edit.
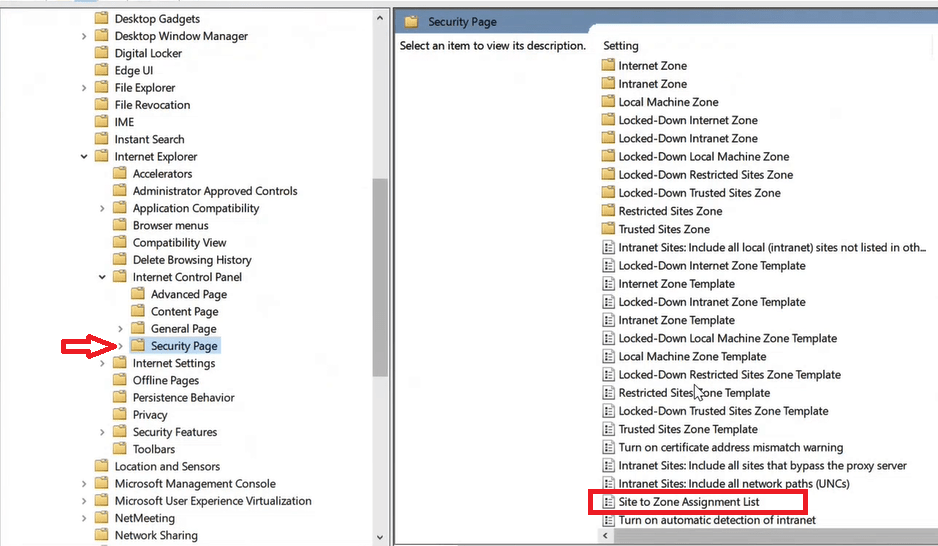
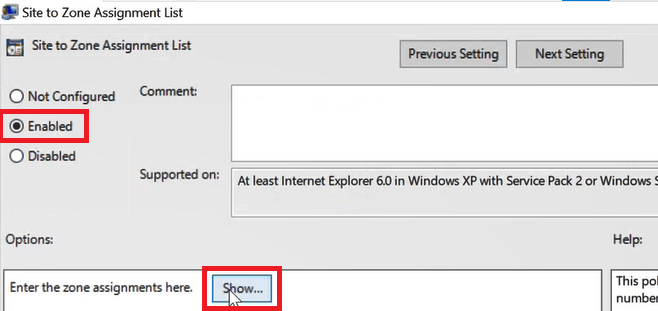
Expand User Configuration > Policies > Administrative Templates > Windows Components > Internet Explorer > Internet Control Panel, click Security Page, and double click Site to Zone Assignment List.
Set the policy to Enabled and click Show.
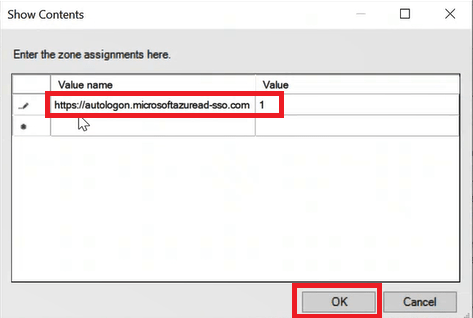
On the Show Contents screen, under Value name type https://autologon.microsoftazuread-sso.com and under Value type 1. Click OK and click OK again.
Go to User Configuration > Policies > Administrative Templates > Windows Components > Internet Explorer > Internet Control Panel > Security Page > Intranet Zone, and double click Allow updates to status bar via script.
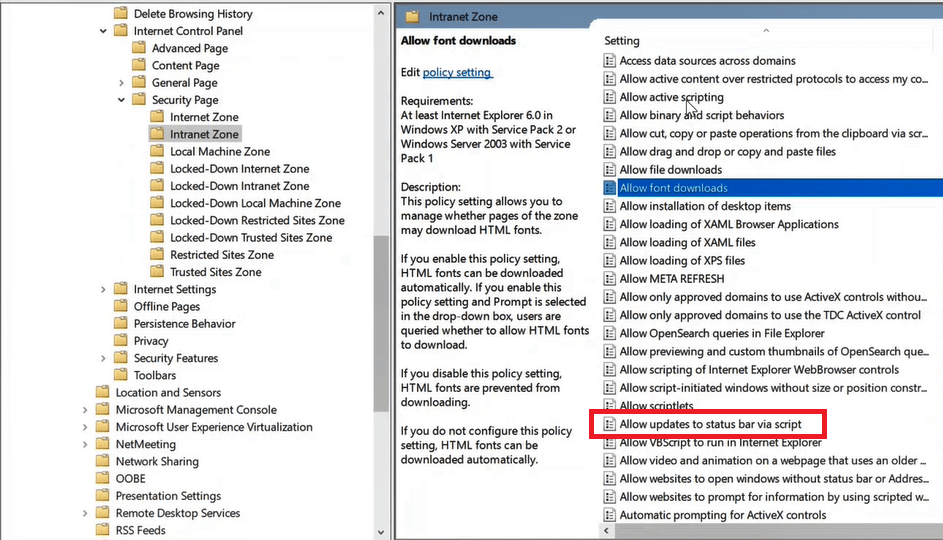
Set this policy to Enabled and click OK.

Go to User Configuration > Preferences > Windows Settings, right click Registry and click New.
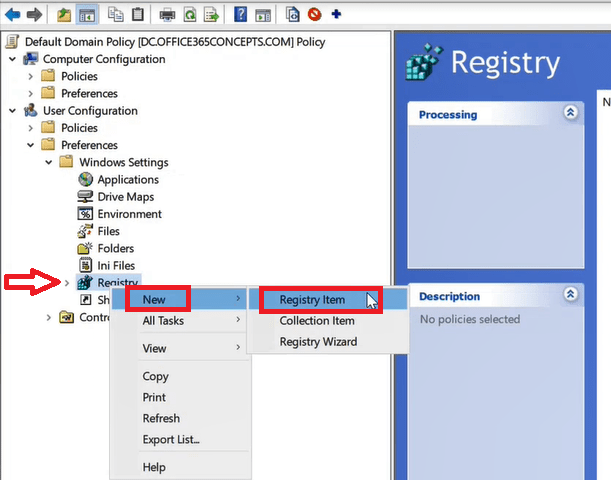
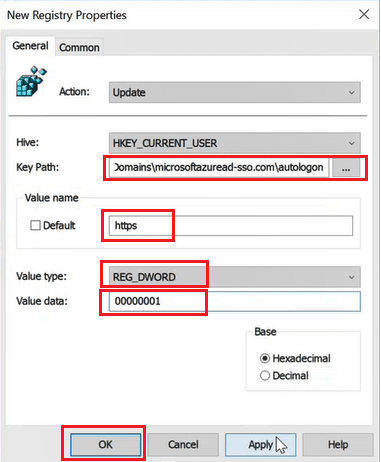
Enter or select the following values as shown below, and then select OK.
Key Path: Software\Microsoft\Windows\CurrentVersion\Internet Settings\ZoneMap\Domains\microsoftazuread-sso.com\autologon
Value name: https
Value type: REG_DWORD
Value data: 00000001
That’s it! You have successfully rolled out Azure AD Seamless SSO.
Conclusion
In this article you learnt what is Azure AD Seamless Single Sign-on, how Seamless Single Sing-on works, and how to set up SSO with Azure AD.
You might like our other article on Microsoft Entra Cloud Sync.
If you found this article helpful and informative, please share it within your community and do not forget to share your feedback in the comments below. Join our YouTube channel for the latest videos on the Cloud technology and join our Newsletter for the early access of the blogs and updates.
Happy Learning!!